rabbitMQ
rabbitMQ
简介
为什么选择?
- 开源,性能优秀,稳定性保障
- 提供可靠性消息投递模式(confirm),返回模式(return)
- 与SpringAMQP完美整合,API丰富
- 集群模式丰富,表达式配置,HA模式,镜像队列模型
- 保证数据不丢失的前提做到高可靠性,可用性
- Erlang语言最初应用于交换机领域的架构模式,这样使得RabbitMQ在Broker之间进行数据交互的性能是非常优秀的
- Erlang的特点:Erlang有着和原生Socket一样的延迟
AMQP
- 高级消息队列协议(Advanced Message Queuing Protocol)
- AMQP定义:是具有现代特征的二进制协议。是一个提供统一消息服务的应用层准高级消息队列协议,是应用层协议的一个开放标准,为面向消息的中间件设计。
- 核心概念:
- Server:又称Broker,接收客户端的连接,实现AMQP实体服务
- Connection:连接,应用程序与Broker的网络连接
- Channel:网络信道,几乎所有的操作都在Channel中进行,Channel是进行消息读写的通道。客户端可建立多个Channel,每个Channel代表一个会话任务
- Message:消息,服务器和应用程序之间传送的数据,由Properties和Body组成。Properties可以对消息进行修饰,比如消息的优先级,延迟等高级特性;Body就是消息体内容
- Virtual host:虚拟地址,用于进行逻辑隔离,最上层的消息路由。一个Virtual Host里面可以有若干个Exchange和Queue,同一个Virtual Host 里面不能有相同名称的Exchange或Queue。
- Exchange:交换机,接收消息,根据路由键转发消息到绑定的队列
- Binding:Exchange和Queue之间的虚拟连接,binding中可以包含routing key
- Routing key:一个路由规则,虚拟机可用它来确定如何路由一个特定消息
- Queue:也称为Message Queue,消息队列,保存消息并将它们转发给消费者
安装与使用
- 1.下载Erlang
- 2.对照版本下载RabbitMQ
- 服务的启动:rabbitmq-server start &
- 服务的停止:rabbitmqctl stop_app
- 管理插件:rabbitmq-plugins enable rabbitmq_management
- 访问地址:
http://IP:15672/ - 常用命令:
- 关闭应用:rabbitmqctl stop_app
- 启动应用:rabbitmqctl start_app
- 查看节点状态:rabbitmqctl status
- 添加用户:rabbitmqctl add_user username password
- 列出所有用户:rabbitmqctl list_users
- 删除用户:rabbitmqctl delete_user username
- 清除用户权限:rabbitmqctl clear_permissions -p vhostpath username
- 列出用户权限:rabbitmqctl list_user_permission username
- 修改密码:rabbitmqctl change_password username newpassword
- 设置用户权限:
rabbitmqctl set_permissions -p vhostpath username ".*" ".*" ".*" - 创建虚拟主机:rabbitmqctl add_vhost vhostpath
- 列出所有虚拟主机:rabbitmqctl list_vhosts
- 列出虚拟主机上所有权限:rabbitmqctl list_permissions -p vhostpath
- 删除虚拟主机:rabbitmqctl delete_vhost vhostpath
- 查看所有队列信息:rabbitmqctl list_queues
- 清除队列里的消息:rabbitmqctl -p vhostpath purge_queue blue
- 清除所有数据,在stop_app后使用:rabbitmqctl reset
- 组成集群命令:
rabbitmqctl join_cluster <clusternode> [--ram] - 查看集群状态:rabbitmqctl cluster_status
- 修改集群节点的存储形式:
rabbitmqctl change_cluster_node_type disc | ram - 摘除节点:rabbitmqctl forget_cluster_node [–offline]
- 修改节点名称:
rabbitmqctl rename_cluster_node oldnode1 newnode1 [oldnode2][newnode2]
生产者与消费者
- pom
1
2
3
4
5
         <dependency>
             <groupId>com.rabbitmq</groupId>
             <artifactId>amqp-client</artifactId>
             <version>3.6.5</version>
         </dependency>
- 生产者
1
2
3
4
5
6
7
8
9
10
11
12
13
14
15
16
17
18
19
20
21
22
23
24
25
26
27
public class Procuder {
    public static void main(String[] args) throws Exception {
         //1 创建一个ConnectionFactory, 并进行配置
         ConnectionFactory connectionFactory = new ConnectionFactory();
         connectionFactory.setHost("192.168.11.76");
         connectionFactory.setPort(5672);
         connectionFactory.setVirtualHost("/");

         //2 通过连接工厂创建连接
         Connection connection = connectionFactory.newConnection();

         //3 通过connection创建一个Channel
         Channel channel = connection.createChannel();

         //4 通过Channel发送数据
         for(int i=0; i < 5; i++){
             String msg = "Hello RabbitMQ!";
             //1 exchange   2 routingKey
             channel.basicPublish("", "test001", null, msg.getBytes());
         }

         //5 记得要关闭相关的连接
         channel.close();
         connection.close();
    }
}
- 消费者
1
2
3
4
5
6
7
8
9
10
11
12
13
14
15
16
17
18
19
20
21
22
23
24
25
26
27
28
29
30
31
32
33
34
35
36
37
public class Consumer {

    public static void main(String[] args) throws Exception {

         //1 创建一个ConnectionFactory, 并进行配置
         ConnectionFactory connectionFactory = new ConnectionFactory();
         connectionFactory.setHost("192.168.11.76");
         connectionFactory.setPort(5672);
         connectionFactory.setVirtualHost("/");

         //2 通过连接工厂创建连接
         Connection connection = connectionFactory.newConnection();

         //3 通过connection创建一个Channel
         Channel channel = connection.createChannel();

         //4 声明(创建)一个队列
         String queueName = "test001";
         channel.queueDeclare(queueName, true, false, false, null);

         //5 创建消费者
         QueueingConsumer queueingConsumer = new QueueingConsumer(channel);

         //6 设置Channel
         channel.basicConsume(queueName, true, queueingConsumer);

         while(true){
             //7 获取消息
             Delivery delivery = queueingConsumer.nextDelivery();
             String msg = new String(delivery.getBody());
             System.err.println("消费端: " + msg);
             //Envelope envelope = delivery.getEnvelope();
         }

    }
}
交换机
- Exchange:接收消息,并根据路由键转发消息所绑定的队列
- 交换机属性:
- Name:交换机名称
- Durability:是否需要持久化,true为持久化
- Auto Delete:当最后一个绑定到Exchange上的队列删除后,自动删除该Exchange
- Internal:当前Exchange是否用于RabbitMQ内部使用,默认为false
- Arguements:扩展参数,用于扩展AMQP协议自定制化使用
- 交换机类型:
- Direct:所有发送到Direct Exchange的消息被转发到RouteKey中指定的Queue
- 注意:Direct模式可以使用RabbitMQ自带的Exchange:default Exchange,所以不需要将Exchange进行任何绑定(binding)操作,消息传递时,RouteKey必须完全匹配才会被队列接收,否则该消息会被抛弃。

- 生产者
1
2
3
4
5
6
7
8
9
10
11
12
13
14
15
16
17
18
19
20
21
22
23
24
25
26
27
public class Producer4DirectExchange {


    public static void main(String[] args) throws Exception {

         //1 创建ConnectionFactory
         ConnectionFactory connectionFactory = new ConnectionFactory();
         connectionFactory.setHost("192.168.11.76");
         connectionFactory.setPort(5672);
         connectionFactory.setVirtualHost("/");

         //2 创建Connection
         Connection connection = connectionFactory.newConnection();
         //3 创建Channel
         Channel channel = connection.createChannel();
         //4 声明
         String exchangeName = "test_direct_exchange";
         String routingKey = "test.direct";
         //5 发送

         String msg = "Hello World RabbitMQ 4  Direct Exchange Message 111 ... ";
         channel.basicPublish(exchangeName, routingKey , null , msg.getBytes());

    }

}
- 消费者
1
2
3
4
5
6
7
8
9
10
11
12
13
14
15
16
17
18
19
20
21
22
23
24
25
26
27
28
29
30
31
32
33
34
35
36
37
38
39
40
41
42
43
public class Consumer4DirectExchange {

    public static void main(String[] args) throws Exception {


        ConnectionFactory connectionFactory = new ConnectionFactory() ;

        connectionFactory.setHost("192.168.11.76");
        connectionFactory.setPort(5672);
         connectionFactory.setVirtualHost("/");
         //重连
        connectionFactory.setAutomaticRecoveryEnabled(true);
        connectionFactory.setNetworkRecoveryInterval(3000);
        Connection connection = connectionFactory.newConnection();

        Channel channel = connection.createChannel();
         //4 声明
         String exchangeName = "test_direct_exchange";
         String exchangeType = "direct";
         String queueName = "test_direct_queue";
         String routingKey = "test.direct";

         //表示声明了一个交换机
         channel.exchangeDeclare(exchangeName, exchangeType, true, false, false, null);
         //表示声明了一个队列
         channel.queueDeclare(queueName, false, false, false, null);
         //建立一个绑定关系:
         channel.queueBind(queueName, exchangeName, routingKey);

        //durable 是否持久化消息
        QueueingConsumer consumer = new QueueingConsumer(channel);
        //参数:队列名称、是否自动ACK、Consumer
        channel.basicConsume(queueName, true, consumer);
        //循环获取消息
        while(true){
            //获取消息,如果没有消息,这一步将会一直阻塞
            Delivery delivery = consumer.nextDelivery();
            String msg = new String(delivery.getBody());
            System.out.println("收到消息:" + msg);
        }
    }
}
- Topic:所有发送到Topic Exchange的消息被转发到所有关心RouteKey中指定Topic的Queue上。Exchange将RouteKey和某Topic进行模糊匹配,此时队列需要绑定一个Topic。
- 注意:可以使用通配符进行模糊查询
- 符号“#”匹配一个或多个词
- 符号* 匹配不多不少一个词
- 例如:“log.#”能匹配到“log.info.oa”。而”log.*“只会匹配到”log.error”

- 生产者
1
2
3
4
5
6
7
8
9
10
11
12
13
14
15
16
17
18
19
20
21
22
23
24
25
26
27
28
29
30
31
32
public class Producer4TopicExchange {


    public static void main(String[] args) throws Exception {

         //1 创建ConnectionFactory
         ConnectionFactory connectionFactory = new ConnectionFactory();
         connectionFactory.setHost("192.168.11.76");
         connectionFactory.setPort(5672);
         connectionFactory.setVirtualHost("/");

         //2 创建Connection
         Connection connection = connectionFactory.newConnection();
         //3 创建Channel
         Channel channel = connection.createChannel();
         //4 声明
         String exchangeName = "test_topic_exchange";
         String routingKey1 = "user.save";
         String routingKey2 = "user.update";
         String routingKey3 = "user.delete.abc";
         //5 发送

         String msg = "Hello World RabbitMQ 4 Topic Exchange Message ...";
         channel.basicPublish(exchangeName, routingKey1 , null , msg.getBytes());
         channel.basicPublish(exchangeName, routingKey2 , null , msg.getBytes());
         channel.basicPublish(exchangeName, routingKey3 , null , msg.getBytes());
         channel.close();
        connection.close();
    }

}
- 消费者
1
2
3
4
5
6
7
8
9
10
11
12
13
14
15
16
17
18
19
20
21
22
23
24
25
26
27
28
29
30
31
32
33
34
35
36
37
38
39
40
41
42
43
public class Consumer4TopicExchange {

    public static void main(String[] args) throws Exception {


        ConnectionFactory connectionFactory = new ConnectionFactory() ;

        connectionFactory.setHost("192.168.11.76");
        connectionFactory.setPort(5672);
         connectionFactory.setVirtualHost("/");

        connectionFactory.setAutomaticRecoveryEnabled(true);
        connectionFactory.setNetworkRecoveryInterval(3000);
        Connection connection = connectionFactory.newConnection();

        Channel channel = connection.createChannel();
         //4 声明
         String exchangeName = "test_topic_exchange";
         String exchangeType = "topic";
         String queueName = "test_topic_queue";
         //模糊匹配
         String routingKey = "user.*";
         // 1 声明交换机
         channel.exchangeDeclare(exchangeName, exchangeType, true, false, false, null);
         // 2 声明队列
         channel.queueDeclare(queueName, false, false, false, null);
         // 3 建立交换机和队列的绑定关系:
         channel.queueBind(queueName, exchangeName, routingKey);

        //durable 是否持久化消息
        QueueingConsumer consumer = new QueueingConsumer(channel);
        //参数:队列名称、是否自动ACK、Consumer
        channel.basicConsume(queueName, true, consumer);
        //循环获取消息
        while(true){
            //获取消息,如果没有消息,这一步将会一直阻塞
            Delivery delivery = consumer.nextDelivery();
            String msg = new String(delivery.getBody());
            System.out.println("收到消息:" + msg);
        }
    }
}
//注意:修改了模糊匹配的routing Key后要把以前的进行解绑
- Fanout:不处理路由键,只需要简单的将队列绑定到交换机上。发送到交换机的消息都会被转发到与该交换机绑定的所有队列上。Fanout交换机转发消息是最快的

- 生产者
1
2
3
4
5
6
7
8
9
10
11
12
13
14
15
16
17
18
19
20
21
22
23
24
25
26
27
28
public class Producer4FanoutExchange {


    public static void main(String[] args) throws Exception {

         //1 创建ConnectionFactory
         ConnectionFactory connectionFactory = new ConnectionFactory();
         connectionFactory.setHost("192.168.11.76");
         connectionFactory.setPort(5672);
         connectionFactory.setVirtualHost("/");

         //2 创建Connection
         Connection connection = connectionFactory.newConnection();
         //3 创建Channel
         Channel channel = connection.createChannel();
         //4 声明
         String exchangeName = "test_fanout_exchange";
         //5 发送
         for(int i = 0; i < 10; i ++) {
             String msg = "Hello World RabbitMQ 4 FANOUT Exchange Message ...";
             channel.basicPublish(exchangeName, "", null , msg.getBytes());
         }
         channel.close();
        connection.close();
    }

}
- 消费者
1
2
3
4
5
6
7
8
9
10
11
12
13
14
15
16
17
18
19
20
21
22
23
24
25
26
27
28
29
30
31
32
33
34
35
36
37
38
public class Consumer4FanoutExchange {

    public static void main(String[] args) throws Exception {

        ConnectionFactory connectionFactory = new ConnectionFactory() ;

        connectionFactory.setHost("192.168.11.76");
        connectionFactory.setPort(5672);
         connectionFactory.setVirtualHost("/");

        connectionFactory.setAutomaticRecoveryEnabled(true);
        connectionFactory.setNetworkRecoveryInterval(3000);
        Connection connection = connectionFactory.newConnection();

        Channel channel = connection.createChannel();
         //4 声明
         String exchangeName = "test_fanout_exchange";
         String exchangeType = "fanout";
         String queueName = "test_fanout_queue";
         String routingKey = "";    //不设置路由键
         channel.exchangeDeclare(exchangeName, exchangeType, true, false, false, null);
         channel.queueDeclare(queueName, false, false, false, null);
         channel.queueBind(queueName, exchangeName, routingKey);

        //durable 是否持久化消息
        QueueingConsumer consumer = new QueueingConsumer(channel);
        //参数:队列名称、是否自动ACK、Consumer
        channel.basicConsume(queueName, true, consumer);
        //循环获取消息
        while(true){
            //获取消息,如果没有消息,这一步将会一直阻塞
            Delivery delivery = consumer.nextDelivery();
            String msg = new String(delivery.getBody());
            System.out.println("收到消息:" + msg);
        }
    }
}
概念
绑定:Exchange和Exchange,Queue之间的连接关系,Binding中可以包含RoutingKey或者参数
消息队列:实际存储消息数据
- Durability:是否持久化,Durable:是,Transient:否
- Auto delete:若选yes,代表当最后一个监听被移除之后,该Queue会自动被删除
消息:服务器和应用程序之间传送的数据,本质上就是一段数据,由Properties和Payload(Body)组成
- 常用属性:delivery mode,headers,content_type,content_encoding,priority,correlation_id,reply_to,expiration,message_id,timestamp,type,user_id,app_id,cluster_id
- 生产者
1
2
3
4
5
6
7
8
9
10
11
12
13
14
15
16
17
18
19
20
21
22
23
24
25
26
27
28
29
30
31
32
33
34
35
36
37
38
39
40
41
public class Procuder {


    public static void main(String[] args) throws Exception {
         //1 创建一个ConnectionFactory, 并进行配置
         ConnectionFactory connectionFactory = new ConnectionFactory();
         connectionFactory.setHost("192.168.11.76");
         connectionFactory.setPort(5672);
         connectionFactory.setVirtualHost("/");

         //2 通过连接工厂创建连接
         Connection connection = connectionFactory.newConnection();

         //3 通过connection创建一个Channel
         Channel channel = connection.createChannel();

         Map<String, Object> headers = new HashMap<>();
         headers.put("my1", "111");
         headers.put("my2", "222");


         AMQP.BasicProperties properties = new AMQP.BasicProperties.Builder()
                 .deliveryMode(2)
                 .contentEncoding("UTF-8")
                 .expiration("10000")
                 .headers(headers)
                 .build();

         //4 通过Channel发送数据
         for(int i=0; i < 5; i++){
             String msg = "Hello RabbitMQ!";
             //1 exchange   2 routingKey
             channel.basicPublish("", "test001", properties, msg.getBytes());
         }

         //5 记得要关闭相关的连接
         channel.close();
         connection.close();
    }
}
- 消费者
1
2
3
4
5
6
7
8
9
10
11
12
13
14
15
16
17
18
19
20
21
22
23
24
25
26
27
28
29
30
31
32
33
34
35
36
37
38
39
40
public class Consumer {

    public static void main(String[] args) throws Exception {

         //1 创建一个ConnectionFactory, 并进行配置
         ConnectionFactory connectionFactory = new ConnectionFactory();
         connectionFactory.setHost("192.168.11.76");
         connectionFactory.setPort(5672);
         connectionFactory.setVirtualHost("/");

         //2 通过连接工厂创建连接
         Connection connection = connectionFactory.newConnection();

         //3 通过connection创建一个Channel
         Channel channel = connection.createChannel();

         //4 声明(创建)一个队列
         String queueName = "test001";
         channel.queueDeclare(queueName, true, false, false, null);

         //5 创建消费者
         QueueingConsumer queueingConsumer = new QueueingConsumer(channel);

         //6 设置Channel
         channel.basicConsume(queueName, true, queueingConsumer);

         while(true){
             //7 获取消息
             Delivery delivery = queueingConsumer.nextDelivery();
             String msg = new String(delivery.getBody());
             System.err.println("消费端: " + msg);
             Map<String, Object> headers = delivery.getProperties().getHeaders();
             System.err.println("headers get my1 value: " + headers.get("my1"));

             //Envelope envelope = delivery.getEnvelope();
         }

    }
}
虚拟主机:虚拟地址,用于进行逻辑隔离,最上层的消息路由。一个Virtual Host里面可以有若干个Exchange和Queue。同一个Virtual Host里面不能有相同名称的Exchange或Queue
特性
消息投递成功
- 什么是生产端的可靠性投递?
- 保障消息的成功发出
- 保障节点的成功接收
- 发送端收到节点的确认应答
- 完善的消息补偿机制
- 如何保障消息百分百投递成功?
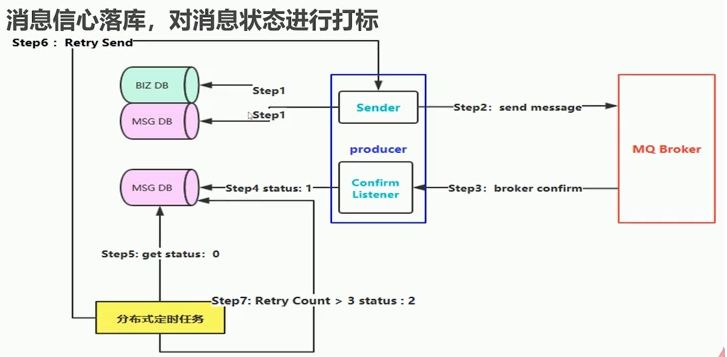
- 方案一:消息落库,对消息状态进行打标
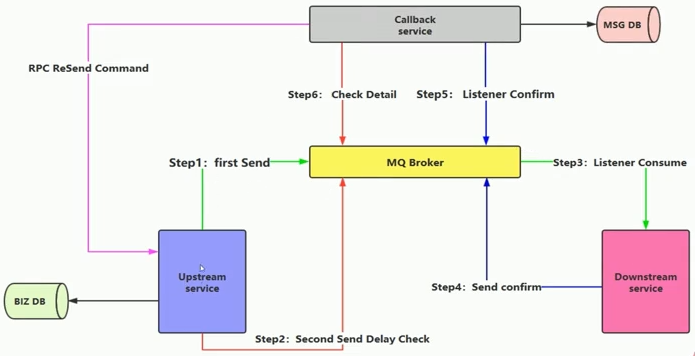
- 方案二:消息的延迟投递,做二次确认,回调检查
消息幂等性
- 什么是消息幂等性?
- 借鉴数据库的乐观锁机制:
- 比如购买商品更新库存时:update table set count=count-1,version=version+1 where version=1
- version是一个版本号,在每次查询时进行加一
避免消息重复消费
- 消费端实现幂等性,就意味着,我们的消息永远不会消费多次,即使我们收到了多条一样的消息
- 业界主流的幂等性操作:
- 唯一ID+指纹码机制,利用数据库主键去重
- select count(1) from t_order where id=唯一ID+指纹码
- 好处:实现简单
- 坏处:高并发下有数据库写入的性能瓶颈
- 解决方案:跟进ID进行分库分表进行算法路由
- 使用Redis进行幂等,需要考虑的问题
- 我们是否要进行数据库落库,如果落库的话,关键解决的问题是数据库和缓存如何做到原子性
- 如果不进行落库,那么存储到缓存中,如何设置定时同步的策略
消息确认与返回
- 什么是消息确认机制:
- 消息的确认是指生产者投递消息后,如果客户端收到消息,则会给生产端一个应答
- 生产端进行接收应答,用来确定这条消息是否正常的发送到客户端,这种方式也是消息的可靠性投递的核心保障
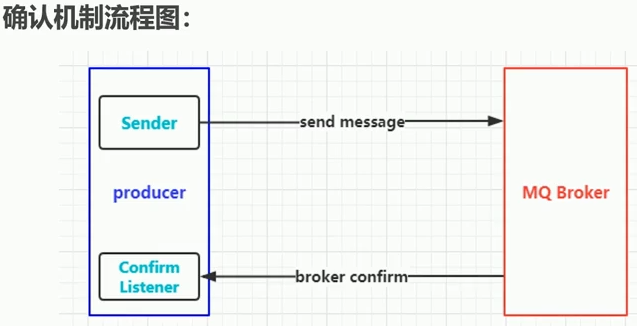
- 如何实现Confirm确认消息?
- 第一步,在channel上开启确认模式:channel.confirmSelect()
- 第二步,在channel上添加监听:addConfirmListener,监听成功和失败的返回结果,根据具体的结果对消息进行重新发送,或者记录日志等后续处理
- confirm生产者
1
2
3
4
5
6
7
8
9
10
11
12
13
14
15
16
17
18
19
20
21
22
23
24
25
26
27
28
29
30
31
32
33
34
35
36
37
38
39
40
41
42
43
44
45
46
public class Producer {


    public static void main(String[] args) throws Exception {


         //1 创建ConnectionFactory
         ConnectionFactory connectionFactory = new ConnectionFactory();
         connectionFactory.setHost("192.168.11.76");
         connectionFactory.setPort(5672);
         connectionFactory.setVirtualHost("/");

         //2 获取C   onnection
         Connection connection = connectionFactory.newConnection();

         //3 通过Connection创建一个新的Channel
         Channel channel = connection.createChannel();


         //4 指定我们的消息投递模式: 消息的确认模式
         channel.confirmSelect();

         String exchangeName = "test_confirm_exchange";
         String routingKey = "confirm.save";

         //5 发送一条消息
         String msg = "Hello RabbitMQ Send confirm message!";
         channel.basicPublish(exchangeName, routingKey, null, msg.getBytes());

         //6 添加一个确认监听
         channel.addConfirmListener(new ConfirmListener() {
             @Override
             public void handleNack(long deliveryTag, boolean multiple) throws IOException {
                 System.err.println("-------no ack!-----------");
             }

             @Override
             public void handleAck(long deliveryTag, boolean multiple) throws IOException {
                 //成功
                 System.err.println("-------ack!-----------");
             }
         });

    }
}
- confirm消费者
1
2
3
4
5
6
7
8
9
10
11
12
13
14
15
16
17
18
19
20
21
22
23
24
25
26
27
28
29
30
31
32
33
34
35
36
37
38
39
40
public class Consumer {


    public static void main(String[] args) throws Exception {


         //1 创建ConnectionFactory
         ConnectionFactory connectionFactory = new ConnectionFactory();
         connectionFactory.setHost("192.168.11.76");
         connectionFactory.setPort(5672);
         connectionFactory.setVirtualHost("/");

         //2 获取Connection
         Connection connection = connectionFactory.newConnection();

         //3 通过Connection创建一个新的Channel
         Channel channel = connection.createChannel();

         String exchangeName = "test_confirm_exchange";
         String routingKey = "confirm.#";
         String queueName = "test_confirm_queue";

         //4 声明交换机和队列 然后进行绑定设置, 最后制定路由Key
         channel.exchangeDeclare(exchangeName, "topic", true);
         channel.queueDeclare(queueName, true, false, false, null);
         channel.queueBind(queueName, exchangeName, routingKey);

         //5 创建消费者
         QueueingConsumer queueingConsumer = new QueueingConsumer(channel);
         channel.basicConsume(queueName, true, queueingConsumer);

         while(true){
             Delivery delivery = queueingConsumer.nextDelivery();
             String msg = new String(delivery.getBody());

             System.err.println("消费端: " + msg);
         }

    }
}
- return:消息返回
- return Listener用于处理一些不可路由的消息
- 我们的消息生产者,通过指定一个Exchange和Routingkey,把消息送达到某一个队列中去,然后我们的消费者监听队列,进行消息处理操作
- 但是在某些情况下,如果我们在发送消息的时候,当前的exchange不存在或者指定的路由key路由不到,这个时候如果我们需要监听这种不可达的消息,就要使用return Listener
- 关键配置项Mandatory:如果为true,则监听器会接收到路由不可达的消息,然后进行后续处理,如果为false,那么客户端自动删除该消息
- 生产者
1
2
3
4
5
6
7
8
9
10
11
12
13
14
15
16
17
18
19
20
21
22
23
24
25
26
27
28
29
30
31
32
33
34
35
36
37
38
39
40
41
42
43
44
public class Producer {


    public static void main(String[] args) throws Exception {


         ConnectionFactory connectionFactory = new ConnectionFactory();
         connectionFactory.setHost("192.168.11.76");
         connectionFactory.setPort(5672);
         connectionFactory.setVirtualHost("/");

         Connection connection = connectionFactory.newConnection();
         Channel channel = connection.createChannel();

         String exchange = "test_return_exchange";
         String routingKey = "return.save";
         String routingKeyError = "abc.save";

         String msg = "Hello RabbitMQ Return Message";


         channel.addReturnListener(new ReturnListener() {
             @Override
             public void handleReturn(int replyCode, String replyText, String exchange,
                      String routingKey, AMQP.BasicProperties properties, byte[] body) throws IOException {

                 System.err.println("---------handle  return----------");
                 System.err.println("replyCode: " + replyCode);
                 System.err.println("replyText: " + replyText);
                 System.err.println("exchange: " + exchange);
                 System.err.println("routingKey: " + routingKey);
                 System.err.println("properties: " + properties);
                 System.err.println("body: " + new String(body));
             }
         });


         channel.basicPublish(exchange, routingKeyError, true, null, msg.getBytes());

         //channel.basicPublish(exchange, routingKeyError, true, null, msg.getBytes());

    }
}
- 消费者
1
2
3
4
5
6
7
8
9
10
11
12
13
14
15
16
17
18
19
20
21
22
23
24
25
26
27
28
29
30
31
32
public class Consumer {
    public static void main(String[] args) throws Exception {

         ConnectionFactory connectionFactory = new ConnectionFactory();
         connectionFactory.setHost("192.168.11.76");
         connectionFactory.setPort(5672);
         connectionFactory.setVirtualHost("/");

         Connection connection = connectionFactory.newConnection();
         Channel channel = connection.createChannel();

         String exchangeName = "test_return_exchange";
         String routingKey = "return.#";
         String queueName = "test_return_queue";

         channel.exchangeDeclare(exchangeName, "topic", true, false, null);
         channel.queueDeclare(queueName, true, false, false, null);
         channel.queueBind(queueName, exchangeName, routingKey);

         QueueingConsumer queueingConsumer = new QueueingConsumer(channel);

         channel.basicConsume(queueName, true, queueingConsumer);

         while(true){

             Delivery delivery = queueingConsumer.nextDelivery();
             String msg = new String(delivery.getBody());
             System.err.println("消费者: " + msg);
         }

    }
}
自定义消费者
- 生产者
1
2
3
4
5
6
7
8
9
10
11
12
13
14
15
16
17
18
19
20
21
22
23
24
25
26
public class Producer {


    public static void main(String[] args) throws Exception {

         ConnectionFactory connectionFactory = new ConnectionFactory();
         connectionFactory.setHost("192.168.11.76");
         connectionFactory.setPort(5672);
         connectionFactory.setVirtualHost("/");

         Connection connection = connectionFactory.newConnection();
         Channel channel = connection.createChannel();

         String exchange = "test_consumer_exchange";
         String routingKey = "consumer.save";

         String msg = "Hello RabbitMQ Consumer Message";

         for(int i =0; i<5; i ++){
             channel.basicPublish(exchange, routingKey, true, null, msg.getBytes());
         }

    }
}
- 消费者
1
2
3
4
5
6
7
8
9
10
11
12
13
14
15
16
17
18
19
20
21
22
23
24
25
26
public class Consumer {


    public static void main(String[] args) throws Exception {


         ConnectionFactory connectionFactory = new ConnectionFactory();
         connectionFactory.setHost("192.168.11.76");
         connectionFactory.setPort(5672);
         connectionFactory.setVirtualHost("/");

         Connection connection = connectionFactory.newConnection();
         Channel channel = connection.createChannel();


         String exchangeName = "test_consumer_exchange";
         String routingKey = "consumer.#";
         String queueName = "test_consumer_queue";

         channel.exchangeDeclare(exchangeName, "topic", true, false, null);
         channel.queueDeclare(queueName, true, false, false, null);
         channel.queueBind(queueName, exchangeName, routingKey);

         channel.basicConsume(queueName, true, new MyConsumer(channel));
    }
}
- 自定义消费者
1
2
3
4
5
6
7
8
9
10
11
12
13
14
15
16
17
18
19
public class MyConsumer extends DefaultConsumer {


    public MyConsumer(Channel channel) {
         super(channel);
    }

    @Override
    public void handleDelivery(String consumerTag, Envelope envelope, AMQP.BasicProperties properties, byte[] body) throws IOException {
         System.err.println("-----------consume message----------");
         System.err.println("consumerTag: " + consumerTag);
         System.err.println("envelope: " + envelope);
         System.err.println("properties: " + properties);
         System.err.println("body: " + new String(body));
    }


}
消息限流
- 什么是消息限流?
- 假设一个场景,首先,我们rabbitMQ服务器有上万条未处理的消息,我们随便打开一个消费者客户端,就会瞬间有巨量的消息全部推送过来,但是我们单个客户端无法同时处理这么多数据
- rabbitMQ提供了一种qos(服务质量保证)功能,即在非自动确认消息的前提下,如果一定数目的消息(通过基于consumer或者channel设置qos的值)未被确认前,不进行消费新的消息
- 方法:void BasicQos(uint prefetchSize,ushort prefetchCount,bool global);
- prefetchSize:0
- prefetchCount:会告诉MQ不要同时给一个消费者推送多于N个消息,即一旦有N个消息还没有ack,则该consumer将block掉,直到有消息ack
- global:true\false 以上限制是channel级别的还是consumer级别
- 生产者
1
2
3
4
5
6
7
8
9
10
11
12
13
14
15
16
17
18
19
20
21
22
23
public class Producer {
    public static void main(String[] args) throws Exception {

         ConnectionFactory connectionFactory = new ConnectionFactory();
         connectionFactory.setHost("192.168.11.76");
         connectionFactory.setPort(5672);
         connectionFactory.setVirtualHost("/");

         Connection connection = connectionFactory.newConnection();
         Channel channel = connection.createChannel();

         String exchange = "test_qos_exchange";
         String routingKey = "qos.save";

         String msg = "Hello RabbitMQ QOS Message";

         for(int i =0; i<5; i ++){
             channel.basicPublish(exchange, routingKey, true, null, msg.getBytes());
         }

    }
}
- 消费者
1
2
3
4
5
6
7
8
9
10
11
12
13
14
15
16
17
18
19
20
21
22
23
24
25
26
27
28
29
30
31
32
33
public class Consumer {


    public static void main(String[] args) throws Exception {


         ConnectionFactory connectionFactory = new ConnectionFactory();
         connectionFactory.setHost("192.168.11.76");
         connectionFactory.setPort(5672);
         connectionFactory.setVirtualHost("/");

         Connection connection = connectionFactory.newConnection();
         Channel channel = connection.createChannel();


         String exchangeName = "test_qos_exchange";
         String queueName = "test_qos_queue";
         String routingKey = "qos.#";

         channel.exchangeDeclare(exchangeName, "topic", true, false, null);
         channel.queueDeclare(queueName, true, false, false, null);
         channel.queueBind(queueName, exchangeName, routingKey);

         //1 限流方式  第一件事就是 autoAck设置为 false

         channel.basicQos(0, 1, false);

         channel.basicConsume(queueName, false, new MyConsumer(channel));


    }
}
1
2
3
4
5
6
7
8
9
10
11
12
13
14
15
16
17
18
19
20
21
22
23
24
25
public class MyConsumer extends DefaultConsumer {


    private Channel channel ;

    public MyConsumer(Channel channel) {
         super(channel);
         this.channel = channel;
    }

    @Override
    public void handleDelivery(String consumerTag, Envelope envelope, AMQP.BasicProperties properties, byte[] body) throws IOException {
         System.err.println("-----------consume message----------");
         System.err.println("consumerTag: " + consumerTag);
         System.err.println("envelope: " + envelope);
         System.err.println("properties: " + properties);
         System.err.println("body: " + new String(body));

         channel.basicAck(envelope.getDeliveryTag(), false);

    }


}
消息的ACK和NACK
- 消费端的手工ACK和NACK
- 消费端进行消费的时候,如果由于业务异常我们可以进行日志的记录,然后进行补偿!
- 如果由于服务器宕机等严重问题,那么我们就需要手工进行ACK保障消费端消费成功。
- 消费端的重回队列
- 消费端重回队列是为了对没有处理成功的消息,把消息重新投递给Broker
- 一般实际应用中,都会关闭重回队列,设置为false
- 生产者
1
2
3
4
5
6
7
8
9
10
11
12
13
14
15
16
17
18
19
20
21
22
23
24
25
26
27
28
29
30
31
32
public class Producer {


    public static void main(String[] args) throws Exception {

         ConnectionFactory connectionFactory = new ConnectionFactory();
         connectionFactory.setHost("192.168.11.76");
         connectionFactory.setPort(5672);
         connectionFactory.setVirtualHost("/");

         Connection connection = connectionFactory.newConnection();
         Channel channel = connection.createChannel();

         String exchange = "test_ack_exchange";
         String routingKey = "ack.save";

         for(int i =0; i<5; i ++){
             Map<String, Object> headers = new HashMap<String, Object>();
             headers.put("num", i);

             AMQP.BasicProperties properties = new AMQP.BasicProperties.Builder()
                      .deliveryMode(2)
                      .contentEncoding("UTF-8")
                      .headers(headers)
                      .build();
             String msg = "Hello RabbitMQ ACK Message " + i;
             channel.basicPublish(exchange, routingKey, true, properties, msg.getBytes());
         }

    }
}
消费者
1
2
3
4
5
6
7
8
9
10
11
12
13
14
15
16
17
18
19
20
21
22
23
24
25
26
27
28
public class Consumer {

    public static void main(String[] args) throws Exception {

         ConnectionFactory connectionFactory = new ConnectionFactory();
         connectionFactory.setHost("192.168.11.76");
         connectionFactory.setPort(5672);
         connectionFactory.setVirtualHost("/");

         Connection connection = connectionFactory.newConnection();
         Channel channel = connection.createChannel();


         String exchangeName = "test_ack_exchange";
         String queueName = "test_ack_queue";
         String routingKey = "ack.#";

         channel.exchangeDeclare(exchangeName, "topic", true, false, null);
         channel.queueDeclare(queueName, true, false, false, null);
         channel.queueBind(queueName, exchangeName, routingKey);

         // 手工签收 必须要关闭 autoAck = false
         channel.basicConsume(queueName, false, new MyConsumer(channel));


    }
}
1
2
3
4
5
6
7
8
9
10
11
12
13
14
15
16
17
18
19
20
21
22
23
24
25
26
27
28
public class MyConsumer extends DefaultConsumer {
    private Channel channel ;

    public MyConsumer(Channel channel) {
         super(channel);
         this.channel = channel;
    }

    @Override
    public void handleDelivery(String consumerTag, Envelope envelope, AMQP.BasicProperties properties, byte[] body) throws IOException {
         System.err.println("-----------consume message----------");
         System.err.println("body: " + new String(body));
         try {
             Thread.sleep(2000);
         } catch (InterruptedException e) {
             e.printStackTrace();
         }
         if((Integer)properties.getHeaders().get("num") == 0) {
             // 当num=0时,把消息放到重回队列尾端
             channel.basicNack(envelope.getDeliveryTag(), false, true);
         } else {
             // 正常消费
             channel.basicAck(envelope.getDeliveryTag(), false);
         }

    }
}
TTL消息
- TTL是time to live的缩写,也就是生存时间
- rabbitMQ支持消息的过期时间,在消息发送时可以进行指定
- rabbitMQ支持队列的过期时间,从消息入队列开始计算,只要超过了队列的超时时间配置,那么消息就会自动的清除
死信队列
- 死信队列:DLX,Dead-Letter-Exchange
- 利用DLX,当消息在一个队列中变成死信之后,它能被重新publish到另一个Exchange,这个Exchange就是DLX
- 消息变成死信的几种情况:
- 消息被拒绝(basic.reject/basic.nack)并且requeue=false
- 消息TTL过期
- 队列达到最大长度
- DLX也是一个正常的Exchange,和一般的Exchange没有区别,它能在任何的队列上被指定,实际上就是设置某个队列的属性
- 当这个队列中有死信时,MQ就自动的将这个消息重新发布到设置的Exchange上去,进而被路由到另一个队列
- 可以监听这个队列中消息做相应的处理,这个特性可以弥补MQ3.0以前支持的immediate参数的功能
- 死信队列设置
- 首先需要设置死信队列的exchange和queue,然后进行绑定
- 然后我们进行正常声明交换机,队列,绑定,只不过我们需要在队列上加一个参数:
arguments.put("x-dead-letter-exchange","dlx.exchange") - 这样消息在过期,requeue,队列在达到最大长度时,消息就可以直接路由到死信队列
- 生产者
1
2
3
4
5
6
7
8
9
10
11
12
13
14
15
16
17
18
19
20
21
22
23
24
25
26
27
28
29
30
31
public class Producer {


    public static void main(String[] args) throws Exception {

         ConnectionFactory connectionFactory = new ConnectionFactory();
         connectionFactory.setHost("192.168.11.76");
         connectionFactory.setPort(5672);
         connectionFactory.setVirtualHost("/");

         Connection connection = connectionFactory.newConnection();
         Channel channel = connection.createChannel();

         String exchange = "test_dlx_exchange";
         String routingKey = "dlx.save";

         String msg = "Hello RabbitMQ DLX Message";

         for(int i =0; i<1; i ++){

             AMQP.BasicProperties properties = new AMQP.BasicProperties.Builder()
                      .deliveryMode(2)
                      .contentEncoding("UTF-8")
                      .expiration("10000")  //消息过期后会转入死信队列
                      .build();
             channel.basicPublish(exchange, routingKey, true, properties, msg.getBytes());
         }

    }
}
消费者
1
2
3
4
5
6
7
8
9
10
11
12
13
14
15
16
17
18
19
20
21
22
23
24
25
26
27
28
29
30
31
32
33
34
35
36
37
38
public class Consumer {


    public static void main(String[] args) throws Exception {


         ConnectionFactory connectionFactory = new ConnectionFactory();
         connectionFactory.setHost("192.168.11.76");
         connectionFactory.setPort(5672);
         connectionFactory.setVirtualHost("/");

         Connection connection = connectionFactory.newConnection();
         Channel channel = connection.createChannel();

         // 这就是一个普通的交换机 和 队列 以及路由
         String exchangeName = "test_dlx_exchange";
         String routingKey = "dlx.#";
         String queueName = "test_dlx_queue";

         channel.exchangeDeclare(exchangeName, "topic", true, false, null);

         Map<String, Object> agruments = new HashMap<String, Object>();
         agruments.put("x-dead-letter-exchange", "dlx.exchange");
         //这个agruments属性,要设置到声明队列上
         channel.queueDeclare(queueName, true, false, false, agruments);
         channel.queueBind(queueName, exchangeName, routingKey);

         //要进行死信队列的声明:
         channel.exchangeDeclare("dlx.exchange", "topic", true, false, null);
         channel.queueDeclare("dlx.queue", true, false, false, null);
         channel.queueBind("dlx.queue", "dlx.exchange", "#");

         channel.basicConsume(queueName, true, new MyConsumer(channel));


    }
}
1
2
3
4
5
6
7
8
9
10
11
12
13
14
15
16
17
public class MyConsumer extends DefaultConsumer {


    public MyConsumer(Channel channel) {
         super(channel);
    }

    @Override
    public void handleDelivery(String consumerTag, Envelope envelope, AMQP.BasicProperties properties, byte[] body) throws IOException {
         System.err.println("-----------consume message----------");
         System.err.println("consumerTag: " + consumerTag);
         System.err.println("envelope: " + envelope);
         System.err.println("properties: " + properties);
         System.err.println("body: " + new String(body));
    }
}
整合spring AMQP
RabbitAdmin
- RabbitAdmin底层实现就是从spring容器中获取exchange,binding,routingkey以及queue的@Bean声明
- 然后使用RabbitTemplate的execute方法执行对应的声明,修改,删除等一系列RabbitMQ基础功能操作
- pom
1
2
3
4
5
6
7
8
9
         <dependency>
             <groupId>com.rabbitmq</groupId>
             <artifactId>amqp-client</artifactId>
             <version>3.6.5</version>
         </dependency>
         <dependency>
             <groupId>org.springframework.boot</groupId>
             <artifactId>spring-boot-starter-amqp</artifactId>
         </dependency>
config
1
2
3
4
5
6
7
8
9
10
11
12
13
14
15
16
17
18
19
20
21
22
23
24
25
26
27
28
29
30
31
32
33
34
35
36
37
38
39
40
41
42
43
44
45
46
47
48
49
50
51
52
53
54
55
56
57
58
59
60
61
62
63
64
65
66
67
68
69
70
@Configuration
@ComponentScan({"com.bfxy.spring.*"})
public class RabbitMQConfig {

    @Bean
    public ConnectionFactory connectionFactory(){
         CachingConnectionFactory connectionFactory = new CachingConnectionFactory();
         connectionFactory.setAddresses("192.168.11.76:5672");
         connectionFactory.setUsername("guest");
         connectionFactory.setPassword("guest");
         connectionFactory.setVirtualHost("/");
         return connectionFactory;
    }

    @Bean
    public RabbitAdmin rabbitAdmin(ConnectionFactory connectionFactory) {
         RabbitAdmin rabbitAdmin = new RabbitAdmin(connectionFactory);
         rabbitAdmin.setAutoStartup(true);
         return rabbitAdmin;
    }

    /**
     * 针对消费者配置
     * 1. 设置交换机类型
     * 2. 将队列绑定到交换机
        FanoutExchange: 将消息分发到所有的绑定队列,无routingkey的概念
        HeadersExchange :通过添加属性key-value匹配
        DirectExchange:按照routingkey分发到指定队列
        TopicExchange:多关键字匹配
     */
    @Bean
    public TopicExchange exchange001() {
        return new TopicExchange("topic001", true, false);
    }

    @Bean
    public Queue queue001() {
        return new Queue("queue001", true); //队列持久
    }

    @Bean
    public Binding binding001() {
        return BindingBuilder.bind(queue001()).to(exchange001()).with("spring.*");
    }

    @Bean
    public TopicExchange exchange002() {
        return new TopicExchange("topic002", true, false);
    }

    @Bean
    public Queue queue002() {
        return new Queue("queue002", true); //队列持久
    }

    @Bean
    public Binding binding002() {
        return BindingBuilder.bind(queue002()).to(exchange002()).with("rabbit.*");
    }

    @Bean
    public Queue queue003() {
        return new Queue("queue003", true); //队列持久
    }

    @Bean
    public Binding binding003() {
        return BindingBuilder.bind(queue003()).to(exchange001()).with("mq.*");
    }
测试
1
2
3
4
5
6
7
8
9
10
11
12
13
14
15
16
17
18
19
20
21
22
23
24
25
26
27
28
29
30
31
32
33
34
35
36
37
38
39
40
41
42
43
44
45
@RunWith(SpringRunner.class)
@SpringBootTest
public class ApplicationTests {

    @Test
    public void contextLoads() {
    }

    @Autowired
    private RabbitAdmin rabbitAdmin;

    @Test
    public void testAdmin() throws Exception {
         rabbitAdmin.declareExchange(new DirectExchange("test.direct", false, false));

         rabbitAdmin.declareExchange(new TopicExchange("test.topic", false, false));

         rabbitAdmin.declareExchange(new FanoutExchange("test.fanout", false, false));

         rabbitAdmin.declareQueue(new Queue("test.direct.queue", false));

         rabbitAdmin.declareQueue(new Queue("test.topic.queue", false));

         rabbitAdmin.declareQueue(new Queue("test.fanout.queue", false));

         rabbitAdmin.declareBinding(new Binding("test.direct.queue",
                 Binding.DestinationType.QUEUE,
                 "test.direct", "direct", new HashMap<>()));

         rabbitAdmin.declareBinding(
                 BindingBuilder
                 .bind(new Queue("test.topic.queue", false))         //直接创建队列
                 .to(new TopicExchange("test.topic", false, false)) //直接创建交换机 建立关联关系
                 .with("user.#"));   //指定路由Key


         rabbitAdmin.declareBinding(
                 BindingBuilder
                 .bind(new Queue("test.fanout.queue", false))
                 .to(new FanoutExchange("test.fanout", false, false)));

         //清空队列数据
         rabbitAdmin.purgeQueue("test.topic.queue", false);
    }
消息监听器
- SimpleMessageListenerContainer:简单消息监听容器,有监听队列,自动启动,自动声明功能。设置事务特性,事务管理器,事务属性,事务容量(并发),是否开启事务,回滚消息等
- 配置
1
2
3
4
5
6
7
8
9
10
11
12
13
14
15
16
17
18
19
20
21
22
23
24
25
26
@Bean
    public SimpleMessageListenerContainer messageContainer(ConnectionFactory connectionFactory) {

    SimpleMessageListenerContainer container = new SimpleMessageListenerContainer(connectionFactory);
    container.setQueues(queue001(), queue002(), queue003(), queue_image(), queue_pdf());
    container.setConcurrentConsumers(1);
    container.setMaxConcurrentConsumers(5);
    container.setDefaultRequeueRejected(false);
    container.setAcknowledgeMode(AcknowledgeMode.AUTO);
    container.setExposeListenerChannel(true);
    container.setConsumerTagStrategy(new ConsumerTagStrategy() {
             @Override
             public String createConsumerTag(String queue) {
                 return queue + "_" + UUID.randomUUID().toString();
             }
         });

    container.setMessageListener(new ChannelAwareMessageListener() {
             @Override
             public void onMessage(Message message, Channel channel) throws Exception {
                 String msg = new String(message.getBody());
                 System.err.println("----------消费者: " + msg);
             }
         });
   }
消息监听适配器
- MessageListenerAdapter:消息监听适配器
- 通过适配器的代码我们可以看出如下核心属性
- defaultListenerMethod 默认监听方法名称:用于设置监听方法名称
- Delegate 委托对象:实际真实的委托对象,用于处理消息
- queueOrTagMethodName 队列标识与方法名组成的集合
- 配置
1
2
3
4
5
6
7
8
9
10
11
12
13
14
15
16
17
18
19
20
21
22
23
24
25
26
@Bean
    public SimpleMessageListenerContainer messageContainer(ConnectionFactory connectionFactory) {
/**
    * 1 适配器方式. 默认是有自己的方法名字的:handleMessage
         // 可以自己指定一个方法的名字: consumeMessage
         // 也可以添加一个转换器: 从字节数组转换为String
    MessageListenerAdapter adapter = new MessageListenerAdapter(new MessageDelegate());
    adapter.setDefaultListenerMethod("consumeMessage");
    adapter.setMessageConverter(new TextMessageConverter());
    container.setMessageListener(adapter);
    */

    /**
    * 2 适配器方式: 我们的队列名称 和 方法名称 也可以进行一一的匹配
    *
    MessageListenerAdapter adapter = new MessageListenerAdapter(new MessageDelegate());
    adapter.setMessageConverter(new TextMessageConverter());
    Map<String, String> queueOrTagToMethodName = new HashMap<>();
    queueOrTagToMethodName.put("queue001", "method1");
    queueOrTagToMethodName.put("queue002", "method2");
    adapter.setQueueOrTagToMethodName(queueOrTagToMethodName);
    container.setMessageListener(adapter);
    */
    return container;
}
adapter
1
2
3
4
5
6
7
8
9
10
11
12
13
14
15
16
17
18
19
20
21
22
23
24
25
26
27
28
29
30
31
32
33
34
35
36
37
38
39
40
41
42
43
44
45
public class MessageDelegate {

    public void handleMessage(byte[] messageBody) {
         System.err.println("默认方法, 消息内容:" + new String(messageBody));
    }

    public void consumeMessage(byte[] messageBody) {
         System.err.println("字节数组方法, 消息内容:" + new String(messageBody));
    }

    public void consumeMessage(String messageBody) {
         System.err.println("字符串方法, 消息内容:" + messageBody);
    }

    public void method1(String messageBody) {
         System.err.println("method1 收到消息内容:" + new String(messageBody));
    }

    public void method2(String messageBody) {
         System.err.println("method2 收到消息内容:" + new String(messageBody));
    }


    public void consumeMessage(Map messageBody) {
         System.err.println("map方法, 消息内容:" + messageBody);
    }


    public void consumeMessage(Order order) {
         System.err.println("order对象, 消息内容, id: " + order.getId() +
                 ", name: " + order.getName() +
                 ", content: "+ order.getContent());
    }

    public void consumeMessage(Packaged pack) {
         System.err.println("package对象, 消息内容, id: " + pack.getId() +
                 ", name: " + pack.getName() +
                 ", content: "+ pack.getDescription());
    }

    public void consumeMessage(File file) {
         System.err.println("文件对象 方法, 消息内容:" + file.getName());
    }
}
消息转换器
- MessageConverter
- 我们在发送消息时,默认消息体为二进制的数据方式进行传输,如果希望内部进行转换,就需要自定义消息转换器
- 需要实现MessageConverter接口,重写toMessage(java对象转换为message)和fromMessage(message对象转换为java对象)两个方法
- json转换器:Jackson2JsonMessageConverter:可以进行java对象的转换功能
- DegaultJackson2JavaTypeMapper:映射器,可以进行java对象的映射关系
- 自定义二进制转换器:比如图片类型,PDF,PPT,流媒体
- 配置
1
2
3
4
5
6
7
8
9
10
11
12
13
14
15
16
17
18
19
20
21
22
23
24
25
26
27
28
29
30
31
32
33
34
35
36
37
38
39
40
41
42
43
44
45
46
47
48
49
50
51
52
53
54
55
56
57
58
59
60
61
62
63
64
65
66
67
68
69
70
71
72
73
74
75
76
77
78
79
80
@Bean
    public SimpleMessageListenerContainer messageContainer(ConnectionFactory connectionFactory) {
// 1.1 支持json格式的转换器
        /**
        MessageListenerAdapter adapter = new MessageListenerAdapter(new MessageDelegate());
        adapter.setDefaultListenerMethod("consumeMessage");

        Jackson2JsonMessageConverter jackson2JsonMessageConverter = new Jackson2JsonMessageConverter();
        adapter.setMessageConverter(jackson2JsonMessageConverter);

        container.setMessageListener(adapter);
        */


        // 1.2 DefaultJackson2JavaTypeMapper & Jackson2JsonMessageConverter 支持java对象转换
        /**
        MessageListenerAdapter adapter = new MessageListenerAdapter(new MessageDelegate());
        adapter.setDefaultListenerMethod("consumeMessage");

        Jackson2JsonMessageConverter jackson2JsonMessageConverter = new Jackson2JsonMessageConverter();

        DefaultJackson2JavaTypeMapper javaTypeMapper = new DefaultJackson2JavaTypeMapper();
        jackson2JsonMessageConverter.setJavaTypeMapper(javaTypeMapper);

        adapter.setMessageConverter(jackson2JsonMessageConverter);
        container.setMessageListener(adapter);
        */


        //1.3 DefaultJackson2JavaTypeMapper & Jackson2JsonMessageConverter 支持java对象多映射转换
        /**
        MessageListenerAdapter adapter = new MessageListenerAdapter(new MessageDelegate());
        adapter.setDefaultListenerMethod("consumeMessage");
        Jackson2JsonMessageConverter jackson2JsonMessageConverter = new Jackson2JsonMessageConverter();
        DefaultJackson2JavaTypeMapper javaTypeMapper = new DefaultJackson2JavaTypeMapper();

        Map<String, Class<?>> idClassMapping = new HashMap<String, Class<?>>();
         idClassMapping.put("order", com.bfxy.spring.entity.Order.class);
         idClassMapping.put("packaged", com.bfxy.spring.entity.Packaged.class);

         javaTypeMapper.setIdClassMapping(idClassMapping);

         jackson2JsonMessageConverter.setJavaTypeMapper(javaTypeMapper);
        adapter.setMessageConverter(jackson2JsonMessageConverter);
        container.setMessageListener(adapter);
        */

        //1.4 ext convert

        MessageListenerAdapter adapter = new MessageListenerAdapter(new MessageDelegate());
        adapter.setDefaultListenerMethod("consumeMessage");

        //全局的转换器:
         ContentTypeDelegatingMessageConverter convert = new ContentTypeDelegatingMessageConverter();

         TextMessageConverter textConvert = new TextMessageConverter();
         convert.addDelegate("text", textConvert);
         convert.addDelegate("html/text", textConvert);
         convert.addDelegate("xml/text", textConvert);
         convert.addDelegate("text/plain", textConvert);

         Jackson2JsonMessageConverter jsonConvert = new Jackson2JsonMessageConverter();
         convert.addDelegate("json", jsonConvert);
         convert.addDelegate("application/json", jsonConvert);

         ImageMessageConverter imageConverter = new ImageMessageConverter();
         convert.addDelegate("image/png", imageConverter);
         convert.addDelegate("image", imageConverter);

         PDFMessageConverter pdfConverter = new PDFMessageConverter();
         convert.addDelegate("application/pdf", pdfConverter);


         adapter.setMessageConverter(convert);
         container.setMessageListener(adapter);

    return container;
}
body
1
2
3
4
5
6
7
8
9
10
11
12
13
14
15
16
17
18
19
20
21
public class ConverterBody {

    private byte[] body;

    public ConverterBody() {
    }

    public ConverterBody(byte[] body) {
         this.body = body;
    }

    public byte[] getBody() {
         return body;
    }

    public void setBody(byte[] body) {
         this.body = body;
    }

}
image
1
2
3
4
5
6
7
8
9
10
11
12
13
14
15
16
17
18
19
20
21
22
23
24
25
26
27
28
public class ImageMessageConverter implements MessageConverter {

    @Override
    public Message toMessage(Object object, MessageProperties messageProperties) throws MessageConversionException {
         throw new MessageConversionException(" convert error ! ");
    }

    @Override
    public Object fromMessage(Message message) throws MessageConversionException {
         System.err.println("-----------Image MessageConverter----------");

         Object _extName = message.getMessageProperties().getHeaders().get("extName");
         String extName = _extName == null ? "png" : _extName.toString();

         byte[] body = message.getBody();
         String fileName = UUID.randomUUID().toString();
         String path = "d:/010_test/" + fileName + "." + extName;
         File f = new File(path);
         try {
             Files.copy(new ByteArrayInputStream(body), f.toPath());
         } catch (IOException e) {
             e.printStackTrace();
         }
         return f;
    }

}
1
2
3
4
5
6
7
8
9
10
11
12
13
14
15
16
17
18
19
20
21
22
23
24
25
public class PDFMessageConverter implements MessageConverter {

    @Override
    public Message toMessage(Object object, MessageProperties messageProperties) throws MessageConversionException {
         throw new MessageConversionException(" convert error ! ");
    }

    @Override
    public Object fromMessage(Message message) throws MessageConversionException {
         System.err.println("-----------PDF MessageConverter----------");

         byte[] body = message.getBody();
         String fileName = UUID.randomUUID().toString();
         String path = "d:/010_test/" + fileName + ".pdf";
         File f = new File(path);
         try {
             Files.copy(new ByteArrayInputStream(body), f.toPath());
         } catch (IOException e) {
             e.printStackTrace();
         }
         return f;
    }

}
text
1
2
3
4
5
6
7
8
9
10
11
12
13
14
15
16
17
18
public class TextMessageConverter implements MessageConverter {

    @Override
    public Message toMessage(Object object, MessageProperties messageProperties) throws MessageConversionException {
         return new Message(object.toString().getBytes(), messageProperties);
    }

    @Override
    public Object fromMessage(Message message) throws MessageConversionException {
         String contentType = message.getMessageProperties().getContentType();
         if(null != contentType && contentType.contains("text")) {
             return new String(message.getBody());
         }
         return message.getBody();
    }

}
测试
1
2
3
4
5
6
7
8
9
10
11
12
13
14
15
16
17
18
19
20
21
22
23
24
25
26
27
28
29
30
31
32
33
34
35
36
37
38
39
40
41
42
43
44
45
46
47
48
49
50
51
52
53
54
55
56
57
58
59
60
61
62
63
64
65
66
67
68
69
70
71
72
73
74
75
76
77
78
79
80
81
82
83
84
85
86
87
88
89
90
91
@Test
    public void testSendJsonMessage() throws Exception {

         Order order = new Order();
         order.setId("001");
         order.setName("消息订单");
         order.setContent("描述信息");
         ObjectMapper mapper = new ObjectMapper();
         String json = mapper.writeValueAsString(order);
         System.err.println("order 4 json: " + json);

         MessageProperties messageProperties = new MessageProperties();
         //这里注意一定要修改contentType为 application/json
         messageProperties.setContentType("application/json");
         Message message = new Message(json.getBytes(), messageProperties);

         rabbitTemplate.send("topic001", "spring.order", message);
    }

    @Test
    public void testSendJavaMessage() throws Exception {

         Order order = new Order();
         order.setId("001");
         order.setName("订单消息");
         order.setContent("订单描述信息");
         ObjectMapper mapper = new ObjectMapper();
         String json = mapper.writeValueAsString(order);
         System.err.println("order 4 json: " + json);

         MessageProperties messageProperties = new MessageProperties();
         //这里注意一定要修改contentType为 application/json
         messageProperties.setContentType("application/json");
         messageProperties.getHeaders().put("__TypeId__", "com.bfxy.spring.entity.Order");
         Message message = new Message(json.getBytes(), messageProperties);

         rabbitTemplate.send("topic001", "spring.order", message);
    }

    @Test
    public void testSendMappingMessage() throws Exception {

         ObjectMapper mapper = new ObjectMapper();

         Order order = new Order();
         order.setId("001");
         order.setName("订单消息");
         order.setContent("订单描述信息");

         String json1 = mapper.writeValueAsString(order);
         System.err.println("order 4 json: " + json1);

         MessageProperties messageProperties1 = new MessageProperties();
         //这里注意一定要修改contentType为 application/json
         messageProperties1.setContentType("application/json");
         messageProperties1.getHeaders().put("__TypeId__", "order");
         Message message1 = new Message(json1.getBytes(), messageProperties1);
         rabbitTemplate.send("topic001", "spring.order", message1);

         Packaged pack = new Packaged();
         pack.setId("002");
         pack.setName("包裹消息");
         pack.setDescription("包裹描述信息");

         String json2 = mapper.writeValueAsString(pack);
         System.err.println("pack 4 json: " + json2);

         MessageProperties messageProperties2 = new MessageProperties();
         //这里注意一定要修改contentType为 application/json
         messageProperties2.setContentType("application/json");
         messageProperties2.getHeaders().put("__TypeId__", "packaged");
         Message message2 = new Message(json2.getBytes(), messageProperties2);
         rabbitTemplate.send("topic001", "spring.pack", message2);
    }

    @Test
    public void testSendExtConverterMessage() throws Exception {
//          byte[] body = Files.readAllBytes(Paths.get("d:/002_books", "picture.png"));
//          MessageProperties messageProperties = new MessageProperties();
//          messageProperties.setContentType("image/png");
//          messageProperties.getHeaders().put("extName", "png");
//          Message message = new Message(body, messageProperties);
//          rabbitTemplate.send("", "image_queue", message);

             byte[] body = Files.readAllBytes(Paths.get("d:/002_books", "mysql.pdf"));
             MessageProperties messageProperties = new MessageProperties();
             messageProperties.setContentType("application/pdf");
             Message message = new Message(body, messageProperties);
             rabbitTemplate.send("", "pdf_queue", message);
    }
整合springboot
pom
1
2
3
4
         <dependency>
             <groupId>org.springframework.boot</groupId>
             <artifactId>spring-boot-starter-amqp</artifactId>
         </dependency>
生产者
- 配置
1
2
3
4
5
6
7
8
9
spring.rabbitmq.addresses=192.168.11.76:5672
spring.rabbitmq.username=guest
spring.rabbitmq.password=guest
spring.rabbitmq.virtual-host=/
spring.rabbitmq.connection-timeout=15000

spring.rabbitmq.publisher-confirms=true
spring.rabbitmq.publisher-returns=true
spring.rabbitmq.template.mandatory=true
发送端
1
2
3
4
5
6
7
8
9
10
11
12
13
14
15
16
17
18
19
20
21
22
23
24
25
26
27
28
29
30
31
32
33
34
35
36
37
38
39
40
41
42
43
44
45
46
47
48
49
50
51
52
53
54
55
56
57
58
59
60
61
62
63
64
65
import java.util.Map;

import org.springframework.amqp.rabbit.core.RabbitTemplate;
import org.springframework.amqp.rabbit.core.RabbitTemplate.ConfirmCallback;
import org.springframework.amqp.rabbit.core.RabbitTemplate.ReturnCallback;
import org.springframework.amqp.rabbit.support.CorrelationData;
import org.springframework.beans.factory.annotation.Autowired;
import org.springframework.messaging.Message;
import org.springframework.messaging.MessageHeaders;
import org.springframework.messaging.support.MessageBuilder;
import org.springframework.stereotype.Component;

import com.bfxy.springboot.entity.Order;

@Component
public class RabbitSender {

    //自动注入RabbitTemplate模板类
    @Autowired
    private RabbitTemplate rabbitTemplate;

    //回调函数: confirm确认
    final ConfirmCallback confirmCallback = new RabbitTemplate.ConfirmCallback() {
         @Override
         public void confirm(CorrelationData correlationData, boolean ack, String cause) {
             System.err.println("correlationData: " + correlationData);
             System.err.println("ack: " + ack);
             if(!ack){
                 System.err.println("异常处理....");
             }
         }
    };

    //回调函数: return返回
    final ReturnCallback returnCallback = new RabbitTemplate.ReturnCallback() {
         @Override
         public void returnedMessage(org.springframework.amqp.core.Message message, int replyCode, String replyText,
                 String exchange, String routingKey) {
             System.err.println("return exchange: " + exchange + ", routingKey: "
                 + routingKey + ", replyCode: " + replyCode + ", replyText: " + replyText);
         }
    };

    //发送消息方法调用: 构建Message消息
    public void send(Object message, Map<String, Object> properties) throws Exception {
         MessageHeaders mhs = new MessageHeaders(properties);
         Message msg = MessageBuilder.createMessage(message, mhs);
         rabbitTemplate.setConfirmCallback(confirmCallback);
         rabbitTemplate.setReturnCallback(returnCallback);
         //id + 时间戳 全局唯一
         CorrelationData correlationData = new CorrelationData("1234567890");
         rabbitTemplate.convertAndSend("exchange-1", "springboot.abc", msg, correlationData);
    }

    //发送消息方法调用: 构建自定义对象消息
    public void sendOrder(Order order) throws Exception {
         rabbitTemplate.setConfirmCallback(confirmCallback);
         rabbitTemplate.setReturnCallback(returnCallback);
         //id + 时间戳 全局唯一
         CorrelationData correlationData = new CorrelationData("0987654321");
         rabbitTemplate.convertAndSend("exchange-2", "springboot.def", order, correlationData);
    }

}
测试
1
2
3
4
5
6
7
8
9
10
11
12
13
14
15
16
17
18
19
20
21
22
23
24
25
26
27
28
29
@RunWith(SpringRunner.class)
@SpringBootTest
public class ApplicationTests {

    @Test
    public void contextLoads() {
    }

    @Autowired
    private RabbitSender rabbitSender;

    private static SimpleDateFormat simpleDateFormat = new SimpleDateFormat("yyyy-MM-dd HH:mm:ss.SSS");

    @Test
    public void testSender1() throws Exception {
          Map<String, Object> properties = new HashMap<>();
          properties.put("number", "12345");
          properties.put("send_time", simpleDateFormat.format(new Date()));
          rabbitSender.send("Hello RabbitMQ For Spring Boot!", properties);
    }

    @Test
    public void testSender2() throws Exception {
          Order order = new Order("001", "第一个订单");
          rabbitSender.sendOrder(order);
    }

}
消费者
- 配置
1
2
3
4
5
6
7
8
9
10
11
12
13
14
15
16
17
18
spring.rabbitmq.addresses=192.168.11.76:5672
spring.rabbitmq.username=guest
spring.rabbitmq.password=guest
spring.rabbitmq.virtual-host=/
spring.rabbitmq.connection-timeout=15000

spring.rabbitmq.listener.simple.acknowledge-mode=manual
spring.rabbitmq.listener.simple.concurrency=5
spring.rabbitmq.listener.simple.max-concurrency=10

spring.rabbitmq.listener.order.queue.name=queue-2
spring.rabbitmq.listener.order.queue.durable=true
spring.rabbitmq.listener.order.exchange.name=exchange-2
spring.rabbitmq.listener.order.exchange.durable=true
spring.rabbitmq.listener.order.exchange.type=topic
spring.rabbitmq.listener.order.exchange.ignoreDeclarationExceptions=true
spring.rabbitmq.listener.order.key=springboot.*
接收端
1
2
3
4
5
6
7
8
9
10
11
12
13
14
15
16
17
18
19
20
21
22
23
24
25
26
27
28
29
30
31
32
33
34
35
36
37
38
39
40
41
42
43
44
45
46
47
48
49
50
51
52
53
54
55
56
57
58
59
60
61
62
63
64
65
66
67
68
import org.springframework.amqp.rabbit.annotation.Exchange;
import org.springframework.amqp.rabbit.annotation.Queue;
import org.springframework.amqp.rabbit.annotation.QueueBinding;
import org.springframework.amqp.rabbit.annotation.RabbitHandler;
import org.springframework.amqp.rabbit.annotation.RabbitListener;
import org.springframework.amqp.support.AmqpHeaders;
import org.springframework.messaging.Message;
import org.springframework.messaging.handler.annotation.Headers;
import org.springframework.messaging.handler.annotation.Payload;
import org.springframework.stereotype.Component;

import com.rabbitmq.client.Channel;

@Component
public class RabbitReceiver {


    @RabbitListener(bindings = @QueueBinding(
             value = @Queue(value = "queue-1",
             durable="true"),
             exchange = @Exchange(value = "exchange-1",
             durable="true",
             type= "topic",
             ignoreDeclarationExceptions = "true"),
             key = "springboot.*"
             )
    )
    @RabbitHandler
    public void onMessage(Message message, Channel channel) throws Exception {
         System.err.println("--------------------------------------");
         System.err.println("消费端Payload: " + message.getPayload());
         Long deliveryTag = (Long)message.getHeaders().get(AmqpHeaders.DELIVERY_TAG);
         //手工ACK
         channel.basicAck(deliveryTag, false);
    }


    /**
     * 使用注解方式可以在启动项目时自动创建交换机,队列和绑定关系
     * @param order
     * @param channel
     * @param headers
     * @throws Exception
     */
    @RabbitListener(bindings = @QueueBinding(
             value = @Queue(value = "${spring.rabbitmq.listener.order.queue.name}",
             durable="${spring.rabbitmq.listener.order.queue.durable}"),
             exchange = @Exchange(value = "${spring.rabbitmq.listener.order.exchange.name}",
             durable="${spring.rabbitmq.listener.order.exchange.durable}",
             type= "${spring.rabbitmq.listener.order.exchange.type}",
             ignoreDeclarationExceptions = "${spring.rabbitmq.listener.order.exchange.ignoreDeclarationExceptions}"),
             key = "${spring.rabbitmq.listener.order.key}"
             )
    )
    @RabbitHandler
    public void onOrderMessage(@Payload com.bfxy.springboot.entity.Order order,
             Channel channel,
             @Headers Map<String, Object> headers) throws Exception {
         System.err.println("--------------------------------------");
         System.err.println("消费端order: " + order.getId());
         Long deliveryTag = (Long)headers.get(AmqpHeaders.DELIVERY_TAG);
         //手工ACK
         channel.basicAck(deliveryTag, false);
    }


}
整合spring cloud
pom
1
2
3
4
5
6
7
8
9
10
11
12
13
14
15
16
17
18
19
20
21
22
23
24
25
26
27
28
29
30
    <dependencies>
         <dependency>
             <groupId>org.springframework.boot</groupId>
             <artifactId>spring-boot-starter-web</artifactId>
         </dependency>
         <dependency>
             <groupId>org.springframework.boot</groupId>
             <artifactId>spring-boot-starter</artifactId>
         </dependency>
         <dependency>
             <groupId>org.springframework.boot</groupId>
             <artifactId>spring-boot-autoconfigure</artifactId>
         </dependency>
         <dependency>
             <groupId>org.springframework.boot</groupId>
             <artifactId>spring-boot-starter-test</artifactId>
             <scope>test</scope>
         </dependency>

         <dependency>
             <groupId>org.springframework.cloud</groupId>
             <artifactId>spring-cloud-starter-stream-rabbit</artifactId>
             <version>1.3.4.RELEASE</version>
         </dependency>
         <dependency>
             <groupId>org.springframework.boot</groupId>
             <artifactId>spring-boot-starter-actuator</artifactId>
         </dependency>
    </dependencies>
生产者
- 配置
1
2
3
4
5
6
7
8
9
10
11
12
13
14
server.port=8001
server.servlet.context-path=/producer

spring.application.name=producer
spring.cloud.stream.bindings.output_channel.destination=exchange-3
spring.cloud.stream.bindings.output_channel.group=queue-3
spring.cloud.stream.bindings.output_channel.binder=rabbit_cluster

spring.cloud.stream.binders.rabbit_cluster.type=rabbit
spring.cloud.stream.binders.rabbit_cluster.environment.spring.rabbitmq.addresses=192.168.11.76:5672
spring.cloud.stream.binders.rabbit_cluster.environment.spring.rabbitmq.username=guest
spring.cloud.stream.binders.rabbit_cluster.environment.spring.rabbitmq.password=guest
spring.cloud.stream.binders.rabbit_cluster.environment.spring.rabbitmq.virtual-host=/
- 通道接口
1
2
3
4
5
6
7
8
9
10
11
12
13
14
15
16
17
18
19
20
21
22
23
24
25
26
27
28
29
import org.springframework.cloud.stream.annotation.Output;
import org.springframework.messaging.MessageChannel;

/**
 * <B>中文类名:</B><BR>
 * <B>概要说明:</B><BR>
 * 这里的Barista接口是定义来作为后面类的参数,这一接口定义来通道类型和通道名称。
 * 通道名称是作为配置用,通道类型则决定了app会使用这一通道进行发送消息还是从中接收消息。
 */
public interface Barista {

    //String INPUT_CHANNEL = "input_channel";
    String OUTPUT_CHANNEL = "output_channel";

    //注解@Input声明了它是一个输入类型的通道,名字是Barista.INPUT_CHANNEL,也就是position3的input_channel。这一名字与上述配置app2的配置文件中position1应该一致,表明注入了一个名字叫做input_channel的通道,它的类型是input,订阅的主题是position2处声明的mydest这个主题
//    @Input(Barista.INPUT_CHANNEL)
//    SubscribableChannel loginput();
    //注解@Output声明了它是一个输出类型的通道,名字是output_channel。这一名字与app1中通道名一致,表明注入了一个名字为output_channel的通道,类型是output,发布的主题名为mydest。
    @Output(Barista.OUTPUT_CHANNEL)
    MessageChannel logoutput();

// String INPUT_BASE = "queue-1";
// String OUTPUT_BASE = "queue-1";
// @Input(Barista.INPUT_BASE)
// SubscribableChannel input1();
// MessageChannel output1();

}
- 发送端
1
2
3
4
5
6
7
8
9
10
11
12
13
14
15
16
17
18
19
20
21
22
23
24
25
26
27
28
29
30
31
32
33
import org.springframework.beans.factory.annotation.Autowired;
import org.springframework.cloud.stream.annotation.EnableBinding;
import org.springframework.messaging.Message;
import org.springframework.messaging.MessageHeaders;
import org.springframework.messaging.support.MessageBuilder;
import org.springframework.stereotype.Service;

@EnableBinding(Barista.class)
@Service
public class RabbitmqSender {

    @Autowired
    private Barista barista;

    // 发送消息
    public String sendMessage(Object message, Map<String, Object> properties) throws Exception {
        try{
         MessageHeaders mhs = new MessageHeaders(properties);
         Message msg = MessageBuilder.createMessage(message, mhs);
            boolean sendStatus = barista.logoutput().send(msg);
            System.err.println("--------------sending -------------------");
            System.out.println("发送数据:" + message + ",sendStatus: " + sendStatus);
        }catch (Exception e){
         System.err.println("-------------error-------------");
         e.printStackTrace();
            throw new RuntimeException(e.getMessage());

        }
        return null;
    }

}
- 测试
1
2
3
4
5
6
7
8
9
10
11
12
13
14
15
16
17
18
19
20
21
22
23
24
25
26
27
28
@RunWith(SpringRunner.class)
@SpringBootTest
public class ApplicationTests {

    @Autowired
    private RabbitmqSender rabbitmqSender;


    @Test
    public void sendMessageTest1() {
       for(int i = 0; i < 1; i ++){
       try {
                Map<String, Object> properties = new HashMap<String, Object>();
                properties.put("SERIAL_NUMBER", "12345");
                properties.put("BANK_NUMBER", "abc");
                properties.put("PLAT_SEND_TIME", DateUtils.formatDate(new Date(), "yyyy-MM-dd HH:mm:ss.SSS"));
            rabbitmqSender.sendMessage("Hello, I am amqp sender num :" + i, properties);

           } catch (Exception e) {
            System.out.println("--------error-------");
               e.printStackTrace();
           }
       }
       //TimeUnit.SECONDS.sleep(Integer.MAX_VALUE);
    }

}
消费者
- 配置
1
2
3
4
5
6
7
8
9
10
11
12
13
14
15
16
17
18
19
20
server.port=8002
server.context-path=/consumer

spring.application.name=consumer
spring.cloud.stream.bindings.input_channel.destination=exchange-3
spring.cloud.stream.bindings.input_channel.group=queue-3
spring.cloud.stream.bindings.input_channel.binder=rabbit_cluster
spring.cloud.stream.bindings.input_channel.consumer.concurrency=1
spring.cloud.stream.rabbit.bindings.input_channel.consumer.requeue-rejected=false
spring.cloud.stream.rabbit.bindings.input_channel.consumer.acknowledge-mode=MANUAL
spring.cloud.stream.rabbit.bindings.input_channel.consumer.recovery-interval=3000
spring.cloud.stream.rabbit.bindings.input_channel.consumer.durable-subscription=true
spring.cloud.stream.rabbit.bindings.input_channel.consumer.max-concurrency=5

spring.cloud.stream.binders.rabbit_cluster.type=rabbit
spring.cloud.stream.binders.rabbit_cluster.environment.spring.rabbitmq.addresses=192.168.11.76:5672
spring.cloud.stream.binders.rabbit_cluster.environment.spring.rabbitmq.username=guest
spring.cloud.stream.binders.rabbit_cluster.environment.spring.rabbitmq.password=guest
spring.cloud.stream.binders.rabbit_cluster.environment.spring.rabbitmq.virtual-host=/
- 通道接口
1
2
3
4
5
6
7
8
9
10
11
12
13
14
15
16
17
18
19
20
21
22
23
import org.springframework.cloud.stream.annotation.Input;
import org.springframework.messaging.SubscribableChannel;

/**
 * <B>中文类名:</B><BR>
 * <B>概要说明:</B><BR>
 * 这里的Barista接口是定义来作为后面类的参数,这一接口定义来通道类型和通道名称。
 * 通道名称是作为配置用,通道类型则决定了app会使用这一通道进行发送消息还是从中接收消息。
 * @author ashen(Alienware)
 * @since 2016年7月22日
 */

public interface Barista {

    String INPUT_CHANNEL = "input_channel";

    //注解@Input声明了它是一个输入类型的通道,名字是Barista.INPUT_CHANNEL,也就是position3的input_channel。这一名字与上述配置app2的配置文件中position1应该一致,表明注入了一个名字叫做input_channel的通道,它的类型是input,订阅的主题是position2处声明的mydest这个主题
    @Input(Barista.INPUT_CHANNEL)
    SubscribableChannel loginput();


}
- 接收端
1
2
3
4
5
6
7
8
9
10
11
12
13
14
15
16
17
18
19
20
21
22
23
import org.springframework.amqp.support.AmqpHeaders;
import org.springframework.cloud.stream.annotation.EnableBinding;
import org.springframework.cloud.stream.annotation.StreamListener;
import org.springframework.messaging.Message;
import org.springframework.stereotype.Service;

import com.rabbitmq.client.Channel;


@EnableBinding(Barista.class)
@Service
public class RabbitmqReceiver {

    @StreamListener(Barista.INPUT_CHANNEL)
    public void receiver(Message message) throws Exception {
         Channel channel = (com.rabbitmq.client.Channel) message.getHeaders().get(AmqpHeaders.CHANNEL);
         Long deliveryTag = (Long) message.getHeaders().get(AmqpHeaders.DELIVERY_TAG);
    System.out.println("Input Stream 1 接受数据:" + message);
    System.out.println("消费完毕------------");
    channel.basicAck(deliveryTag, false);
    }
}
本文由作者按照 CC BY 4.0 进行授权