SpringBoot整合篇
一:整合缓存
JSR107
Java Caching定义了5个核心接口,分别是CachingProvider, CacheManager, Cache, Entry和 Expiry。
- CachingProvider定义了创建、配置、获取、管理和控制多个CacheManager。一个应用可以在运行期访问多个CachingProvider。
- CacheManager定义了创建、配置、获取、管理和控制多个唯一命名的Cache,这些Cache存在于CacheManager的上下文中。一个CacheManager仅被一个CachingProvider所拥有。
- Cache是一个类似Map的数据结构并临时存储以Key为索引的值。一个Cache仅被一个CacheManager所拥有。
- Entry是一个存储在Cache中的key-value对。
- Expiry 每一个存储在Cache中的条目有一个定义的有效期。一旦超过这个时间,条目为过期的状态。一旦过期,条目将不可访问、更新和删除。缓存有效期可以通过ExpiryPolicy设置。
Spring从3.1开始定义了org.springframework.cache.Cache 和org.springframework.cache.CacheManager接口来统一不同的缓存技术;并支持使用JCache(JSR-107)注解简化我们开发;
Cache接口为缓存的组件规范定义,包含缓存的各种操作集合;
Cache接口下Spring提供了各种xxxCache的实现;如RedisCache,EhCacheCache , ConcurrentMapCache等;
每次调用需要缓存功能的方法时,Spring会检查检查指定参数的指定的目标方法是否已经被调用过;如果有就直接从缓存中获取方法调用后的结果,如果没有就调用方法并缓存结果后返回给用户。下次调用直接从缓存中获取。
使用Spring缓存抽象时我们需要关注以下两点;
1、确定方法需要被缓存以及他们的缓存策略
2、从缓存中读取之前缓存存储的数据
| Cache | 缓存接口,定义缓存操作。实现有:RedisCache、EhCacheCache、 ConcurrentMapCache等 |
|---|---|
| CacheManager | 缓存管理器,管理各种缓存(Cache)组件 |
| @Cacheable | 主要针对方法配置,能够根据方法的请求参数对其结果进行缓存 |
| @CacheEvict | 清空缓存 |
| @CachePut | 保证方法被调用,又希望结果被缓存。 |
| @EnableCaching | 开启基于注解的缓存 |
| keyGenerator | 缓存数据时key生成策略 |
| serialize | 缓存数据时value序列化策略 |
案例
启动类
1
2
3
4
5
6
7
8
9
10
11
12
13
14
15
16
package com.mikey.cache;

import org.mybatis.spring.annotation.MapperScan;
import org.springframework.boot.SpringApplication;
import org.springframework.boot.autoconfigure.SpringBootApplication;
import org.springframework.cache.annotation.EnableCaching;

@MapperScan(value = "com.mikey.cache.mapper")
@SpringBootApplication
@EnableCaching//开启缓存
public class Springboot01CacheApplication {

    public static void main(String[] args) {
        SpringApplication.run(Springboot01CacheApplication.class, args);
    }
}
- 配置文件
1
2
3
4
5
6
7
8
9
10
spring.datasource.url=jdbc:mysql://localhost:3306/spring_cache
spring.datasource.username=root
spring.datasource.password=root
#spring.datasource.driver-class-name=com.mysql.jdbc.Driver
# 驼峰命名
mybatis.configuration.multiple-result-sets-enabled=true

# 日志级别
logging.level.com.mikey.cache.mapper=debug
- mapper
1
2
3
4
5
6
7
8
9
10
11
12
13
14
15
16
17
18
19
import com.mikey.cache.bean.Employee;
import org.apache.ibatis.annotations.*;
import org.springframework.stereotype.Component;

@Component
@Mapper
public interface EmployeeMapper {
    @Select("select * from employee where id=#{id}")
    public Employee getEmpById(Integer id);

    @Update("update employee set lastName=#{lastName},email=#{email},gender=#{gender},d_id=#{d_id} where id=#{id}")
    public void updateEmp(Employee employee);

    @Delete("Delete from employee where id=#{id}")
    public void deleteEmpById(Integer id);

    @Insert("insert employee(lastName,email,gender,d_id) values(#{lastName},#{email},#{gender},#{dId}")
    public void insertEmployee(Employee employee);
}
- service
1
2
3
4
5
6
7
8
9
10
11
12
13
14
15
16
17
18
19
20
21
22
23
24
import com.mikey.cache.bean.Employee;
import com.mikey.cache.mapper.EmployeeMapper;
import org.springframework.beans.factory.annotation.Autowired;
import org.springframework.cache.annotation.Cacheable;
import org.springframework.stereotype.Service;

@Service
public class EmployeeService {
    @Autowired
    EmployeeMapper employeeMapper;

    /**
     * 将方法的运行结果进行缓存
     * @param id
     * @return
     */
//    @Cacheable(cacheNames = "emp",key = "#id")
    @Cacheable(cacheNames = "emp",condition = "#id>0",unless = "#result==null")
    public Employee getEmp(Integer id){
        System.out.println("查询"+id+"号员工");
        Employee employee=employeeMapper.getEmpById(id);
        return employee;
    }
}
- controller
1
2
3
4
5
6
7
8
9
10
11
12
13
14
15
16
17
18
19
20
21
import com.mikey.cache.bean.Employee;
import com.mikey.cache.service.EmployeeService;
import org.springframework.beans.factory.annotation.Autowired;
import org.springframework.stereotype.Controller;
import org.springframework.web.bind.annotation.PathVariable;
import org.springframework.web.bind.annotation.RequestMapping;
import org.springframework.web.bind.annotation.RestController;

@RestController
public class EmployeeController {

    @Autowired
    EmployeeService employeeService;

    @RequestMapping("/emp/{id}")
    public Employee getEmployee(@PathVariable("id") Integer id){
        return employeeService.getEmp(id);
    }


}
原理
1、自动配置类;CacheAutoConfiguration
2、缓存的配置类 org.springframework.boot.autoconfigure.cache.GenericCacheConfiguration org.springframework.boot.autoconfigure.cache.JCacheCacheConfiguration org.springframework.boot.autoconfigure.cache.EhCacheCacheConfiguration org.springframework.boot.autoconfigure.cache.HazelcastCacheConfiguration org.springframework.boot.autoconfigure.cache.InfinispanCacheConfiguration org.springframework.boot.autoconfigure.cache.CouchbaseCacheConfiguration org.springframework.boot.autoconfigure.cache.RedisCacheConfiguration org.springframework.boot.autoconfigure.cache.CaffeineCacheConfiguration org.springframework.boot.autoconfigure.cache.GuavaCacheConfiguration org.springframework.boot.autoconfigure.cache.SimpleCacheConfiguration【默认】 org.springframework.boot.autoconfigure.cache.NoOpCacheConfiguration
3、哪个配置类默认生效:SimpleCacheConfiguration;
4、给容器中注册了一个CacheManager:ConcurrentMapCacheManager
5、可以获取和创建ConcurrentMapCache类型的缓存组件;他的作用将数据保存在ConcurrentMap中;
将方法的运行结果进行缓存;以后再要相同的数据,直接从缓存中获取,不用调用方法; CacheManager管理多个Cache组件的,对缓存的真正CRUD操作在Cache组件中,每一个缓存组件有自己唯一一个名字;
运行流程
1
2
3
4
5
6
7
8
9
10
11
12
13
14
15
16
17
18
19
20
21
22
23
24
25
26
27
28
29
30
31
32
33
34
35
36
37
38
39
40
41
42
运行流程:
@Cacheable:
1、方法运行之前,先去查询Cache(缓存组件),按照cacheNames指定的名字获取;
(CacheManager先获取相应的缓存),第一次获取缓存如果没有Cache组件会自动创建。
2、去Cache中查找缓存的内容,使用一个key,默认就是方法的参数;
key是按照某种策略生成的;默认是使用keyGenerator生成的,默认使用SimpleKeyGenerator生成key;
SimpleKeyGenerator生成key的默认策略;
如果没有参数;key=new SimpleKey();
如果有一个参数:key=参数的值
如果有多个参数:key=new SimpleKey(params);
3、没有查到缓存就调用目标方法;
4、将目标方法返回的结果,放进缓存中
@Cacheable标注的方法执行之前先来检查缓存中有没有这个数据,默认按照参数的值作为key去查询缓存,
如果没有就运行方法并将结果放入缓存;以后再来调用就可以直接使用缓存中的数据;
核心:
1)、使用CacheManager【ConcurrentMapCacheManager】按照名字得到Cache【ConcurrentMapCache】组件
2)、key使用keyGenerator生成的,默认是SimpleKeyGenerator
几个属性:
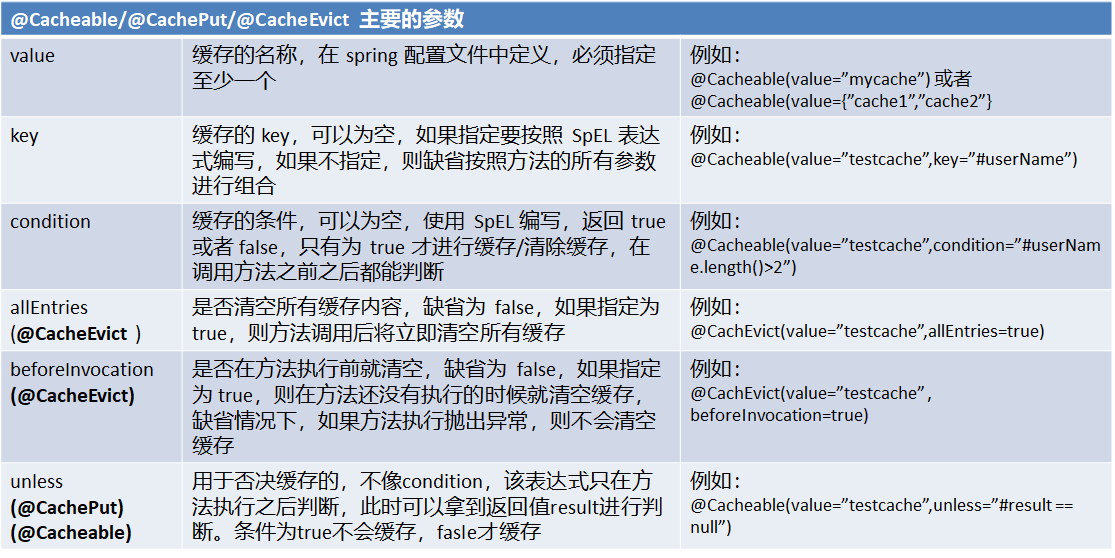
cacheNames/value:指定缓存组件的名字;将方法的返回结果放在哪个缓存中,是数组的方式,可以指定多个缓存;
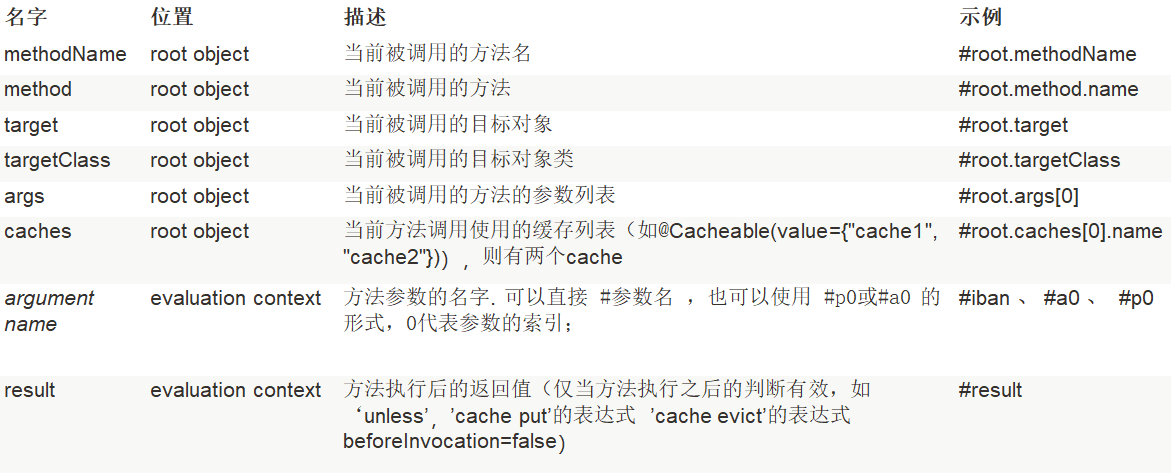
key:缓存数据使用的key;可以用它来指定。默认是使用方法参数的值 1-方法的返回值
编写SpEL; #i d;参数id的值 #a0 #p0 #root.args[0]
getEmp[2]
keyGenerator:key的生成器;可以自己指定key的生成器的组件id
key/keyGenerator:二选一使用;
cacheManager:指定缓存管理器;或者cacheResolver指定获取解析器
condition:指定符合条件的情况下才缓存;
,condition = "#id>0"
condition = "#a0>1":第一个参数的值》1的时候才进行缓存
unless:否定缓存;当unless指定的条件为true,方法的返回值就不会被缓存;可以获取到结果进行判断
unless = "#result == null"
unless = "#a0==2":如果第一个参数的值是2,结果不缓存;
sync:是否使用异步模式
- 自定义key生成器
1
2
3
4
5
6
7
8
9
10
11
12
13
14
15
16
17
18
19
20
import org.springframework.cache.interceptor.KeyGenerator;
import org.springframework.context.annotation.Bean;
import org.springframework.context.annotation.Configuration;

import java.lang.reflect.Method;
import java.util.Arrays;

@Configuration
public class MyCacheConfig {
    @Bean("myKeyGenerator")
    public KeyGenerator keyGenerator(){
        return new KeyGenerator(){
            @Override
            public Object generate(Object target, Method method, Object... params) {
                return method.getName()+"["+ Arrays.asList(params).toString()+"]";
            }
        };
    }
}
- 注意:使用异步不支持unless
- @CachePut
1
2
3
4
5
6
7
8
9
10
11
12
13
14
15
16
17
18
19
20
21
22
23
24
25
26
27
28
/**
     * @CachePut:既调用方法,又更新缓存数据;同步更新缓存
     * 修改了数据库的某个数据,同时更新缓存;
     * 运行时机:
     *  1、先调用目标方法
     *  2、将目标方法的结果缓存起来
     *
     * 测试步骤:
     *  1、查询1号员工;查到的结果会放在缓存中;
     *          key:1  value:lastName:张三
     *  2、以后查询还是之前的结果
     *  3、更新1号员工;【lastName:zhangsan;gender:0】
     *          将方法的返回值也放进缓存了;
     *          key:传入的employee对象  值:返回的employee对象;
     *  4、查询1号员工?
     *      应该是更新后的员工;
     *          key = "#employee.id":使用传入的参数的员工id;
     *          key = "#result.id":使用返回后的id
     *             @Cacheable的key是不能用#result
     *      为什么是没更新前的?【1号员工没有在缓存中更新】
     *
     */
    @CachePut(/*value = "emp",*/key = "#result.id")
    public Employee updateEmp(Employee employee){
        System.out.println("updateEmp:"+employee);
        employeeMapper.updateEmp(employee);
        return employee;
    }
@CacheEvict:缓存清除
key:指定要清除的数据
allEntries = true:指定清除这个缓存中所有的数据
beforeInvocation = false:缓存的清除是否在方法之前执行
默认代表缓存清除操作是在方法执行之后执行;如果出现异常缓存就不会清除
beforeInvocation = true:
代表清除缓存操作是在方法运行之前执行,无论方法是否出现异常,缓存都清除
1
2
3
4
5
6
@CacheEvict(value="emp",beforeInvocation = true/*key = "#id",*/)
    public void deleteEmp(Integer id){
        System.out.println("deleteEmp:"+id);
        //employeeMapper.deleteEmpById(id);
        int i = 10/0;
    }
- @Caching 定义复杂的缓存规则
1
2
3
4
5
6
7
8
9
10
11
12
13
// @Caching 定义复杂的缓存规则
    @Caching(
         cacheable = {
             @Cacheable(/*value="emp",*/key = "#lastName")
         },
         put = {
             @CachePut(/*value="emp",*/key = "#result.id"),
             @CachePut(/*value="emp",*/key = "#result.email")
         }
    )
    public Employee getEmpByLastName(String lastName){
        return employeeMapper.getEmpByLastName(lastName);
    }
- @CacheConfig:
1
2
3
@CacheConfig(cacheNames="emp"/*,cacheManager = "employeeCacheManager"*/) //抽取缓存的公共配置
@Service
public class EmployeeService {
Redis
- 1:引入spring-boot-starter-data-redis
- 2:application.yml配置redis连接地址
1
2
spring.redis.host=localhost
spring.redis.password=
- 3:使用RestTemplate操作redis
- redisTemplate.opsForValue();//操作字符串
- redisTemplate.opsForHash();//操作hash
- redisTemplate.opsForList();//操作list
- redisTemplate.opsForSet();//操作set
- redisTemplate.opsForZSet();//操作有序set
- 4:以json形式存储对象
1
2
3
4
5
6
7
8
9
10
11
12
13
14
15
16
17
18
19
20
21
22
23
24
25
26
27
28
import com.mikey.cache.bean.Employee;
import org.springframework.context.annotation.Bean;
import org.springframework.context.annotation.Configuration;
import org.springframework.data.redis.connection.RedisConnectionFactory;
import org.springframework.data.redis.core.RedisTemplate;
import org.springframework.data.redis.serializer.Jackson2JsonRedisSerializer;

@Configuration
public class MyRedisConfig {
    @Bean
    public RedisTemplate<Object, Employee> empredisTemplate(
            RedisConnectionFactory redisConnectionFactory) throws Exception{
        RedisTemplate<Object,Employee> template=new RedisTemplate<Object, Employee>();
        template.setConnectionFactory(redisConnectionFactory);
        Jackson2JsonRedisSerializer<Employee> ser=new Jackson2JsonRedisSerializer<Employee>(Employee.class);
        template.setDefaultSerializer(ser);
        return template;
    }

    //配置redis的json格式
    @Bean
    public RedisCacheManager empoyeeCacheManager(RedisTemplate<Object,Employee> employeeRedisTemplate){
        RedisCacheManager redisCacheManager=new RedisCacheManager(employeeRedisTemplate);
        redisCacheManager.setUsePrefix(true);
        return redisCacheManager;
    }
}
1
2
3
4
5
6
7
8
9
10
11
12
13
14
15
16
17
18
19
20
21
22
23
24
25
26
27
28
29
30
31
32
33
34
35
36
37
38
import com.mikey.cache.bean.Employee;
import com.mikey.cache.mapper.EmployeeMapper;
import org.junit.Test;
import org.junit.runner.RunWith;
import org.springframework.beans.factory.annotation.Autowired;
import org.springframework.boot.test.context.SpringBootTest;
import org.springframework.data.redis.core.RedisTemplate;
import org.springframework.data.redis.core.StringRedisTemplate;
import org.springframework.test.context.junit4.SpringRunner;

@RunWith(SpringRunner.class)
@SpringBootTest
public class Springboot01CacheApplicationTests {

    @Autowired
    EmployeeMapper employeeMapper;
    @Autowired
    StringRedisTemplate stringRedisTemplate;//操作字符串
    @Autowired
    RedisTemplate redisTemplate;//k-v都是对象

    @Test
    public void testRedis(){
//        stringRedisTemplate.opsForValue().append("msg","hello");
//        String msg = stringRedisTemplate.opsForValue().get("msg");
//        System.out.println("Message="+msg);
        stringRedisTemplate.opsForList().leftPush("mylist","1");
        stringRedisTemplate.opsForList().leftPush("mylist","2");
    }

    @Test
    public void testObjectRedis(){
        Employee employee=employeeMapper.getEmpById(1);
        redisTemplate.opsForValue().set("emp-01",employee);
    }

}
- 直接使用缓存管理器
1
2
3
4
5
6
7
8
9
10
11
12
13
14
15
16
17
18
19
20
21
22

@RestController
public class DeptController {

    @Autowired
    @Qualifier("deptCacheManager")
    private RedisCacheManager deptCacheManager;

    @Autowired
    private DeptService deptService;

    @GetMapping("/depts/{id}")
    public Department getDeptByIds(@PathVariable("id") Integer id){
        System.out.println("查询部门");
        Department department=deptService.getDeptById(1);

        Cache dept = deptCacheManager.getCache("dept");
        dept.put("dept:1",department);
        return department;
    }

}
二:整合消息队列
JMS
大多应用中,可通过消息服务中间件来提升系统异步通信、扩展解耦能力
消息服务中两个重要概念:消息代理(message broker)和目的地(destination)
当消息发送者发送消息以后,将由消息代理接管,消息代理保证消息传递到指定目的地。
消息队列主要有两种形式的目的地
队列(queue):点对点消息通信(point-to-point)
主题(topic):发布(publish)/订阅(subscribe)消息通信
点对点式:消息发送者发送消息,消息代理将其放入一个队列中,消息接收者从队列中获取消息内容,消息读取后被移出队列,消息只有唯一的发送者和接受者,但并不是说只能有一个接收者
发布订阅式:发送者(发布者)发送消息到主题,多个接收者(订阅者)监听(订阅)这个主题,那么就会在消息到达时同时收到消息
JMS(Java Message Service)JAVA消息服务:基于JVM消息代理的规范。ActiveMQ、HornetMQ是JMS实现
AMQP:高级查询队列协议:高级消息队列协议,也是一个消息代理的规范,兼容JMS。RabbitMQ是AMQP的实现
| JMS | AMQP | |
|---|---|---|
| 定义 | Java api | 网络线级协议 |
| 跨语言 | 否 | 是 |
| 跨平台 | 否 | 是 |
| Model | 提供两种消息模型: (1) 、Peer-2-Peer (2) 、Pub/sub | 提供了五种消息模型: (1) 、direct exchange (2) 、fanout exchange (3) 、topic change (4) 、headers exchange (5) 、system exchange 本质来讲,后四种和JMS的pub/sub模型没有太大差别,仅是在路由机制上做了更详细的划分; |
| 支持消息类型 | 多种消息类型: TextMessage MapMessage BytesMessage StreamMessage ObjectMessage Message (只有消息头和属性) | byte[] 当实际应用时,有复杂的消息,可以将消息序列化后发送。 |
| 综合评价 | JMS 定义了JAVA API层面的标准;在java体系中,多个client均可以通过JMS进行交互,不需要应用修改代码,但是其对跨平台的支持较差; | AMQP定义了wire-level层的协议标准;天然具有跨平台、跨语言特性。 |
Spring支持:
spring-jms提供了对JMS的支持 spring-rabbit提供了对AMQP的支持 需要ConnectionFactory的实现来连接消息代理 提供JmsTemplate、RabbitTemplate来发送消息 @JmsListener(JMS)、@RabbitListener(AMQP)注解在方法上监听消息代理发布的消息 @EnableJms、@EnableRabbit开启支持
Spring Boot自动配置
JmsAutoConfiguration RabbitAutoConfiguration
RabbitMQ
- RabbitMQ是一个由erlang开发的AMQP(Advanved Message Queue Protocol)的开源实现。
- Message:消息,消息是不具名的,它由消息头和消息体组成。消息体是不透明的,而消息头则由一系列的可选属性组成,这些属性包括routing-key(路由键)、priority(相对于其他消息的优先权)、delivery-mode(指出该消息可能需要持久性存储)等。
- Publisher:消息的生产者,也是一个向交换器发布消息的客户端应用程序。
- Exchange:交换器,用来接收生产者发送的消息并将这些消息路由给服务器中的队列。Exchange有4种类型:direct(默认),fanout, topic, 和headers,不同类型的Exchange转发消息的策略有所区别
- Queue:消息队列,用来保存消息直到发送给消费者。它是消息的容器,也是消息的终点。一个消息可投入一个或多个队列。消息一直在队列里面,等待消费者连接到这个队列将其取走。
- Binding:绑定,用于消息队列和交换器之间的关联。一个绑定就是基于路由键将交换器和消息队列连接起来的路由规则,所以可以将交换器理解成一个由绑定构成的路由表。Exchange 和Queue的绑定可以是多对多的关系。
- Connection:网络连接,比如一个TCP连接。
- Channel:信道,多路复用连接中的一条独立的双向数据流通道。信道是建立在真实的TCP连接内的虚拟连接,AMQP 命令都是通过信道发出去的,不管是发布消息、订阅队列还是接收消息,这些动作都是通过信道完成。因为对于操作系统来说建立和销毁 TCP 都是非常昂贵的开销,所以引入了信道的概念,以复用一条 TCP 连接。
- Consumer:消息的消费者,表示一个从消息队列中取得消息的客户端应用程序。
- Broker:表示消息队列服务器实体
整合RabbitMQ
- 引入 spring-boot-starter-amqp
- application.yml配置
- 测试RabbitMQ:账号密码默认为guest
- AmqpAdmin:管理组件
- RabbitTemplate:消息发送处理组件
自动配置
- 1、RabbitAutoConfiguration 2、有自动配置了连接工厂ConnectionFactory; 3、RabbitProperties 封装了 RabbitMQ的配置 4、 RabbitTemplate :给RabbitMQ发送和接受消息; 5、 AmqpAdmin : RabbitMQ系统管理功能组件; AmqpAdmin:创建和删除 Queue,Exchange,Binding 6、@EnableRabbit + @RabbitListener 监听消息队列的内容
- 配置文件
1
2
3
4
5
spring.rabbitmq.addresses=47.106.210.183
spring.rabbitmq.username=guest
spring.rabbitmq.password=guest
#spring.rabbitmq.port=5672//默认5672
#spring.rabbitmq.virtual-host=
- 测试
1
2
3
4
5
6
7
8
9
10
11
12
13
14
15
16
17
18
19
20
21
22
23
24
25
26
27
28
29
30
31
32
33
34
35
36
37
38
39
40
41
42
package com.mikey.springbootamqp;

import org.junit.Test;
import org.junit.runner.RunWith;
import org.springframework.amqp.rabbit.core.RabbitTemplate;
import org.springframework.beans.factory.annotation.Autowired;
import org.springframework.boot.test.context.SpringBootTest;
import org.springframework.test.context.junit4.SpringRunner;

import java.util.Arrays;
import java.util.HashMap;
import java.util.Map;

@RunWith(SpringRunner.class)
@SpringBootTest
public class SpringbootAmqpApplicationTests {
    @Autowired
    private RabbitTemplate rabbitTemplate;

    /**
    *发送消息,点对点模式
    */
    @Test
    public void contextLoads() {
        Map<String,Object> map=new HashMap<>();
        map.put("msg","这是第一个消息");
        map.put("data", Arrays.asList("helloworld",123,true));
		//指定模式,队列名称和数据
        rabbitTemplate.convertAndSend("exchange.direct","atguigu.news",map);

    }

    /**
    *接收消息,点对点模式
    */
    @Test
    public void receive(){
        Object o = rabbitTemplate.receiveAndConvert("atguigu.news");
        System.out.println("数据类型="+o.getClass());
        System.out.println("数据="+o);
    }
}
消息转换器
- 自定义messageconveter(json格式)
1
2
3
4
5
6
7
8
9
10
11
12
13
14
15
16
17
18
19
20
21
package com.mikey.springbootamqp.config;

import org.springframework.amqp.support.converter.Jackson2JsonMessageConverter;
import org.springframework.amqp.support.converter.MessageConverter;
import org.springframework.context.annotation.Bean;
import org.springframework.context.annotation.Configuration;

/**
*RabbitMQ配置类
*/
@Configuration
public class MyAMQPConfig {
    /**
    *注册消息转换器(json格式)
    */
    @Bean
    public MessageConverter messageConverter(){
        return new Jackson2JsonMessageConverter();
    }
}
1
2
3
4
5
6
7
8
9
10
11
12
13
14
15
16
17
18
19
20
21
22
23
24
25
26
27
28
29
30
31
32
33
34
35
36
37
38
39
40
41
42
43
44
45
46
47
48
49
50
51
52
53
54
55
56
57
58
59
60
61
62
63
64
65
66
package com.mikey.springbootamqp;

import com.mikey.springbootamqp.bean.Book;
import org.junit.Test;
import org.junit.runner.RunWith;
import org.springframework.amqp.rabbit.core.RabbitTemplate;
import org.springframework.beans.factory.annotation.Autowired;
import org.springframework.boot.test.context.SpringBootTest;
import org.springframework.test.context.junit4.SpringRunner;

import java.util.Arrays;
import java.util.HashMap;
import java.util.Map;

@RunWith(SpringRunner.class)
@SpringBootTest
public class SpringbootAmqpApplicationTests {
    @Autowired
    private RabbitTemplate rabbitTemplate;

    @Test
    public void contextLoads() {
        Map<String,Object> map=new HashMap<>();
        map.put("msg","这是第一个消息");
        map.put("data", Arrays.asList("helloworld",123,true));

        rabbitTemplate.convertAndSend("exchange.direct","atguigu.news",map);


    }

    @Test
    public void receive(){
        Object o = rabbitTemplate.receiveAndConvert("atguigu.news");
        System.out.println("数据类型="+o.getClass());
        System.out.println("数据="+o);
    }

    /**
     * 发送javaBean
     */
    @Test
    public void testBeanSend(){
        Book book = new Book("阿姆斯特朗", "回旋喷气式加速炮");
        System.out.println("Book="+book);
        rabbitTemplate.convertAndSend("exchange.direct","atguigu.news",book);
    }

    /**
     * 接收对象
     */
    @Test
    public void getBeanSend(){
        Book book = (Book) rabbitTemplate.receiveAndConvert("atguigu.news");
        System.out.println("messsage="+book);
    }

    /**
     * 广播发送
     */
    @Test
    public void sendAll(){
        rabbitTemplate.convertAndSend("exchange.fanout","",new Book("麦奇","麦奇"));
    }
}
消息监听器
- 在springboot启动类上添加开启Rabbit注解
1
2
3
4
5
6
7
@EnableRabbit
@SpringBootApplication
public class MySpringbootApplication{
    public static void main(String[]args){

    }
}
- 编写监听方法
1
2
3
4
5
6
7
8
9
10
@Service
public class BookService{
    /**
    *实时监听,只要消息队列中有消息就取出
    */
    @RabbitListener(queues = "atguigu.news")
    public void receive(Book book){
        System.out.println("收到消息"+book);
    }
}
创建消息队列和交换器
1
2
3
4
5
6
7
8
9
10
11
12
13
14
15
16
17
18
19
20
21
22
23
24
25
26
27
28
29
30
31
32
33
34
35
36
37
38
39
40
41
42
43
44
45
46
47
48
49
50
51
52
53
package com.mikey.springbootamqp;

import com.mikey.springbootamqp.bean.Book;
import org.junit.Test;
import org.junit.runner.RunWith;
import org.springframework.amqp.core.AmqpAdmin;
import org.springframework.amqp.core.Binding;
import org.springframework.amqp.core.DirectExchange;
import org.springframework.amqp.core.Queue;
import org.springframework.amqp.rabbit.core.RabbitTemplate;
import org.springframework.beans.factory.annotation.Autowired;
import org.springframework.boot.test.context.SpringBootTest;
import org.springframework.test.context.junit4.SpringRunner;

import java.util.Arrays;
import java.util.HashMap;
import java.util.Map;

@RunWith(SpringRunner.class)
@SpringBootTest
public class SpringbootAmqpApplicationTests {
    @Autowired
    private RabbitTemplate rabbitTemplate;

    @Autowired
    private AmqpAdmin amqpAdmin;//操作

    /**
     * 添加Exchange
     */
    @Test
    public void createExchange(){
        amqpAdmin.declareExchange(new DirectExchange("amqpadmin.exchange"));
        System.out.println("创建完成");
    }

    /**
     * 添加队列
     */
    @Test
    public void createQueue(){
        amqpAdmin.declareQueue(new Queue("amqpadmin.queue"));
        System.out.println("创建队列成功");
    }

    /**
     * 添加绑定
     */
    @Test
    public void createBinding(){
        amqpAdmin.declareBinding(new Binding("amqpadmin.queue",Binding.DestinationType.QUEUE,"amqpadmin.exchange","ampq.haha",null));
    }
}
三:整合数据检索
ElasticSearch
- 开源的 ElasticSearch 是目前全文搜索引擎的首选。他可以快速的存储、搜索和分析海量数据。
- Spring Boot通过整合Spring Data ElasticSearch为我们提供了非常便捷的检索功能支持;
- Elasticsearch是一个分布式搜索服务,提供Restful API,底层基于Lucene,采用多shard(分片)的方式保证数据安全,并且提供自动resharding的功能,github等大型的站点也是采用了ElasticSearch作为其搜索服务
docker安装
1
2
docker run -e ES_JAVA_OPTS="-Xms256m -Xmx256m" -d -p 9200:9200 -p 9300:9300 --name ES01 5acf0e8da90b
限制堆空间内存,elasticSearch默认占用2G
整合
- 引入spring-boot-starter-data-elasticsearch 安装Spring Data 对应版本的ElasticSearch application.yml配置 Spring Boot自动配置的 ElasticsearchRepository、ElasticsearchTemplate、Jest
1
2
3
4
5
6
7
8
9
10
11
12
13
14
15
16
/**
 * SpringBoot默认支持两种技术来和ES交互;
 * 1、Jest(默认不生效)
 *     需要导入jest的工具包(io.searchbox.client.JestClient)
 * 2、SpringData ElasticSearch【ES版本有可能不合适】
 *         版本适配说明:https://github.com/spring-projects/spring-data-elasticsearch
 *        如果版本不适配:2.4.6
 *            1)、升级SpringBoot版本
 *            2)、安装对应版本的ES
 *
 *         1)、Client 节点信息clusterNodes;clusterName
 *         2)、ElasticsearchTemplate 操作es
 *        3)、编写一个 ElasticsearchRepository 的子接口来操作ES;
 *    两种用法:https://github.com/spring-projects/spring-data-elasticsearch
 *    1)、编写一个 ElasticsearchRepository
 */
- 第一种方式:jest
1
spring.elasticsearch.jest.uris=localhsot:9200
1
2
3
4
5
<dependency>
	<groupId>io.searchbox</groupId>
    <artifactId>jest</artifactId>
    <version>5.3.4</version>
</dependency>
1
2
3
4
5
6
7
8
9
10
11
12
13
14
15
16
17
18
19
20
21
22
23
24
25
26
27
28
29
30
31
32
33
34
35
36
37
38
39
40
41
42
43
44
45
46
47
48
49
50
package com.mikey.springbootelasticsearch;

import com.mikey.springbootelasticsearch.bean.Article;
import io.searchbox.client.JestClient;
import io.searchbox.core.Index;
import io.searchbox.core.Search;
import io.searchbox.core.SearchResult;
import org.junit.Test;
import org.junit.runner.RunWith;
import org.springframework.beans.factory.annotation.Autowired;
import org.springframework.boot.test.context.SpringBootTest;
import org.springframework.test.context.junit4.SpringRunner;

import java.io.IOException;

@RunWith(SpringRunner.class)
@SpringBootTest
public class SpringbootelasticsearchApplicationTests {

    @Autowired
    JestClient jestClient;
    @Test
    public void contextLoads() throws IOException {
        Article article = new Article();
        article.setId(1);
        article.setTitle("ElasticSearch");
        article.setAuthor("阿姆斯特朗炮");
        article.setContent("Hello world");
        Index build = new Index.Builder(article).index("atguigu").type("news").build();//构建一个索引功能
        jestClient.execute(build);
    }

    /**
     * 测试搜索
     */
    @Test
    public void search() throws IOException {
        String json="{\n"+
                "  \"query\" :{\n"+
                "    \"match\" :{\n"+
                "      \"content\" : \"hello\"\n"+
                "       }\n"+
                "      }\n"+
                "}";
        Search build = new Search.Builder(json).addIndex("atguigu").addType("news").build();
        SearchResult execute = jestClient.execute(build);
        System.out.println("Message="+execute.getJsonString());
    }

}
第二种方式:springData
在pom文件中spring-boot-starter-data-elasticsearch
1
2
spring.data.elasticsearch.cluster-name=elasticsearch
spring.data.elasticsearch.cluster-nodes=localhost:9300
- 编写bean
1
2
3
4
5
6
7
8
9
10
11
12
13
14
15
16
17
18
19
20
21
22
23
24
25
26
27
28
29
30
31
32
33
34
35
36
37
38
39
40
41
42
43
package com.mikey.springbootelasticsearch.bean;

import org.springframework.data.elasticsearch.annotations.Document;

@Document(indexName = "atguigu",type = "book")
public class Book {
    private Integer id;
    private String bookName;
    private String author;

    public Integer getId() {
        return id;
    }

    public void setId(Integer id) {
        this.id = id;
    }

    public String getBookName() {
        return bookName;
    }

    public void setBookName(String bookName) {
        this.bookName = bookName;
    }

    public String getAuthor() {
        return author;
    }

    public void setAuthor(String author) {
        this.author = author;
    }

    @Override
    public String toString() {
        return "Book{" +
                "id=" + id +
                ", bookName='" + bookName + '\'' +
                ", author='" + author + '\'' +
                '}';
    }
}
- 编写接口
1
2
3
4
5
6
7
8
9
10
11
12
13
14
15
package com.atguigu.elastic.repository;

import com.atguigu.elastic.bean.Book;
import org.springframework.data.elasticsearch.repository.ElasticsearchRepository;

import java.util.List;


public interface BookRepository extends ElasticsearchRepository<Book,Integer> {

    //参照
    // https://docs.spring.io/spring-data/elasticsearch/docs/3.0.6.RELEASE/reference/html/
   public List<Book> findByBookNameLike(String bookName);

}
- 测试
1
2
3
4
5
6
7
8
9
10
11
12
13
14
15
16
17
18
19
20
21
22
23
24
25
26
27
@RunWith(SpringRunner.class)
@SpringBootTest
public class Springboot03ElasticApplicationTests {

    @Autowired
    JestClient jestClient;

    @Autowired
    BookRepository bookRepository;

    @Test
    public void test02(){
//        Book book = new Book();
//        book.setId(1);
//        book.setBookName("西游记");
//        book.setAuthor("吴承恩");
//        bookRepository.index(book);


        for (Book book : bookRepository.findByBookNameLike("游")) {
            System.out.println(book);
        }
        ;

    }

}
- 注意:要选择对应的版本不然会报连接超时异常:参考文档
四、整合消息推送
邮件
- 邮件发送需要引入spring-boot-starter-mail
- Spring Boot 自动配置MailSenderAutoConfiguration
- 定义MailProperties内容,配置在application.yml中
- 自动装配JavaMailSender
- 添加依赖
1
2
3
4
<dependency>
	<groupId>org.springframework.boot</groupId>
    <artifactId>spring-boot-starter-mail</artifactId>
</dependency>
- 添加配置
1
2
3
4
spring.mail.username=xxxxx@qq.com
spring.mail.password=xxxx
spring.mail.host=smtp.qq.com
spring.mail.properties.mail.smtp.ssl.enable=true
- 测试
1
2
3
4
5
6
7
8
9
10
11
12
13
14
15
16
17
18
19
20
21
22
23
24
25
26
27
28
29
30
31
32
33
34
35
36
37
38
39
40
41
42
43
44
45
46
47
48
49
50
51
52
53
54
55
56
package com.atguigu.task;

import org.junit.Test;
import org.junit.runner.RunWith;
import org.springframework.beans.factory.annotation.Autowired;
import org.springframework.boot.test.context.SpringBootTest;
import org.springframework.mail.SimpleMailMessage;
import org.springframework.mail.javamail.JavaMailSenderImpl;
import org.springframework.mail.javamail.MimeMessageHelper;
import org.springframework.test.context.junit4.SpringRunner;

import javax.mail.internet.MimeMessage;
import java.io.File;

@RunWith(SpringRunner.class)
@SpringBootTest
public class Springboot04TaskApplicationTests {

    @Autowired
    JavaMailSenderImpl mailSender;

    @Test
    public void contextLoads() {
        SimpleMailMessage message = new SimpleMailMessage();
        //邮件设置
        message.setSubject("通知-今晚开会");
        message.setText("今晚7:30开会");

        message.setTo("17512080612@163.com");
        message.setFrom("534096094@qq.com");

        mailSender.send(message);
    }

    @Test
    public void test02() throws  Exception{
        //1、创建一个复杂的消息邮件
        MimeMessage mimeMessage = mailSender.createMimeMessage();
        MimeMessageHelper helper = new MimeMessageHelper(mimeMessage, true);

        //邮件设置
        helper.setSubject("通知-今晚开会");
        helper.setText("<b style='color:red'>今天 7:30 开会</b>",true);

        helper.setTo("17512080612@163.com");
        helper.setFrom("534096094@qq.com");

        //上传文件
        helper.addAttachment("1.jpg",new File("C:\\Users\\lfy\\Pictures\\Saved Pictures\\1.jpg"));
        helper.addAttachment("2.jpg",new File("C:\\Users\\lfy\\Pictures\\Saved Pictures\\2.jpg"));

        mailSender.send(mimeMessage);

    }

}
五:整合安全框架
- 两大安全框架:shiro,SpringSecutity
SpringSecurity
Spring Security是针对Spring项目的安全框架,也是Spring Boot底层安全模块默认的技术选型。他可以实现强大的web安全控制。对于安全控制,我们仅需引入spring-boot-starter-security模块,进行少量的配置,即可实现强大的安全管理。
WebSecurityConfigurerAdapter:自定义Security策略
AuthenticationManagerBuilder:自定义认证策略
@EnableWebSecurity:开启WebSecurity模式
应用程序的两个主要区域是“认证”和“授权”(或者访问控制)。这两个主要区域是Spring Security 的两个目标。
“认证”(Authentication),是建立一个他声明的主体的过程(一个“主体”一般是指用户,设备或一些可以在你的应用程序中执行动作的其他系统)。
“授权”(Authorization)指确定一个主体是否允许在你的应用程序执行一个动作的过程。为了抵达需要授权的店,主体的身份已经有认证过程建立。
Web&安全
- 登陆/注销
- HttpSecurity配置登陆、注销功能
- Thymeleaf提供的SpringSecurity标签支持
- 需要引入thymeleaf-extras-springsecurity4
- sec:authentication=“name”获得当前用户的用户名
- sec:authorize=“hasRole(‘ADMIN’)”当前用户必须拥有ADMIN权限时才会显示标签内容
- 记住我功能
- 表单添加remember-me的checkbox
- 配置启用remember-me功能
- CSRF(Cross-site request forgery)跨站请求伪造
- HttpSecurity启用csrf功能,会为表单添加_csrf的值,提交携带来预防CSRF;
初始化向导创建项目
1
2
3
4
5
6
7
8
9
10
11
12
13
14
15
16
17
18
19
20
21
22
23
24
25
26
27
28
29
30
31
32
33
34
35
36
37
38
39
40
41
42
43
44
45
46
47
48
49
50
51
52
53
54
55
56
57
58
59
60
61
62
63
64
65
<?xml version="1.0" encoding="UTF-8"?>
<project xmlns="http://maven.apache.org/POM/4.0.0" xmlns:xsi="http://www.w3.org/2001/XMLSchema-instance"
         xsi:schemaLocation="http://maven.apache.org/POM/4.0.0 http://maven.apache.org/xsd/maven-4.0.0.xsd">
    <modelVersion>4.0.0</modelVersion>

    <groupId>com.mikey</groupId>
    <artifactId>springboot-security</artifactId>
    <version>0.0.1-SNAPSHOT</version>
    <packaging>jar</packaging>

    <name>springboot-security</name>
    <description>Demo project for Spring Boot</description>

    <parent>
        <groupId>org.springframework.boot</groupId>
        <artifactId>spring-boot-starter-parent</artifactId>
        <version>1.5.17.RELEASE</version>
        <relativePath/> <!-- lookup parent from repository -->
    </parent>

    <properties>
        <project.build.sourceEncoding>UTF-8</project.build.sourceEncoding>
        <project.reporting.outputEncoding>UTF-8</project.reporting.outputEncoding>
        <java.version>1.8</java.version>
        <thymeleaf.version>3.0.9.RELEASE</thymeleaf.version>
        <thymeleaf-layout-dialect.version>2.3.0</thymeleaf-layout-dialect.version>
        <thymeleaf-extras-springsecurity4.version>3.0.2.RELEASE</thymeleaf-extras-springsecurity4.version>
    </properties>

    <dependencies>
        <dependency>
            <groupId>org.thymeleaf.extras</groupId>
            <artifactId>thymeleaf-extras-springsecurity4</artifactId>
        </dependency>
        <dependency>
            <groupId>org.springframework.boot</groupId>
            <artifactId>spring-boot-starter-security</artifactId>
        </dependency>
        <dependency>
            <groupId>org.springframework.boot</groupId>
            <artifactId>spring-boot-starter-thymeleaf</artifactId>
        </dependency>
        <dependency>
            <groupId>org.springframework.boot</groupId>
            <artifactId>spring-boot-starter-web</artifactId>
        </dependency>

        <dependency>
            <groupId>org.springframework.boot</groupId>
            <artifactId>spring-boot-starter-test</artifactId>
            <scope>test</scope>
        </dependency>
    </dependencies>

    <build>
        <plugins>
            <plugin>
                <groupId>org.springframework.boot</groupId>
                <artifactId>spring-boot-maven-plugin</artifactId>
            </plugin>
        </plugins>
    </build>


</project>
- 编写配置类
1
2
3
4
5
6
7
8
9
10
11
12
13
14
15
16
17
18
19
20
1、引入SpringSecurity;
2、编写SpringSecurity的配置类;
        @EnableWebSecurity   extends WebSecurityConfigurerAdapter
3、控制请求的访问权限:
        configure(HttpSecurity http) {
             http.authorizeRequests().antMatchers("/").permitAll()
                 .antMatchers("/level1/**").hasRole("VIP1")
        }
4、定义认证规则:
        configure(AuthenticationManagerBuilder auth){
             auth.inMemoryAuthentication()
                 .withUser("zhangsan").password("123456").roles("VIP1","VIP2")
        }
5、开启自动配置的登陆功能:
        configure(HttpSecurity http){
             http.formLogin();
        }
6、注销:http.logout();
7、记住我:Remeberme();
1
2
3
4
5
6
7
8
9
10
11
12
13
14
15
16
17
18
19
20
21
22
23
24
25
26
27
28
29
30
31
32
33
34
35
36
37
38
39
40
41
42
43
44
45
46
47
48
49
50
51
52
53
import org.springframework.security.config.annotation.authentication.builders.AuthenticationManagerBuilder;
import org.springframework.security.config.annotation.web.builders.HttpSecurity;
import org.springframework.security.config.annotation.web.configuration.EnableWebSecurity;
import org.springframework.security.config.annotation.web.configuration.WebSecurityConfigurerAdapter;

@EnableWebSecurity
public class MySecurityConfig extends WebSecurityConfigurerAdapter {

    @Override
    protected void configure(HttpSecurity http) throws Exception {
        //super.configure(http);
        //定制请求的授权规则
        http.authorizeRequests().antMatchers("/").permitAll()
                .antMatchers("/level1/**").hasRole("VIP1")
                .antMatchers("/level2/**").hasRole("VIP2")
                .antMatchers("/level3/**").hasRole("VIP3");

        //开启自动配置的登陆功能,效果,如果没有登陆,没有权限就会来到登陆页面
        //指定登录界面的访问路径为/userlogin,用户名输入框名字为user,密码输入框名字为pwd
        http.formLogin().usernameParameter("user").passwordParameter("pwd")
                .loginPage("/userlogin");
        //1、/login来到登陆页
        //2、重定向到/login?error表示登陆失败
        //3、更多详细规定
        //4、默认post形式的 /login代表处理登陆
        //5、一但定制loginPage;那么 loginPage的post请求就是登陆。比如这里我们自定义的访问登录界面的路径是/userlogin,那么在form表单中发送的action请求就是post的/userlogin请求


        //开启自动配置的注销功能。
        http.logout().logoutSuccessUrl("/");//注销成功以后来到首页
        //1、访问 /logout 表示用户注销,清空session
        //2、注销成功会返回 /login?logout 页面;

        //开启记住我功能
        http.rememberMe().rememberMeParameter("remeber");
        //登陆成功以后,将cookie发给浏览器保存,以后访问页面带上这个cookie,只要通过检查就可以免登录
        //点击注销会删除cookie

    }

    //定义认证规则
    @Override
    protected void configure(AuthenticationManagerBuilder auth) throws Exception {
        //super.configure(auth);
        auth.inMemoryAuthentication()
                .withUser("zhangsan").password("123456").roles("VIP1","VIP2")
                .and()
                .withUser("lisi").password("123456").roles("VIP2","VIP3")
                .and()
                .withUser("wangwu").password("123456").roles("VIP1","VIP3");

    }
}
- 视图页面
1
2
3
4
5
6
7
8
9
10
11
12
13
14
15
16
17
18
19
20
21
22
23
24
25
26
27
28
29
30
31
32
33
34
35
36
37
38
39
40
41
42
43
44
45
46
47
48
49
50
51
52
53
54
<!DOCTYPE html>
<html xmlns:th="http://www.thymeleaf.org"
      xmlns:sec="http://www.thymeleaf.org/thymeleaf-extras-springsecurity4">
<head>
<meta http-equiv="Content-Type" content="text/html; charset=UTF-8">
<title>Insert title here</title>
</head>
<body>
<h1 align="center">欢迎光临武林秘籍管理系统</h1>
<div sec:authorize="!isAuthenticated()">
    <h2 align="center">游客您好,如果想查看武林秘籍 <a th:href="@{/userlogin}">请登录</a></h2>
</div>
<div sec:authorize="isAuthenticated()">
    <h2><span sec:authentication="name"></span>,您好,您的角色有:
        <span sec:authentication="principal.authorities"></span></h2>
    <form th:action="@{/logout}" method="post">
        <input type="submit" value="注销"/>
    </form>
</div>

<hr>

<div sec:authorize="hasRole('VIP1')">
    <h3>普通武功秘籍</h3>
    <ul>
        <li><a th:href="@{/level1/1}">罗汉拳</a></li>
        <li><a th:href="@{/level1/2}">武当长拳</a></li>
        <li><a th:href="@{/level1/3}">全真剑法</a></li>
    </ul>

</div>

<div sec:authorize="hasRole('VIP2')">
    <h3>高级武功秘籍</h3>
    <ul>
        <li><a th:href="@{/level2/1}">太极拳</a></li>
        <li><a th:href="@{/level2/2}">七伤拳</a></li>
        <li><a th:href="@{/level2/3}">梯云纵</a></li>
    </ul>

</div>

<div sec:authorize="hasRole('VIP3')">
    <h3>绝世武功秘籍</h3>
    <ul>
        <li><a th:href="@{/level3/1}">葵花宝典</a></li>
        <li><a th:href="@{/level3/2}">龟派气功</a></li>
        <li><a th:href="@{/level3/3}">独孤九剑</a></li>
    </ul>
</div>


</body>
</html>
- 注意:记住我功能出现报错:org.xml.sax.SAXParseException原因是模板引擎版本过低,解决办法是更换新版本的themleaf。
六:整合分布式组件
- 在分布式系统中,国内常用zookeeper+dubbo组合,而Spring Boot推荐使用全栈的Spring,Spring Boot+Spring Cloud。
- 当网站流量很小时,只需一个应用,将所有功能都部署在一起,以减少部署节点和成本。此时,用于简化增删改查工作量的数据访问框架(ORM)是关键。
- 当访问量逐渐增大,单一应用增加机器带来的加速度越来越小,将应用拆成互不相干的几个应用,以提升效率。此时,用于加速前端页面开发的Web框架(MVC)是关键。
- 当垂直应用越来越多,应用之间交互不可避免,将核心业务抽取出来,作为独立的服务,逐渐形成稳定的服务中心,使前端应用能更快速的响应多变的市场需求。此时,用于提高业务复用及整合的分布式服务框架(RPC)是关键。
- 当服务越来越多,容量的评估,小服务资源的浪费等问题逐渐显现,此时需增加一个调度中心基于访问压力实时管理集群容量,提高集群利用率。此时,用于提高机器利用率的资源调度和治理中心(SOA)是关键
- ZooKeeper 是一个分布式的,开放源码的分布式应用程序协调服务。它是一个为分布式应用提供一致性服务的软件,提供的功能包括:配置维护、域名服务、分布式同步、组服务等。
- Dubbo是Alibaba开源的分布式服务框架,它最大的特点是按照分层的方式来架构,使用这种方式可以使各个层之间解耦合(或者最大限度地松耦合)。从服务模型的角度来看,Dubbo采用的是一种非常简单的模型,要么是提供方提供服务,要么是消费方消费服务,所以基于这一点可以抽象出服务提供方(Provider)和服务消费方(Consumer)两个角色。
ZooKeeper+Dubbo
- 实现步骤:
- 1、安装zookeeper作为注册中心
- 2、编写服务提供者
- 3、编写服务消费者
- 4、整合dubbo
- 消费者实现:
1
2
3
4
5
6
7
8
9
10
11
12
13
14
15
16
17
18
19
20
21
22
23
24
25
26
27
28
29
30
31
32
33
34
35
36
37
38
39
40
41
42
43
44
45
46
47
48
49
50
51
52
53
54
55
56
57
58
59
60
61
62
63
64
65
<?xml version="1.0" encoding="UTF-8"?>
<project xmlns="http://maven.apache.org/POM/4.0.0" xmlns:xsi="http://www.w3.org/2001/XMLSchema-instance"
    xsi:schemaLocation="http://maven.apache.org/POM/4.0.0 http://maven.apache.org/xsd/maven-4.0.0.xsd">
    <modelVersion>4.0.0</modelVersion>

    <groupId>com.atguigu</groupId>
    <artifactId>consumer-user</artifactId>
    <version>0.0.1-SNAPSHOT</version>
    <packaging>jar</packaging>

    <name>consumer-user</name>
    <description>Demo project for Spring Boot</description>

    <parent>
        <groupId>org.springframework.boot</groupId>
        <artifactId>spring-boot-starter-parent</artifactId>
        <version>1.5.12.RELEASE</version>
        <relativePath/> <!-- lookup parent from repository -->
    </parent>

    <properties>
        <project.build.sourceEncoding>UTF-8</project.build.sourceEncoding>
        <project.reporting.outputEncoding>UTF-8</project.reporting.outputEncoding>
        <java.version>1.8</java.version>
    </properties>

    <dependencies>
        <dependency>
            <groupId>org.springframework.boot</groupId>
            <artifactId>spring-boot-starter-web</artifactId>
        </dependency>

        <dependency>
            <groupId>com.alibaba.boot</groupId>
            <artifactId>dubbo-spring-boot-starter</artifactId>
            <version>0.1.0</version>
        </dependency>

        <!--引入zookeeper的客户端工具-->
        <!-- https://mvnrepository.com/artifact/com.github.sgroschupf/zkclient -->
        <dependency>
            <groupId>com.github.sgroschupf</groupId>
            <artifactId>zkclient</artifactId>
            <version>0.1</version>
        </dependency>


        <dependency>
            <groupId>org.springframework.boot</groupId>
            <artifactId>spring-boot-starter-test</artifactId>
            <scope>test</scope>
        </dependency>
    </dependencies>

    <build>
        <plugins>
            <plugin>
                <groupId>org.springframework.boot</groupId>
                <artifactId>spring-boot-maven-plugin</artifactId>
            </plugin>
        </plugins>
    </build>


</project>
1
2
3
dubbo.application.name=consumer-user

dubbo.registry.address=zookeeper://118.24.44.169:2181
1
2
3
4
5
6
7
8
9
10
11
12
13
14
15
16
17
package com.atguigu.user;

import org.springframework.boot.SpringApplication;
import org.springframework.boot.autoconfigure.SpringBootApplication;

/**
 * 1、引入依赖‘
 * 2、配置dubbo的注册中心地址
 * 3、引用服务
 */
@SpringBootApplication
public class ConsumerUserApplication {

    public static void main(String[] args) {
        SpringApplication.run(ConsumerUserApplication.class, args);
    }
}
1
2
3
4
5
6
7
8
9
10
11
12
13
14
15
16
17
18
19
20
package com.atguigu.user.service;


import com.alibaba.dubbo.config.annotation.Reference;
import com.atguigu.ticket.service.TicketService;
import org.springframework.stereotype.Service;

@Service//Spring的service
public class UserService{

    @Reference//注意两个工程的全类名相同
    TicketService ticketService;

    public void hello(){
        String ticket = ticketService.getTicket();
        System.out.println("买到票了:"+ticket);
    }


}
1
2
3
4
5
6
7
8
package com.atguigu.ticket.service;
/**
*传递接口
*/
public interface TicketService {

    public String getTicket();
}
1
2
3
4
5
6
7
8
9
10
11
12
13
14
15
16
17
18
19
20
21
22
23
package com.atguigu.user;

import com.atguigu.user.service.UserService;
import org.junit.Test;
import org.junit.runner.RunWith;
import org.springframework.beans.factory.annotation.Autowired;
import org.springframework.boot.test.context.SpringBootTest;
import org.springframework.test.context.junit4.SpringRunner;

@RunWith(SpringRunner.class)
@SpringBootTest
public class ConsumerUserApplicationTests {

    @Autowired
    UserService userService;

    @Test
    public void contextLoads() {

        userService.hello();
    }

}
- 提供者编写,pom文件同消费者
1
2
3
4
5
dubbo.application.name=provider-ticket

dubbo.registry.address=zookeeper://118.24.44.169:2181
# 指明提供服务的类所在的包
dubbo.scan.base-packages=com.atguigu.ticket.service
1
2
3
4
5
6
7
8
9
10
11
12
13
14
15
16
17
18
package com.atguigu.ticket;

import org.springframework.boot.SpringApplication;
import org.springframework.boot.autoconfigure.SpringBootApplication;

/**
 * 1、将服务提供者注册到注册中心
 *         1、引入dubbo和zkclient相关依赖
 *         2、配置dubbo的扫描包和注册中心地址
 *         3、使用@Service发布服务
 */
@SpringBootApplication
public class ProviderTicketApplication {

    public static void main(String[] args) {
        SpringApplication.run(ProviderTicketApplication.class, args);
    }
}
1
2
3
4
5
6
7
8
package com.atguigu.ticket.service;
/**
*服务接口
*/
public interface TicketService {

    public String getTicket();
}
1
2
3
4
5
6
7
8
9
10
11
12
13
14
15
16
package com.atguigu.ticket.service;

import com.alibaba.dubbo.config.annotation.Service;
import org.springframework.stereotype.Component;

/**
*提供服务的类
*/
@Component
@Service //将服务发布出去,是dubbo的service
public class TicketServiceImpl implements TicketService {
    @Override
    public String getTicket() {
        return "《厉害了,我的国》";
    }
}
springCloud
Spring Cloud是一个分布式的整体解决方案。Spring Cloud 为开发者提供了在分布式系统(配置管理,服务发现,熔断,路由,微代理,控制总线,一次性token,全局琐,leader选举,分布式session,集群状态)中快速构建的工具,使用Spring Cloud的开发者可以快速的启动服务或构建应用、同时能够快速和云平台资源进行对接。
SpringCloud分布式开发五大常用组件:
- 服务发现——Netflix Eureka
- 客服端负载均衡——Netflix Ribbon
- 断路器——Netflix Hystrix
- 服务网关——Netflix Zuul
- 分布式配置——Spring Cloud Config
Spring Cloud 入门 1、创建provider 2、创建consumer 3、引入Spring Cloud 4、引入Eureka注册中心 5、引入Ribbon进行客户端负载均衡
目录结构:
consumer-user
eureka-server
provide-ticket
1.创建服务中心:eureka-server 选择服务模块cloud Discovery—》Eureka Server
1
2
3
4
5
6
7
8
9
10
11
12
13
14
15
16
17
18
19
20
21
22
23
24
25
26
27
28
29
30
31
32
33
34
35
36
37
38
39
40
41
42
43
44
45
46
47
48
49
50
51
52
53
54
55
56
57
58
59
60
61
62
63
64
<?xml version="1.0" encoding="UTF-8"?>
<project xmlns="http://maven.apache.org/POM/4.0.0" xmlns:xsi="http://www.w3.org/2001/XMLSchema-instance"
	xsi:schemaLocation="http://maven.apache.org/POM/4.0.0 http://maven.apache.org/xsd/maven-4.0.0.xsd">
	<modelVersion>4.0.0</modelVersion>

	<groupId>com.atguigu</groupId>
	<artifactId>eureka-server</artifactId>
	<version>0.0.1-SNAPSHOT</version>
	<packaging>jar</packaging>

	<name>eureka-server</name>
	<description>Demo project for Spring Boot</description>

	<parent>
		<groupId>org.springframework.boot</groupId>
		<artifactId>spring-boot-starter-parent</artifactId>
		<version>1.5.12.RELEASE</version>
		<relativePath/> <!-- lookup parent from repository -->
	</parent>

	<properties>
		<project.build.sourceEncoding>UTF-8</project.build.sourceEncoding>
		<project.reporting.outputEncoding>UTF-8</project.reporting.outputEncoding>
		<java.version>1.8</java.version>
		<spring-cloud.version>Edgware.SR3</spring-cloud.version>
	</properties>

	<dependencies>
		<dependency>
			<groupId>org.springframework.cloud</groupId>
			<artifactId>spring-cloud-starter-eureka-server</artifactId>
		</dependency>

		<dependency>
			<groupId>org.springframework.boot</groupId>
			<artifactId>spring-boot-starter-test</artifactId>
			<scope>test</scope>
		</dependency>
	</dependencies>

	<dependencyManagement>
		<dependencies>
			<dependency>
				<groupId>org.springframework.cloud</groupId>
				<artifactId>spring-cloud-dependencies</artifactId>
				<version>${spring-cloud.version}</version>
				<type>pom</type>
				<scope>import</scope>
			</dependency>
		</dependencies>
	</dependencyManagement>

	<build>
		<plugins>
			<plugin>
				<groupId>org.springframework.boot</groupId>
				<artifactId>spring-boot-maven-plugin</artifactId>
			</plugin>
		</plugins>
	</build>


</project>
1
2
3
4
5
6
7
8
9
10
server:
  port: 8761
eureka:
  instance:
    hostname: eureka-server  # eureka实例的主机名
  client:
    register-with-eureka: false #不把自己注册到eureka上
    fetch-registry: false #不从eureka上来获取服务的注册信息
    service-url:
      defaultZone: http://localhost:8761/eureka/
1
2
3
4
5
6
7
8
9
10
11
12
13
/**
*注册中心
*1.配置Eureka信息
*2.使用@EnableEurekaServer
*/
@EnableEurekaServer
@SpringBootApplication
public class EurekaServerApplication {

    public static void main(String[] args) {
        SpringApplication.run(EurekaServerApplication.class, args);
    }
}
- 2.新建provider-ticket 的model
1
2
3
4
5
6
7
8
9
10
11
12
13
14
15
16
17
18
19
20
21
22
23
24
25
26
27
28
29
30
31
32
33
34
35
36
37
38
39
40
41
42
43
44
45
46
47
48
49
50
51
52
53
54
55
56
57
58
59
60
61
62
63
64
<?xml version="1.0" encoding="UTF-8"?>
<project xmlns="http://maven.apache.org/POM/4.0.0" xmlns:xsi="http://www.w3.org/2001/XMLSchema-instance"
	xsi:schemaLocation="http://maven.apache.org/POM/4.0.0 http://maven.apache.org/xsd/maven-4.0.0.xsd">
	<modelVersion>4.0.0</modelVersion>

	<groupId>com.atguigu</groupId>
	<artifactId>provider-ticket</artifactId>
	<version>0.0.1-SNAPSHOT</version>
	<packaging>jar</packaging>

	<name>provider-ticket</name>
	<description>Demo project for Spring Boot</description>

	<parent>
		<groupId>org.springframework.boot</groupId>
		<artifactId>spring-boot-starter-parent</artifactId>
		<version>1.5.12.RELEASE</version>
		<relativePath/> <!-- lookup parent from repository -->
	</parent>

	<properties>
		<project.build.sourceEncoding>UTF-8</project.build.sourceEncoding>
		<project.reporting.outputEncoding>UTF-8</project.reporting.outputEncoding>
		<java.version>1.8</java.version>
		<spring-cloud.version>Edgware.SR3</spring-cloud.version>
	</properties>

	<dependencies>
		<dependency>
			<groupId>org.springframework.cloud</groupId>
			<artifactId>spring-cloud-starter-eureka</artifactId>
		</dependency>

		<dependency>
			<groupId>org.springframework.boot</groupId>
			<artifactId>spring-boot-starter-test</artifactId>
			<scope>test</scope>
		</dependency>
	</dependencies>

	<dependencyManagement>
		<dependencies>
			<dependency>
				<groupId>org.springframework.cloud</groupId>
				<artifactId>spring-cloud-dependencies</artifactId>
				<version>${spring-cloud.version}</version>
				<type>pom</type>
				<scope>import</scope>
			</dependency>
		</dependencies>
	</dependencyManagement>

	<build>
		<plugins>
			<plugin>
				<groupId>org.springframework.boot</groupId>
				<artifactId>spring-boot-maven-plugin</artifactId>
			</plugin>
		</plugins>
	</build>


</project>
1
2
3
4
5
6
7
8
9
10
11
12
13
14
server:
  port: 8002
spring:
  application:
    name: provider-ticket


eureka:
  instance:
    prefer-ip-address: true # 注册服务的时候使用服务的ip地址
  client:
    service-url:
      defaultZone: http://localhost:8761/eureka/
1
2
3
4
5
6
7
8
9
10
11
12
package com.atguigu.providerticket;

import org.springframework.boot.SpringApplication;
import org.springframework.boot.autoconfigure.SpringBootApplication;

@SpringBootApplication
public class ProviderTicketApplication {

    public static void main(String[] args) {
        SpringApplication.run(ProviderTicketApplication.class, args);
    }
}
1
2
3
4
5
6
7
8
9
10
11
12
package com.atguigu.providerticket.service;

import org.springframework.stereotype.Service;

@Service
public class TicketService {

    public String getTicket(){
        System.out.println("8002");
        return "《厉害了,我的国》";
    }
}
1
2
3
4
5
6
7
8
9
10
11
12
13
14
15
16
17
18
19
package com.atguigu.providerticket.controller;

import com.atguigu.providerticket.service.TicketService;
import org.springframework.beans.factory.annotation.Autowired;
import org.springframework.web.bind.annotation.GetMapping;
import org.springframework.web.bind.annotation.RestController;

@RestController
public class TicketController {


    @Autowired
    TicketService ticketService;

    @GetMapping("/ticket")
    public String getTicket(){
        return ticketService.getTicket();
    }
}
- 3.新建model consumer-user
1
2
3
4
5
6
7
8
9
10
11
12
spring:
  application:
    name: consumer-user
server:
  port: 8200

eureka:
  instance:
    prefer-ip-address: true # 注册服务的时候使用服务的ip地址
  client:
    service-url:
      defaultZone: http://localhost:8761/eureka/
1
2
3
4
5
6
7
8
9
10
11
12
13
14
15
16
17
18
19
20
21
22
23
24
package com.atguigu.consumeruser;

import org.springframework.boot.SpringApplication;
import org.springframework.boot.autoconfigure.SpringBootApplication;
import org.springframework.cloud.client.discovery.EnableDiscoveryClient;
import org.springframework.cloud.client.loadbalancer.LoadBalanced;
import org.springframework.context.annotation.Bean;
import org.springframework.web.client.RestTemplate;

@EnableDiscoveryClient //开启发现服务功能
@SpringBootApplication
public class ConsumerUserApplication {

    public static void main(String[] args) {
        SpringApplication.run(ConsumerUserApplication.class, args);
    }

    //注册模板来访问其他服务器
    @LoadBalanced //使用负载均衡机制
    @Bean
    public RestTemplate restTemplate(){
        return new RestTemplate();
    }
}
1
2
3
4
5
6
7
8
9
10
11
12
13
14
15
16
17
18
19
20
package com.atguigu.consumeruser.controller;

import org.springframework.beans.factory.annotation.Autowired;
import org.springframework.web.bind.annotation.GetMapping;
import org.springframework.web.bind.annotation.RestController;
import org.springframework.web.client.RestTemplate;

@RestController
public class UserController {

    @Autowired
    RestTemplate restTemplate;

    @GetMapping("/buy")
    public String buyTicket(String name){
        //通过RestTemplate来调用远程服务器PROVIDER-TICKET的/ticket接口来获取数据
        String s = restTemplate.getForObject("http://PROVIDER-TICKET/ticket", String.class);
        return name+"购买了"+s;
    }
}