Python3基础
第一篇:Python基础
注释
以 # 开头,# 右边的所有东西都被当做说明文字,而不是真正要执行的程序,只起到辅助说明作用
要在 Python 程序中使用多行注释,可以用 一对 连续的 三个 引号(单引号和双引号都可以)
变量
在 Python 中,每个变量 在使用前都必须赋值,变量 赋值以后 该变量 才会被创建
等号(=)用来给变量赋值
=左边是一个变量名
=右边是存储在变量中的值
变量的命名
标示符可以由 字母、下划线 和 数字 组成
不能以数字开头
- 不能与关键字重名
Python中的 标识符 是 区分大小写的- 在
Python中,如果 变量名 需要由 二个 或 多个单词 组成时,可以按照以下方式命名
- 每个单词都使用小写字母
- 单词与单词之间使用
_下划线连接;first_name、last_name
- 还可以使用驼峰命名法
demo
1
2
3
4
5
6
7
8
9
# 定义 qq 号码变量
qq_number = "1234567"

# 定义 qq 密码变量
qq_password = "123"

# 在程序中,如果要输出变量的内容,需要使用 print 函数
print(qq_number)
print(qq_password)
变量的类型
- 在
Python中定义变量是 不需要指定类型(在其他很多高级语言中都需要) - 数据类型可以分为 数字型 和 非数字型
- 数字型
- 整型 (
int)
- 整型 (
- 浮点型(
float)
- 浮点型(
- 布尔型(
bool)
- 布尔型(
- 真
True非 0 数—— 非零即真
- 真
- 假
False0
- 假
- 复数型 (
complex)
- 复数型 (
- 主要用于科学计算,例如:平面场问题、波动问题、电感电容等问题
- 非数字型
- 字符串
- 列表
- 元组
- 字典
- 使用
type函数可以查看一个变量的类型
变量的格式化输出
在 Python 中可以使用
print函数将信息输出到控制台如果希望输出文字信息的同时,一起输出 数据,就需要使用到 格式化操作符
%被称为 格式化操作符,专门用于处理字符串中的格式- 包含
%的字符串,被称为 格式化字符串
- 包含
%和不同的 字符 连用,不同类型的数据 需要使用 不同的格式化字符
| 格式化字符 | 含义 |
|---|---|
| %s | 字符串 |
| %d | 有符号十进制整数,%06d 表示输出的整数显示位数,不足的地方使用 0 补全 |
| %f | 浮点数,%.2f 表示小数点后只显示两位 |
| %% | 输出 % |
代码演示
1
2
3
4
5
6
7
8
9
10
11
12
13
14
15
16
17
18
19
20
21
22
print("我的名字叫 %s,请多多关照!" % name)
print("我的学号是 %06d" % student_no)
print("苹果单价 %.02f 元/斤,购买 %.02f 斤,需要支付 %.02f 元" % (price, weight, money))
print("数据比例是 %.02f%%" % (scale * 100))

"""
在控制台依次提示用户输入:姓名、公司、职位、电话、电子邮箱
"""
name = input("请输入姓名:")
company = input("请输入公司:")
title = input("请输入职位:")
phone = input("请输入电话:")
email = input("请输入邮箱:")

print("*" * 50)
print(company)
print()
print("%s (%s)" % (name, title))
print()
print("电话:%s" % phone)
print("邮箱:%s" % email)
print("*" * 50)
- 在
Python中,所有 非数字型变量 都支持以下特点:
- 都是一个 序列
sequence,也可以理解为 容器 - 取值
[] - 遍历
for in - 计算长度、最大/最小值、比较、删除
- 链接
+和 重复* - 切片
- 都是一个 序列
基本数据类型
Number数字
整数int(不可变,值类型)
浮点数float
一个斜杠是除;两个斜杠是整除,只保留整数位
1
2
3
4
5
6
7
8
9
10
11
12
13
14
15
16
17
18
19
20
21
22
23
24
>>> type(1)
<class 'int'>
>>> type(-1)
<class 'int'>
>>> type(1.1)
<class 'float'>
>>> type(1.12)
<class 'float'>
>>> 1+0.1
1.1
>>> type(1+0.1)
<class 'float'>
>>> type(1+1)
<class 'int'>
>>> type(1+1.0)
<class 'float'>
>>> type(1*2)
<class 'int'>
>>> type(1*1.0)
<class 'float'>
>>> type(2/2)
<class 'float'>
>>> type(2//2)
<class 'int'>
bool布尔类型,表示真假
1
2
3
4
5
6
7
8
9
10
11
12
13
14
15
16
>>> True
True
>>> False
False
>>> type(True)
<class 'bool'>
>>> type(False)
<class 'bool'>
>>> int(True)
1
>>> int(False)
0
>>> bool(1)
True
>>> bool(0)
False
complex表示复数
1
2
>>> 36j
36j
进制表示和转换
二进制
用0b表示,0b10表示二进制10
八进制
用0o表示,0o10表示八进制10
十进制
123
十六进制
用0x表示,0x10表示十六进制10
其他进制转换为二进制用bin()命令,例如bin(10),bin(0o7),bin(0x1F)
其他进制转换为八进制用oct()命令,例如oct(0b111)
其他进制转换为十进制用int()命令,例如int(0b111)
其他进制转换为十六进制用hex()命令,例如hex(0b1111)
1
2
3
4
5
6
7
8
9
10
11
12
13
14
>>> 0b10
2
>>> 0o10
8
>>> 0x10
16
>>> bin(10)
'0b1010'
>>> oct(0b111)
'0o7'
>>> int(0b111)
7
>>> hex(0b11111)
'0x1f'
字符串
str表示字符串,可以用单引号,或者双引号表示,(不可变,值类型)
1
2
3
4
5
6
7
8
9
10
11
12
13
14
15
16
>>> 'hello world'
'hello world'
>>> "hello world"
'hello world'
>>> type('hello')
<class 'str'>
>>> type("hello")
<class 'str'>
>>> type('1')
<class 'str'>
>>> "let's go"
"let's go"
>>> 'let"s go'
'let"s go'
>>> 'let\' go'
"let' go"
三个引号可以表示多行字符串,\n转义字符表示换行,\r表示回车,\t表示tab
1
2
3
4
5
6
7
8
>>> '''
... hello
... world
... '''
'\nhello\nworld\n'
>>> print('hello world\nhaha')
hello world
haha
原始字符串,在字符串前加r,就会原样输出
1
2
>>> print(r'c:\ntwork\py')
c:\ntwork\py
字符串运算
1
2
3
4
5
6
7
8
9
10
11
12
13
14
15
16
17
18
>>> 'hello'+' world'
'hello world'
>>> 'hello'+1
Traceback (most recent call last):
  File "<stdin>", line 1, in <module>
TypeError: can only concatenate str (not "int") to str
>>> 'hello'*2
'hellohello'
>>> 'hello'[0]
'h'
>>> 'hello'[-1]
'o'
>>> 'hello'[0:3]
'hel'
>>> 'hello'[0:-1]
'hell'
>>> 'hello world'[6:]
'world'
查看字符对应的ASCII值
1
2
>>> ord('a')
97
str与byte转换
1
2
3
4
5
6
7
8
9
10
11
12
13
14
15
16
17
18
19
20
21
22
23
a = 'hello xiaomu'
print(a, type(a)) # str
b = b'hello xiaomu'
print(b, type(b)) # bytes


'''
用法
string. encode(encoding='utf-8,errors='strict)
bytes. decode(encoding='utf-8', errors='strict')
参数:
encoding: 转换成的编码格式,如ascii,gbk,默认 utf-8
errors: 出错时的处理方法,默认strict直接抛错误,也可以选择 ignore忽略错误
返回值 :
返回一个比特 ( bytes )类型
'''
str_data = 'my name is dewei'
byte_data = str_data.encode('utf-8')
print(byte_data) # b'my name is dewei'

byte_data = b'my name is dewei'
str_data = byte_data.decode('utf-8')
print(str_data) # 'my name is dewei'
常用方法
1
2
3
4
5
6
7
8
9
10
11
12
13
14
15
16
17
18
19
20
21
22
23
24
25
26
27
28
29
30
31
32
33
34
35
36
37
38
39
40
41
42
43
44
45
46
47
48
49
50
51
52
53
54
55
56
57
58
59
60
61
62
63
64
65
66
67
68
69
70
71
72
73
74
75
76
77
78
79
80
81
82
83
84
85
# capitalize 首字母大写,其他字母小写
s = 'student'
s = s.capitalize()
print(s)

# lower casefold 字符串字母全部小写
s = 'STUDENT HELLO'
print(s)
s1 = s.lower()
print(s1)
s2 = s.casefold()
print(s2)

# upper 字符串字母全部大写
s = 'student hello'
print(s)
s1 = s.upper()
print(s1)

# swapcase 字符串字母大小写翻转
s = 'student HELLO'
print(s)
s1 = s.swapcase()
print(s1)

# zfill 为字符串定义长度,入不满足,缺少的部分在前面用0填补
s = 'love'
print(s)
s1 = s.zfill(8)
print(s1) #0000love


# count 统计字符串中字符的数量
s = 'loveloove'
print(s)
s1 = s.count('o')
print(s1) # 3

# startswith,endswith 判断字符串是否以某个字符或字符串开头或结尾,返回布尔值
s = 'we are love'
print(s)
s1 = s.startswith('we')
print(s1) # True
s2 = s.endswith('ve')
print(s2) # True

# find查询字符串中元素的位置下标,查询不到返回-1;index 查询字符串中元素的位置下标,查询不到报错
s = 'we are love'
print(s)
s1 = s.find('are')
print(s1) # 3
s2 = s.index('ve')
print(s2) # 9

# strip 去除字符串中的空格或元素
s = '  we are love '
print(s)
s1 = s.strip()
print(s1)
s2 = s.strip('ve ')
print(s2)

# replace 把字符串中的某个元素替换为另一个元素,可以指定替换的数量
s = 'python is a good python code'
print(s)
s1 = s.replace('python', 'java',1)
print(s1)
s2 = s.replace('python', 'java',2)
print(s2)

# isspace 判断字符串是否是由空格组成
print(' '.isspace()) # True
print('hello world'.isspace()) # False

# istitle 判断字符串是不是一个标题类型,此函数只适用于英文
print('Hello World'.istitle()) # True
print('hello world'.istitle()) # False

# isupper islower 判断字符串是否全是大写或者小写
print('HELLO'.isupper()) # True
print('hello'.islower()) # True

# join 字符串拼接

# split 字符串切割
字符串与数字类型转换
1
2
3
4
5
6
7
8
9
10
11
# 整形转字符串
new_str = str(123)

# 浮点型转字符串
new_str = str(3.14)

# 字符串转整形
new_int = int('123')

# 字符串转浮点型
new_float = float('3.14')
字符串与列表的转换
1
2
3
4
5
6
7
8
9
10
11
12
13
14
15
16
17
18
19
20
21
22
23
24
25
26
27
28
29
30
31
'''
split用法
string.split(sep=None, maxsplit=-1)
参数:
sep: 切割的规则符号,不填写,默认空格,如字符串无空格则不分割生成列表
maxsplit : 根据切割符号切割的次数,默认-1无限制
返回值 :返回一个列表
'''
info = 'my name is dewei'
info_list = info.split()
print(info_list) #['my','name','is', 'dewei']

'''
join用法
'sep'join(iterable)
参数:
sep: 生成字符串用来分割列表每个元素的符号
iterable : 非数字类型的列表或元组或集合
返回值 :
返回一个字符串
'''
test = ['a', 'b', 'c']
new_str ='.'.join(test)
print(new_str) # 'a.b.c'


# sorted内置函数
sort_str_new = 'abdfipqc'
print(sort_str_new)
res = sorted(sort_str new)
print(''.join(res)) # abcdfipq
列表与元组
列表list,或者称为数组,(可变,引用类型)
1
2
3
4
5
6
7
8
9
10
11
12
13
14
15
16
17
18
19
20
21
22
23
24
25
26
27
>>> type([1,2,3])
<class 'list'>
>>> type(["hello",2,True])
<class 'list'>
>>> [[1,2,3],["hello","world"],[True,False]]
[[1, 2, 3], ['hello', 'world'], [True, False]]
>>> [1,2,3][0]
1
>>> [1,2,3][-1]
3
>>> [1,2,3][0:2]
[1, 2]
>>> [1,2,3]+[4,5]
[1, 2, 3, 4, 5]
>>> [1,2,3]*2
[1, 2, 3, 1, 2, 3]

>>> 3 in [1,2,3]
True
>>> 3 not in [1,2,3]
False
>>> len("hello world")
11
>>> max([1,2,3])
3
>>> min([1,2,3])
1
len函数可以计算出除了数字类型以外,其他所有数据类型的长度
与列表比较相似的还有一个元组(不可变,值类型)
1
2
3
4
5
6
7
8
9
10
>>> type((1,2,3))
<class 'tuple'>
>>> type((1))
<class 'int'>
>>> type(('hello'))
<class 'str'>
>>> type(())
<class 'tuple'>
>>> type((1,))
<class 'tuple'>
常用函数
1
2
3
4
5
6
7
8
9
10
11
12
13
14
15
16
17
18
19
20
21
22
23
24
25
26
27
28
29
30
31
32
33
34
35
36
37
38
39
40
41
42
43
44
45
46
47
48
49
50
51
52
53
54
55
56
57
58
59
60
61
62
63
64
65
66
67
68
69
70
71
72
73
74
75
76
77
78
79
80
81
82
83
84
85
86
87
88
89
90
91
92
# append 把一个元素添加到列表中,被添加的元素只会添加到末尾,是在原有列表的基础上添加的,不会产生新变量
books = []
print(id(books))
books.append('python入门课程')
print(books)
print(id(books))

# insert 把一个元素添加到列表的指定位置,若位置不存在则添加到末尾
xiyouji = '西游记'
books.insert(0,xiyouji)
print(books)
print(id(books))

# count 返回当前列表中某个元素的个数
fruits =['苹果','西瓜','水蜜桃','西瓜','雪梨']
count=fruits.count('西瓜')
print(count)

# remove 删除列表中的某一个元素,如果删除的元素不存在会报错,如果删除的元素有多个,只会删除第一个
drinks=['雪碧','可乐','矿泉水']
drinks.remove('矿泉水')
print(drinks) # ['雪碧','可乐']


# del 把变量从内存中彻底删除
drinks=['雪碧','可乐','矿泉水']
del drinks
print(drinks) # name'drinks is not defined

# reverse 对当前列表顺序进行反转
drinks=['雪碧','可乐','矿泉水']
drinks.reverse()
print(drinks) # ['矿泉水','可乐','雪碧']

# sort 对当前列表按照一定规律进行排序,列表中的元素类型必须一致,否则会报错
'''
用法:
list.sort(cmp=None, key=None, reverse=False)
参数:
cmp--可选参数,制定排序方案的函数
key-参数比较
reverse--排序规则,reverse=True降序,reverse=False升序(默认)
'''
books = ['python', 'django', 'web', 'flask','tornado']
books.sort()
print(books) # ['django', 'flask', 'python', 'tornado','web']


# clear 将当前列表中的数据清空
target=[1,2,3,4,5,6]
target.clear()

# copy 将当前的列表复制一份相同的列表,新列表与旧列表内容相同,但内存空间不同
'''
通俗的说,我们有一个列表a,列表
里的元素还是列表,当我们拷贝出新列
表b后,无论是a还是b的内部的列表中
的数据发生了变化后,相互之间都会受
到影响,-浅拷贝(copy)

不仅对第一层数据进行了
copy,对深层的数据也进行
copy,原始变量和新变量完
完全全不共享数据-深拷贝(deepcopy)

'''
old_list=['a','b','c']
new_list=old_list.copy()
print(new_list) # ['a','b','c']


# extend 将其他列表或元组中的元素导入到当前列表中
students=['dewei','xiaomu','xiaogang']
new_students=('xiaowang','xiaohong')
students.extend(new_students)
students
['dewei', 'xiaomu', 'xiaogang', 'xiaowang', 'xiaohong']

# pop 通过索引删除并获取列表的元素
names =['dewei','xiaomu']
pop_item=names.pop(0)
print('pop item:',pop_item,'names:' , names) # pop item: dewei names:['xiaomu']


# set 列表转集合
new_set = set([1,2,3,4,5])

# tuple 列表转元组
new_tuple = tuple([1,2,3,4,5])

# list 元组转列表
new_list = list((1,2,3,4,5))
索引与切片
1
2
3
4
5
6
7
8
9
10
11
12
13
14
15
# coding:utf-8
numbers=[1,2,3,4,5,6,7,8,9,10]
print(len(numbers) - 1)
print(numbers[9])
print('获取列表完整数据:',numbers[:])
print('另一种获取完整列表的方法:',numbers[0:])
print('第三种获取列表的方法:',numbers[0:-1]) #1-9
print('列表的反序:',numbers[::-1])
print('列表的反项获取',numbers[-3:-1])
print('步长2获取切片:',numbers[0:8:2])
print('切片生成空列表',numbers[0:0])
new_numbers=numbers[:4]
print(new_numbers)
集合set
用大括号表示,特征:无序,不重复,(可变,引用类型);无法通过索引获取元素;无获取元素的方法,只能打印集合;集合只是用来处理列表或元组的一种临时类型,他不适合存储与传输
1
2
3
4
5
6
7
8
9
10
11
12
13
14
15
16
17
18
19
>>> type({1,2,3})
<class 'set'>
>>> 1 in {1,2,3}
True
>>> 1 not in {1,2,3}
False
>>> {1,2,3,4,5} - {3,4}
{1, 2, 5}
>>> {1,2,3,4,5} & {3,4}
{3, 4}
>>> {1,2,3} | {4,5}
{1, 2, 3, 4, 5}

>>> type({})
<class 'dict'>
>>> type(set())
<class 'set'>
>>> len(set())
0
常用函数
1
2
3
4
5
6
7
8
9
10
11
12
13
14
15
16
17
18
19
20
21
22
23
24
25
26
27
28
29
30
31
32
33
34
35
36
37
38
39
40
41
42
43
44
45
46
47
# add 用于集合中添加一个元素,如果集合中已存在该元素则该函数不执行
a_set=set()
a_set.add('dewei')
print(a_set) # {'dewei'}

# update 加入一个新的集合(或列表,元组,字符串),如新集合内的元素在原集合中存在则无视
a_set=set()
a_set.update([3,4,5])
print(a_set) # {3,4,5}

# remove 将集合中的某个元素删除,如元素不存在将会报错
a_set={1,2,3}
a_set.remove(3)
print(a_set) # {1,2}

# clear 清空当前集合中的所有元素
a_set={1,2,3}
a_set.clear()

# del 删除集合
a_set={1,2,2,3}
del a_set
print(a_set) #报错

# difference 返回集合的差集,即返回的集合元素包含在第一个集合中,但不包含在第二个集合(方法的参数)中
a_set={'name','xiaomu','xiaoming'}
b_set={'xiaoming','xiaogang','xiaohong'}
a_diff=a_set.difference(b_set)
print(a_diff) # {'name','xiaomu'}

# intersection 返回两个或更多集合中都包含的元素,即交集
a_set={'name','xiaomu','xiaoming'}
b_set={'xiaoming','xiaogang','xiaohong'}
a_inter=a_set.intersection(b_set)
print(a_inter) # {'xiaoming'}

# union 返回多个集合的并集,即包含了所有集合的元素,重复的元素只会出现一次
a_set={'name','xiaomu','xiaoming'}
b_set={'xiaoming', 'xiaogang', 'xiaohong'}
un=a_set.union(b_set)
print(un) # {'name', 'xiaogang', 'xiaohong', 'xiaoming', 'xiaaomu'}

# isdisjoint 判断两个集合是否包含相同的元素,如果没有返回True,否则返回False
a_set={'name','xiaomu','xiaoming'}
b_set={'xiaoming','xiaogang','xiaohong'}
result=a_set.isdisjoint(b_set)
print(result) # False
字典dict
字典dict是可变的,引用类型
key必须是不可变类型,比如int,str
1
2
3
4
>>> {1:1,2:2}
{1: 1, 2: 2}
>>> {1:1,2:2}[1]
1
常用方法
1
2
3
4
5
6
7
8
9
10
11
12
13
14
15
16
17
18
19
20
21
22
23
24
25
26
27
28
29
30
31
32
33
34
35
36
37
38
39
40
41
42
43
# keys 获取所有的key
my_dict={'name': 'dewei','age': 33}
key_list=list(my_dict.keys())
key_list
['name','age']

# 根据key获取value
my_dict={'name': 'dewei', 'age': 33}
name=my_dict['name']
print(name) # dewei

In[21]:name=my_dict.get('name')
print(name) # dewei

# clear 清空当前字典中的所有数据
my_dict={'name':'dewei','age': 33}
my_dict.clear()
print(my_dict) # {}

# pop 删除字典中指定的key,并将其结果返回,如果key不存在则报错
my_dict={'name':'dewei','age':33}
pop_value=my_dict.pop('age')
print('pop value:',pop_value,'my_dict:',my_dict) # pop value: 33 my_dict:{'name': 'dewei'}

# popitem 删除当前字典里末尾一组键值对并将其返回
my_dict={'name': 'dewei','age': 33}
my_dict.popitem() # ('age', 33)


# del 删除字典中的元素或删除字典
my_dict= {'name': 'dewei', 'age': 33}
del my_dict['name']
print(my_dict) # {'age':33}


# copy 复制一个新字典
old_dict={'name': 'dewei','age': 33}
new_dict=old_dict.copy()
id(new_dict)!=id(old_dict) # True
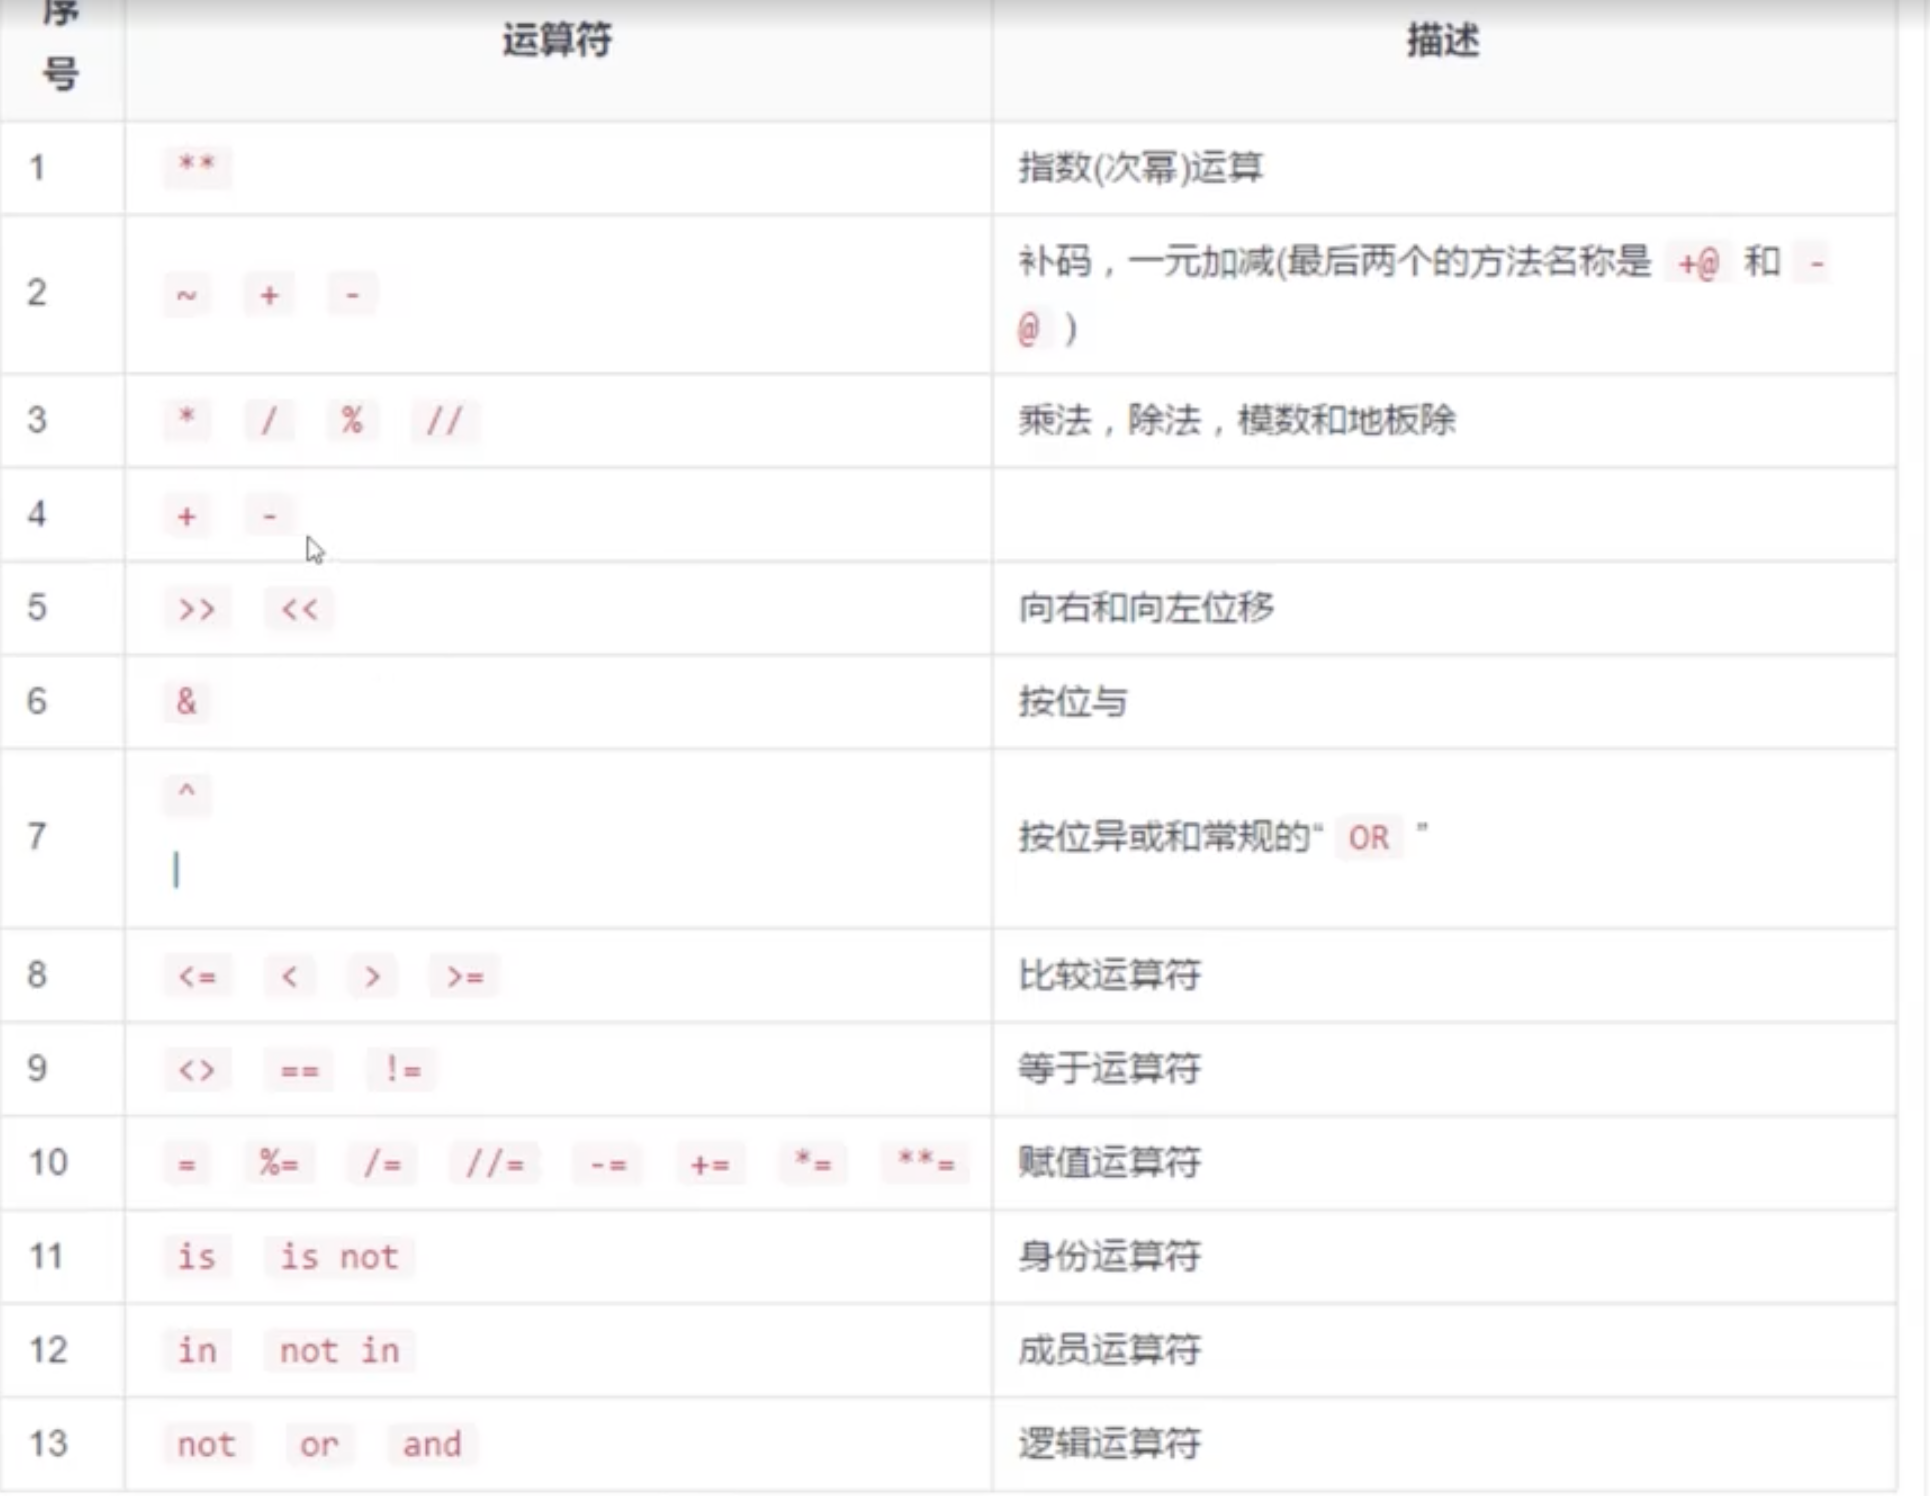
运算符
海象运算符
1
2
3
4
5
p = 'python'
if (b:=len(p)) > 5:
    print("str len is "+str(b))
    #用f关键字拼接字符串
    print(f'str len is {b}')
流程控制
包括条件控制,循环控制
1
2
3
4
5
6
7
8
9
10
11
12
13
14
15
16
17
18
19
20
21
22
23
24
25
26
27
28
29
30
31
32
33
34
35
36
37
38
39
40
41
42
43
44
45
46
47
48
49
50
51
52
53
54
55
56
'''
条件判断语句
'''

MOOD = True
if MOOD:
    print("this is a true")
else:
    print("this is a false")

# 比对用户账号,常量一般用全大写字母表示
USER_NAME = 'admin'
USER_PASS = '123'

print('please input user name')
input_name = input()

print('please input user pass')
input_pass = input()

if USER_NAME == input_name and USER_PASS == input_pass:
    print('success')
else:
    print('fail')

# 计算成绩
SCORE = 90

if SCORE == 90:
    print('A')
elif SCORE == 80:
    print('B')
else:
    print('C')


#循环,可以使用break和continue
li = [1,2,3,4,5]
for item in li:
    print(li)

#等差数列,打印2,4,6,8
for i in range(0,10,2):
    print(i,end=',')

#列表步长,打印1,3,5,7
a = [1,2,3,4,5,6,7,8]
b = a[0:len(a):2]
print(b)


# while
CONDITION = 10
while CONDITION < 10:
    print('this is a while')
迭代器
1
2
3
4
5
6
7
8
9
10
11
12
13
14
15
16
17
18
19
20
21
22
23
24
25
26
27
28
29
30
31
32
33
34
35
# coding:utf-8

iter_obj = iter((1, 2, 3))

def _next(iter_obj):
    try:
        return next(iter_obj)
    except StopIteration:
        return None

# print(_next(iter_obj))
# print(_next(iter_obj))
# print(_next(iter_obj))
# print(_next(iter_obj))

def make_iter():
    for i in range(10):
        yield i

iter_obj = make_iter()

for i in iter_obj:
    print(i)
print('----')
for i in iter_obj:
    print(i)


iter_obj = (i for i in range(10))

for i in iter_obj:
    print(i)
print('=====')
for i in iter_obj:
    print(i)
巩固
1
2
3
4
5
6
7
8
9
10
11
12
13
14
15
16
17
18
19
20
21
22
23
24
25
26
27
28
29
30
31
32
33
34
35
36
37
38
39
40
41
42
43
44
45
46
47
48
49
50
51
52
53
54
55
56
57
58
59
60
61
62
63
64
65
66
67
68
69
70
71
72
73
74
75
76
77
78
79
80
81
82
83
84
85
86
87
88
89
90
91
92
93
94
# coding: utf-8

'''
   小慕早上8点起床,起床之后就开始洗漱
   洗漱完成之后,是8点30分,于是开始吃早饭,早饭有面包,牛奶,还有麦片
   吃完早饭, 上午9点整, 小慕同学开始学习, 他走向自己的书柜, 书柜里有很多书:
     高等数学, 历史,python入门
   小慕拿了python入门的书,开始学习, 一直到12点。
   在12点时候,小慕叫了外卖, 但是到了12点半, 外卖依然没有来。
   于是 小慕给外卖小哥打了电话,电话号码是:
     123456789
   小哥说他有些繁忙,可能要在12点55的时候送达,并请小慕原谅, 他会尽快送到
   到了12点55的时候,外卖小哥准时送达了。
   小慕的午餐是: 西红柿炒鸡蛋盖饭, 价格是 12.5 ,小慕支付了费用后,开始吃饭
   吃过午饭,已经是下午1点25分了,小慕决定不学习了,而是去超市购物。
   于是,小慕来到一家超市,超市里有不同的柜台,放置着不同的内容:
     零食的柜台:
         薯片, 锅巴, 饼干
     生活的柜台:
         洗发水, 香皂, 沐浴乳, 其中洗发水有三款, abc, 价格分别是5,10,15
     水果的柜台:
         苹果,香蕉, 哈密瓜, 橘子, 西瓜
     蔬菜的柜台:
         西红柿, 黄瓜, 韭菜, 大白菜
     饮料的柜台:
         雪碧, 可乐, 矿泉水
   小慕买了 1瓶可乐, 1袋薯片, 两个苹果, 1颗大白菜, 他们的价格分别是:
     2.5, 4, 1.2, 0.9
   小慕还选了 一个洗发水, 并且选择了最贵的一款,放到自己的购物车中
   小慕来到收银台, 收银员计算一下总价 ?
   小慕将这些东西带回家, 然后就去健身了, 在健身之前, 他量了一下体重, 是44.78公斤,
   经过2.5 个小时的锻炼之后, 再来一称, 是 44.76, 小慕很开心, 看来锻炼身体对减肥
   是有帮助的。
   回到家, 已经是下午5点了, 小慕洗了个澡, 拿起可乐 和 一个苹果, 看起了电视,
   一直到很晚...
'''

username = '小慕'
get_up_time = '8:00'
bf_time = '8:30'  # 早餐时间
bf_contents = ['牛奶', '面包', '麦片']
study_time = '9:00'
books = ('高等数学', '历史', 'python入门')
study_book = 'python入门'
ready_lunch_time = '12:00'
brother_phone = 123456789
real_lunch_time = '12:55'
lunch_pay = 12.5
lunch_name = '西红柿鸡蛋盖饭'
shopping_time = '1:25'

shop = {
    'snacks': ['薯片', '锅巴', '饼干'],
    'live': ['洗发水', '香皂', '沐浴乳'],
    'fruits': [
        '苹果', '香蕉',
        '哈密瓜', '橘子',
        '西瓜'
    ],
    'vegetables': ['西红柿', '黄瓜', '韭菜', '大白菜'],
    'drinks': ['雪碧', '可乐', '矿泉水']
}
a, b, c = 5, 10, 15
cola_pay = 2.5
potato = 4
apple_two = 1.2
cabbage = 0.9

tot = cola_pay + potato + apple_two + cabbage + c
sport_time = 2.5
before_weight = 44.78
after_weight = 44.76
go_backhome_time = '5:00'

if __name__ == '__main__':
    print('我们的主人公是:', username)
    print('他是', get_up_time, '起床')
    print(bf_time, '吃早餐')
    print('早餐都有:', bf_contents)
    print(study_time, '开始学习')
    print('书架上都有:', books)
    print(username, '看的书是', study_book)
    print(username, '准备', ready_lunch_time, '吃午饭')
    print('外卖小哥的电话是:', brother_phone)
    print(username, '在', real_lunch_time, '开始吃饭')
    print('他吃的是', lunch_name, '并且价格是', lunch_pay)
    print('购物的时间是', shopping_time)
    print('超市的柜台里有:', shop)
    print(username, '共花费', tot, '元')
    print('去健身了')
    print('健身之前,体重是', before_weight)
    print('经过了', sport_time, '时间的锻炼')
    print('体重变成了', after_weight)
    print(username, '在', go_backhome_time, '回家了')
第二篇:函数与模块
函数
函数定义
def 是英文 define 的缩写
函数名称 应该能够表达 函数封装代码 的功能,方便后续的调用
函数名称 的命名应该 符合 标识符的命名规则
- 可以由 字母、下划线 和 数字 组成
- 不能以数字开头
- 不能与关键字重名
能否将 函数调用 放在 函数定义 的上方?
- 不能!
- 因为在 使用函数名 调用函数之前,必须要保证
Python已经知道函数的存在
- 因为在 使用函数名 调用函数之前,必须要保证
- 否则控制台会提示
NameError: name 'say_hello' is not defined(名称错误:say_hello 这个名字没有被定义)
- 否则控制台会提示
可以在一个Python文件中定义变量或函数,在另一个文件中import导入这个模块,然后使用模块名.变量的方式来调用
演示
1
2
3
4
5
6
7
8
9
10
11
12
13
14
15
16
17
18
19
20
21
22
23
24
25
26
27
28
29
30
31
32
33
34
35
36
37
38
39
40
41
42
43
44
45
46
47
48
49
50
51
52
53
54
55
56
57
58
59
60
61
62
63
64
65
66
67
# 定义一个两数相加的函数
def add(x,y):
    result = x + y
    return result

# 定义一个打印函数
def print_code(code):
    print(code)


# 调用函数
a = add(1,2)
a1 = add(y=3,x=2)
b = print_code('python')
print(a,a1,b)


# 函数多返回值
def damage(skill_one,skill_two):
    damage1 = skill_one * 2
    damage2 = skill_two * 3
    return damage1,damage2

res1,res2 = damage(222,333)
print(res1,res2)


# 默认参数,默认参数必须放到所有非默认参数之后
def print_user_info(name,age=18,gender = '男'):
    print('name: '+name)
    print('gender: '+gender)
    print('age: '+str(age))

print_user_info('七七',24,'女')
print_user_info('七七',gender='女')
print_user_info('放放',25)


#可变参数
def moreparam(*param):
    print(param)
    print(type(param))

moreparam(1,2,3,4)

a = (1,2,3,4)
moreparam(*a)


# 关键词可变参数
def print_city(**city):
    for key,value in city.items():
        print(key,':',value)

print_city(bj='32c',sh='36c')

a = {'bj':'22c','sh':'33c'}
print_city(**a)


# 用global把局部变量变为全局变量
def demo():
    global c
    c = 2

demo()
print(c)
一些常用函数
1
2
3
4
5
6
7
8
9
10
11
12
13
14
15
16
17
18
19
20
21
22
23
24
25
26
27
28
29
30
31
32
33
34
35
36
37
38
39
40
41
42
43
44
45
# coding:utf-8

# 键盘输入函数
food = input('你想吃什么呢:')
print(food)


# 帮助命令函数
# help(input)

class Test(object):
    a = 1
    b = 2

    def __init__(self):
        self.a = self.a
        self.b = self.b


test = Test()
print(test.a)

# 返回实例化的字典信息
result = vars(test)
print(result)

# 判断对象中是否有某个属性
print(hasattr(test, 'a'))
print(hasattr(list, 'appends'))

# 为实例化对象添加属性和值
setattr(test, 'c', 3)
print(test.c)
print(vars(test))

# setattr(list, 'c', 1)
if hasattr(list, 'appends'):
    print(getattr(list, 'appends'))
else:
    print('不能存在')

a = ['', None, True, 0]
print(any(a))
# all - > and
# any - > or
随机数函数
1
2
3
4
5
6
7
8
9
10
11
12
13
14
15
16
17
18
19
20
21
22
23
24
25
26
27
28
29
30
31
32
33
34
35
36
37
38
39
40
41
42
43
44
45
46
47
48
49
# coding:utf-8
import random


# 随机返回0~1的浮点数
print(random.random()) # 0.5699696526701014

# 产生一个a、b区间的随机浮点数
print(random.uniform(1,10)) # 3.803371151513113

# 产生一个a、b区间的随机整数
print(random.randint(10)) # 3

# 返回对象中的一个随机元素
random.choice(['a','b','c']) # b
random.choice('abc') # c

# 随机返回对象中指定的元素
random.sample(['a','b','c'],2) #['a','c']
random.sample('abc',2) # ['b','c']

# 获取区间内的一个随机数
random.randrange(0,100,1)  # 51
random.choice(range(0,100,1))  # 45


# 模拟抽奖
gifts = ['iphone', 'ipad', 'car', 'tv']

def chioce_gifts():
    gift = random.choice(gifts)
    print('你得到了%s' % gift)


def chioce_gift_new():
    count = random.randrange(0, 100, 1)
    if 0 <= count <= 50:
        print('你中了一个iphone')
    elif 50 < count <= 70:
        print('你中了一个ipad')
    elif 70 < count < 90:
        print('你中了一个tv电视')
    elif count >= 90:
        print('恭喜你中了一辆小汽车')

if __name__ == '__main__':
    chioce_gift_new()
高级函数
内置高级函数
提示 __方法名__ 格式的方法是 Python 提供的 内置方法 / 属性,稍后会给大家介绍一些常用的 内置方法 / 属性
| 序号 | 方法名 | 类型 | 作用 |
|---|---|---|---|
| 01 | __new__ | 方法 | 创建对象时,会被 自动 调用 |
| 02 | __init__ | 方法 | 对象被初始化时,会被 自动 调用 |
| 03 | __del__ | 方法 | 对象被从内存中销毁前,会被 自动 调用 |
| 04 | __str__ | 方法 | 返回对象的描述信息,print 函数输出使用 |
具体
1
2
3
4
5
6
7
8
9
10
11
12
13
14
15
16
17
18
19
20
21
22
23
24
25
26
27
28
29
30
31
32
33
34
35
36
37
38
39
40
41
42
43
'''
__str__函数
如果定义了此函数,当print当前实例化对象的时候,会返回该函数的return信息
'''
class Test(object):
	def __str__(self):
		return '这是关于这个类的描述'
test = Test()
print(test)


'''
__getattr__函数
当调用的属性或方法不存在时,会返回该方法定义的信息
'''
class Test(object):
	def __getattr__(self, key):
        return'这个key: {} 不存在'.format(key)
test = Test()
test.a

'''
__setattr__函数
拦截当前类中不存在的值和属性
'''
class Test(object):
    def __setattr__(self, key, value):
        if key not in self.dict:
            self.__dict__[key] = value
t = Test()
t.name = 'dewei
print(t.name) # dewei


'''
__call__函数
把一个类变为一个函数
'''
class Test(object):
    def __call__(self,**kwargs):
        print('args is {}'.format(kwargs))
t = Test()
t(name='dewei') # args is {'name':'dewei'}
高级
1
2
3
4
5
6
7
8
9
10
11
12
13
14
15
16
17
18
19
20
21
22
23
24
25
# coding:utf-8

from functools import reduce

frunts = ['apple', 'banana', 'orange']

result = filter(lambda x: 'e' in x, frunts)
print(list(result))
print(frunts)

def filter_func(item):
    if 'e' in item:
        return True
print('-------')
filter_result = filter(filter_func, frunts)
print(list(filter_result))

map_result = map(filter_func, frunts)  # > all
print(list(map_result))

reduce_result = reduce(lambda x, y: x * y, [1, 1, 2, 4, 4])
print(reduce_result)

reduce_result_str = reduce(lambda x, y: x * y, frunts)
print(reduce_result_str)
多值参数
有时可能需要 一个函数 能够处理的参数 个数 是不确定的,这个时候,就可以使用 多值参数
python中有 两种 多值参数:- 参数名前增加 一个
*可以接收 元组
- 参数名前增加 一个
- 参数名前增加 两个
*可以接收 字典
- 参数名前增加 两个
一般在给多值参数命名时,习惯使用以下两个名字
*args—— 存放 元组 参数,前面有一个*
**kwargs—— 存放 字典 参数,前面有两个*
args是arguments的缩写,有变量的含义kw是keyword的缩写,kwargs可以记忆 键值对参数
举例
1
2
3
4
5
6
7
8
def demo(num, *args, **kwargs):

    print(num)
    print(args)
    print(kwargs)


demo(1, 2, 3, 4, 5, name="小明", age=18, gender=True)
拆包
在调用带有多值参数的函数时,如果希望:
- 将一个 元组变量,直接传递给
args
- 将一个 元组变量,直接传递给
- 将一个 字典变量,直接传递给
kwargs
- 将一个 字典变量,直接传递给
就可以使用 拆包,简化参数的传递,拆包 的方式是:
- 在 元组变量前,增加 一个
*
- 在 元组变量前,增加 一个
- 在 字典变量前,增加 两个
*
- 在 字典变量前,增加 两个
举例
1
2
3
4
5
6
7
8
9
10
11
12
13
def demo(*args, **kwargs):

    print(args)
    print(kwargs)


# 需要将一个元组变量/字典变量传递给函数对应的参数
gl_nums = (1, 2, 3)
gl_xiaoming = {"name": "小明", "age": 18}

# 会把 num_tuple 和 xiaoming 作为元组传递个 args
# demo(gl_nums, gl_xiaoming)
demo(*gl_nums, **gl_xiaoming)
模块导入
1
2
3
4
5
6
7
8
9
10
11
12
# 第一种导入方式
import module.module1
print(module.module1.a)


# 第二种导入方式
import module.module1 as m
print(m.a)

# 第三种导入方式
from module.module1 import a
print(a)
批量导入使用__init__.py文件,注意是双下划线;
假如在module1文件夹下创建了此文件
1
2
3
import sys
import datatime
import io
在module2文件夹下的demo文件下想引用sys库中的变量
1
2
3
import module1

print(module1.sys.path)
模块内置变量
1
2
3
4
print('package: '+ __package__)
print('name: '+__name__)
print('doc: '+__doc__)
print('file: '+__file__)
系统库
datetime库
1
2
3
4
5
6
7
8
9
10
11
12
13
14
15
16
17
18
19
20
21
22
23
24
from datetime import datetime
from datetime import timedelta
now = datetime.now( )
print(now, type(now))
three_days = timedelta(days=3)
after_three_day = now + three_days
print(after_three_day)
before_three_day = now - three_days
print(before_three_day)

one_hour = timedelta(hours=1)
before_one_hour = now - one_hour
print(before_one_hour)


# 日期转字符串
date = datetime.now( )
str_date = date.strftime('%Y-%m-%d %H:%M:%S')
print(str_date) # '2020-03-17 15:19:27'

# 字符串转日期
str_date ='2021-10-10 13:13:13'
date_obj = datetime.strptime(str_date,"%Y-%m-%d %H:%M:%S')
print(date_obj) #datetime.datetime(2021-10-10 13:13:13)
time库
1
2
3
4
5
6
7
8
9
10
11
12
13
14
15
16
17
18
19
import time

# 获取时间戳,秒级别
now = time.time()
print(now, type(now))

# 时间戳转时间对象
time_obj = time.localtime(now)
print(time_obj, type(time_obj))

current_time_obj = time.locatime()
print(current_time_obj)

# 时间暂停1秒
time.sleep(1)

# 时间转字符串
str_time = time.strftime('%Y-%m-%d %H:M:%s', time.localtime())
print(str_time) # 2020-03-17 15:34:59
os库
1
2
3
4
5
6
7
8
9
10
11
12
13
14
15
16
17
18
19
20
21
22
23
24
25
26
27
28
29
30
31
import os

# 获取当前绝对路径
current_path = os.getcwd()
print(current_path)
# 判断是否为绝对路径
print(os.path.isabs(current_path))

# 在当前目录下创建test1文件夹
new_path = '%s/testl' % current_path
if os.path.exists(new_path):
    os.makedirs(new_path)

# 列出当前路径下的文件夹
data = os.listdir(current_path)
print(data)

# 删除相对路径下的文件夹test2和子文件夹
new_path2 = os.path.join(current_path, 'test2' , 'abc') # 路径拼接
os.removedirs('test2/abc')
# 根据绝对路径删除单个文件夹
os.rmdir('%s/test3_new' % current_path)

# 重命名
os.rename('test3','test3_new')
os.rename('pip_image.py','pip3_image.py')

current_path = current_path + '/package os.py'
print(os.path.isfile(current_path))
print(os.path.split(current_path))
print(os.path.isdir(os.path.split(current_path)[0]))
sys库
1
2
3
4
5
6
7
8
9
10
11
12
13
14
15
16
17
18
19
20
21
22
23
import sys

# 获取系统所有模块
modules = sys.modules
print(modules)

# 获取路径
path = sys.path
print(path)

# 获取系统编码
code = sys.getdefaultencoding()
print(code)

# 获取操作系统类型
print(sys.platform)

# 获取Python版本
print(sys.version)

# 获取命令行启动参数
command = sys.argv[1]
print(command)
解包与星号表达式
1
2
3
4
5
6
7
8
9
10
11
12
13
14
15
16
17
18
19
20
21
22
23
24
25
26
27
28
29
30
31
32
33
34
35
36
37
38
39
40
# 基本解包
a, b, c = [1, 2, 3]
print(a, b, c)  # 1 2 3

# 星号表达式 - 收集多余元素
first, *rest = [1, 2, 3, 4, 5]
print(first)    # 1
print(rest)     # [2, 3, 4, 5]

*init, last = [1, 2, 3, 4, 5]
print(init)     # [1, 2, 3, 4]
print(last)     # 5

first, *middle, last = [1, 2, 3, 4, 5]
print(first)    # 1
print(middle)   # [2, 3, 4]
print(last)     # 5

# 忽略值
a, _, c = (1, 2, 3)        # _ 表示不关心的值
a, *_, c = (1, 2, 3, 4, 5) # 忽略中间

# 嵌套解包
(a, b), c = (1, 2), 3
print(a, b, c)  # 1 2 3

# 字典解包合并
d1 = {"a": 1}
d2 = {"b": 2}
merged = {**d1, **d2}       # {'a': 1, 'b': 2}

# 函数调用时解包
def func(a, b, c):
    return a + b + c

args = [1, 2, 3]
print(func(*args))           # 6

kwargs = {"a": 1, "b": 2, "c": 3}
print(func(**kwargs))        # 6
第三篇:面向对象
类和对象
类的定义
类名的命名规则要符合大驼峰命名法
1
2
3
4
5
6
7
8
9
10
11
12
13
14
15
16
17
18
19
20
21
22
23
24
25
26
27
28
29
30
31
32
33
34
35
36
37
38
39
40
41
42
43
44
class Student():

    # 类变量
    name = ''
    age = 18
    count = 0

    # 构造函数,默认返回None
    def __init__(self,name,age):
      self.name = name
      self.age = age

      # 实例变量
      self.score = 0

      # 私有变量,以双下划线开头
      self.__idcard = 12345

    def print_info(self):
        print('name: '+ self.name)
        print('age: ' + str(self.age))

    # 私有方法,以双下划线开头
    def __marking(self):
        print('成绩为: '+ str(self.score))

    # 定义类方法,参数固定cls
    @classmethod
    def print_count(cls):
        cls.count +=1
        print(cls.count)

    # 定义静态方法,参数随意
    @staticmethod
    def smethod(x,y):
        pass

student = Student('qq',18)
student.print_info()
Student.print_count()

# 尽量不要在外面调用私有函数和私有变量
student._Student__marking()
print(student._Student__idcard)
在类封装的方法内部,
self就表示 当前调用方法的对象自己调用方法时,程序员不需要传递
self参数在方法内部
可以通过
self.访问对象的属性也可以通过
self.调用其他的对象方法
汇总
1
2
3
4
5
6
7
8
9
10
11
12
13
14
15
16
17
18
19
20
21
22
23
24
25
26
27
28
29
30
31
32
class Person:
    """人类"""

    def __init__(self, name, weight):

        self.name = name
        self.weight = weight

    def __str__(self):

        return "我的名字叫 %s 体重 %.2f 公斤" % (self.name, self.weight)

    def run(self):
        """跑步"""

        print("%s 爱跑步,跑步锻炼身体" % self.name)
        self.weight -= 0.5

    def eat(self):
        """吃东西"""

        print("%s 是吃货,吃完这顿再减肥" % self.name)
        self.weight += 1


xiaoming = Person("小明", 75)

xiaoming.run()
xiaoming.eat()
xiaoming.eat()

print(xiaoming)
生命周期
1:实例化__init__对象生命开始(在内存中分配一个内存块)
2:__del__对象生命结束(从内存中释放这个内存块)
在 Python 中 当使用 类名() 创建对象时,为对象 分配完空间后,自动 调用 __init__ 方法 当一个 对象被从内存中销毁 前,会 自动 调用 __del__ 方法 应用场景 __init__ 改造初始化方法,可以让创建对象更加灵活 __del__ 如果希望在对象被销毁前,再做一些事情,可以考虑一下 __del__ 方法 生命周期 一个对象从调用 类名() 创建,生命周期开始 一个对象的 __del__ 方法一旦被调用,生命周期结束 在对象的生命周期内,可以访问对象属性,或者让对象调用方法
继承关系
定义子类时,将父类传入子类参数内
子类实例化可以调用自己与父类的函数与变量
父类无法调用子类的函数和变量
父类
1
2
3
4
5
6
7
8
9
10
11
class Parent(object):
		def _init__(self, name, sex):
				self.name = name
        self.sex = sex
		def talk(self):
      	return f'{self.name} are walking'
		def is_sex(self):
				if self.sex == 'boy':
          	return f'{self.name} is a boy'
				else:
						return f'{self.name} is a girl'
子类
1
2
3
4
5
6
7
8
class Child(Parent):
    def __init__(self,school,name,sex):
        self.school = school
        #Parent.__init__(self,name,sex)
        # 调用父类构造方法
        super(Child,self).__init__(name,sex)
    def play_football(self):
      	return f'[self.name] are playing football'
多重继承
1
2
3
4
5
6
7
8
9
10
11
12
13
14
15
16
17
18
19
20
21
22
23
24
class Tool(object):
  	def work(self):
      	return 'tool work'

    def car(self):
      	return 'car will work'


class Food(object):
  	def work(self):
      	return 'food work'

    def cake(self):
      	return 'i like cake'

# 最左侧的类会先被继承
class Person(Tool,Food):
  	pass

if __name__ == '__main__':
	p = Person()
    p_car = p.car()
    p_cake = p.cake()
    p_work = p.work() # tool woek
判空
1
2
3
4
5
6
7
8
9
10
a = None
# a = ''
# a = []
# a = False

if a:
    print()

if not a:
    print()
枚举
创建一个枚举
1
2
3
4
5
6
7
8
9
10
11
12
from enum import Enum

class VIP(Enum):
    YELLO = 1
    GREEN = 2
    BLACK = 3
    RED = 4

print(VIP.YELLO.name())
print(VIP.YELLO.value())

print(VIP(2))
枚举进阶
1
2
3
4
5
6
7
8
9
10
11
12
13
14
15
16
17
18
19
20
21
22
23
24
25
26
27
28
29
30
31
32
33
34
35
36
37
from enum import Enum, IntEnum, Flag, IntFlag, auto, unique

# IntEnum - 支持比较运算
class Priority(IntEnum):
    LOW = 1
    MEDIUM = 2
    HIGH = 3

print(Priority.LOW < Priority.HIGH)  # True

# auto() - 自动赋值
@unique  # 确保值唯一
class Color(Enum):
    RED = auto()
    GREEN = auto()
    BLUE = auto()

print(Color.RED.value)   # 1
print(Color.GREEN.value) # 2

# Flag / IntFlag - 支持位运算
class Permission(Flag):
    READ = auto()     # 1
    WRITE = auto()    # 2
    EXECUTE = auto()  # 4

perm = Permission.READ | Permission.WRITE
print(Permission.READ in perm)  # True
print(perm)                     # Permission.READ|WRITE

# 遍历枚举
for color in Color:
    print(color.name, color.value)

# 通过值获取枚举
print(Color(1))       # Color.RED
print(Color['RED'])   # Color.RED
dataclass 详解
dataclass 是Python 3.7+ 引入的装饰器,自动生成 __init__、__repr__、__eq__ 等方法,大幅减少样板代码
1
2
3
4
5
6
7
8
9
10
11
12
13
14
15
16
17
18
19
20
21
22
23
24
25
26
27
28
29
30
31
32
33
34
35
36
37
38
39
40
41
42
43
44
45
46
47
48
49
50
51
52
53
54
55
56
57
58
59
60
61
62
63
64
65
66
67
68
69
70
71
72
73
74
75
76
77
78
79
80
81
82
83
84
85
86
87
88
89
90
91
92
93
94
95
96
97
98
99
100
101
102
103
104
105
106
from dataclasses import dataclass, field, asdict, astuple
from typing import Optional


# ---- 基本用法 ----
@dataclass
class Student:
    name: str
    age: int
    score: float = 0.0       # 带默认值的字段必须放在后面

stu = Student("小明", 18, 95.5)
print(stu)                    # Student(name='小明', age=18, score=95.5)
print(stu.name)               # 小明


# ---- 对比:不用dataclass要写多少代码 ----
class StudentOld:
    def __init__(self, name, age, score=0.0):
        self.name = name
        self.age = age
        self.score = score

    def __repr__(self):
        return f"StudentOld(name={self.name!r}, age={self.age}, score={self.score})"

    def __eq__(self, other):
        if not isinstance(other, StudentOld):
            return NotImplemented
        return (self.name, self.age, self.score) == (other.name, other.age, other.score)


# ---- field 高级配置 ----
@dataclass
class Product:
    name: str
    price: float
    tags: list = field(default_factory=list)  # 可变默认值必须用field
    discount: float = field(default=0.0, repr=False)  # 不显示在repr中
    id: int = field(init=False)                  # 不参与__init__

    def __post_init__(self):
        """初始化后自动执行"""
        self.id = hash(self.name) % 10000

p = Product("手机", 2999.0)
print(p)            # Product(name='手机', price=2999.0, tags=[])
print(p.id)         # 自动生成的ID
p.tags.append("热销")  # 安全!每个实例独立的list


# ---- frozen 不可变dataclass ----
@dataclass(frozen=True)
class Point:
    x: float
    y: float

pt = Point(3.0, 4.0)
# pt.x = 5.0  # 报错!frozen实例不可修改
print(hash(pt))    # frozen实例可哈希,可做dict key或放入set


# ---- 继承 ----
@dataclass
class Base:
    name: str

@dataclass
class Extended(Base):
    age: int
    score: float = 0.0

ext = Extended("小明", 18, 95.0)
print(ext)  # Extended(name='小明', age=18, score=95.0)


# ---- 转换 ----
@dataclass
class Config:
    host: str = "localhost"
    port: int = 3306
    debug: bool = False

cfg = Config()
print(asdict(cfg))    # {'host': 'localhost', 'port': 3306, 'debug': False}
print(astuple(cfg))   # ('localhost', 3306, False)


# ---- 实战:用dataclass构建数据模型 ----
@dataclass
class TrainingConfig:
    """AI模型训练配置"""
    model_name: str
    learning_rate: float = 1e-3
    batch_size: int = 32
    epochs: int = 10
    dropout: float = 0.1
    device: str = "cpu"

    def __post_init__(self):
        assert 0 < self.learning_rate < 1, "学习率必须在(0,1)之间"
        assert self.batch_size > 0, "批次大小必须大于0"
        assert 0 <= self.dropout < 1, "dropout必须在[0,1)之间"

config = TrainingConfig("bert-base", learning_rate=5e-5, epochs=3)
print(config)
第四篇:进阶特性
f-string 格式化字符串
Python 3.6+ 引入的 f-string 是最推荐的字符串格式化方式,比 % 和 format() 更简洁高效
1
2
3
4
5
6
7
8
9
10
11
12
13
14
15
16
17
18
19
20
21
22
23
24
25
26
27
28
29
30
31
32
33
34
35
36
37
38
39
40
name = "小明"
age = 18
score = 95.678

# 基本用法
print(f"姓名:{name},年龄:{age}")

# 表达式
print(f"明年 {age + 1} 岁")
print(f"{'你好'.center(20)}")

# 格式化数字
print(f"成绩:{score:.2f}")       # 保留2位小数 → 95.68
print(f"编号:{42:06d}")         # 6位整数补零 → 000042
print(f"百分比:{0.856:.1%}")     # 百分比 → 85.6%
print(f"千分位:{1234567:,}")     # 千分位 → 1,234,567

# 对齐
print(f"{'左对齐':<20}")         # 左对齐,宽度20
print(f"{'右对齐':>20}")         # 右对齐
print(f"{'居中':^20}")           # 居中

# 日期格式化
from datetime import datetime
now = datetime.now()
print(f"当前时间:{now:%Y-%m-%d %H:%M:%S}")

# 调试用法 (Python 3.8+)
print(f"{name=}, {age=}")        # 输出 name='小明', age=18

# 多行f-string
msg = f"""
姓名:{name}
年龄:{age}
"""
print(msg)

# 字典用法
user = {"name": "小红", "age": 20}
print(f"用户:{user['name']}")   # 注意引号要用不同的
字符串进阶
1
2
3
4
5
6
7
8
9
10
11
12
13
14
15
16
17
18
19
20
21
22
23
24
25
26
27
28
29
30
31
32
33
# split高级用法
text = "one  two   three"   # 多个空格
print(text.split())         # ['one', 'two', 'three'] 自动处理多余空格
print(text.split(' ', 2))   # ['one', '', 'two   three'] 按空格切2次

# partition - 按分隔符分为三部分
url = "https://example.com/path"
protocol, _, rest = url.partition("://")
print(protocol)  # https
print(rest)      # example.com/path

# rpartition - 从右侧分割
filename = "report.2024.xlsx"
name, _, ext = filename.rpartition(".")
print(name)  # report.2024
print(ext)   # xlsx

# translate - 批量替换/删除字符
table = str.maketrans("aeiou", "12345")
print("hello world".translate(table))  # h2ll4 w4rld

# 删除特定字符
remove_table = str.maketrans("", "", "0123456789")
print("abc123def456".translate(remove_table))  # abcdef

# format_map - 使用字典格式化
user = {"name": "小明", "age": 18}
print("{name}今年{age}岁".format_map(user))

# 字符串对齐
print("left".ljust(10, "."))     # left.....
print("right".rjust(10, "."))    # .....right
print("center".center(12, "="))  # ===center===
深拷贝与浅拷贝详解
1
2
3
4
5
6
7
8
9
10
11
12
13
14
15
16
17
18
19
20
21
22
23
24
25
26
27
28
29
30
31
32
33
34
35
36
37
38
39
40
41
42
import copy

# ---- 浅拷贝 ----
# 只复制第一层对象,内层对象仍然共享引用

list_a = [1, 2, [3, 4]]
list_b = list_a.copy()          # 浅拷贝方式1
list_c = list_a[:]              # 浅拷贝方式2
list_d = list(list_a)           # 浅拷贝方式3
list_e = copy.copy(list_a)      # 浅拷贝方式4

# 修改外层元素 - 互不影响
list_b[0] = 999
print(list_a)  # [1, 2, [3, 4]]
print(list_b)  # [999, 2, [3, 4]]

# 修改内层元素 - 相互影响!(浅拷贝的坑)
list_b[2][0] = 888
print(list_a)  # [1, 2, [888, 4]]  ← 被影响了!
print(list_b)  # [999, 2, [888, 4]]


# ---- 深拷贝 ----
# 递归复制所有层级,完全独立
list_x = [1, 2, [3, 4]]
list_y = copy.deepcopy(list_x)

list_y[2][0] = 777
print(list_x)  # [1, 2, [3, 4]]   ← 不受影响
print(list_y)  # [1, 2, [777, 4]]


# ---- 字典的拷贝 ----
dict_a = {"name": "小明", "scores": [90, 80, 70]}
dict_b = dict_a.copy()                 # 浅拷贝
dict_c = copy.deepcopy(dict_a)          # 深拷贝

dict_b["scores"][0] = 100
print(dict_a["scores"])  # [100, 80, 70]  ← 浅拷贝影响原数据

dict_c["scores"][0] = 60
print(dict_a["scores"])  # [100, 80, 70]  ← 深拷贝不影响
可变默认参数陷阱
1
2
3
4
5
6
7
8
9
10
11
12
13
14
15
16
17
18
19
20
21
22
23
24
25
26
27
28
29
30
31
# ❌ 经典陷阱:可变对象作为默认参数
def append_item(item, lst=[]):    # 这个 [] 只在函数定义时创建一次!
    lst.append(item)
    return lst

print(append_item(1))   # [1]
print(append_item(2))   # [1, 2]  ← 不是预期的 [2]!
print(append_item(3))   # [1, 2, 3]  ← 累加了!


# ✅ 正确写法:用 None 作为默认值
def append_item_fixed(item, lst=None):
    if lst is None:
        lst = []
    lst.append(item)
    return lst

print(append_item_fixed(1))   # [1]
print(append_item_fixed(2))   # [2]  ✓


# 同样的陷阱也适用于字典和集合
def add_user(name, users={}):      # ❌
    users[name] = True
    return users

def add_user_fixed(name, users=None):  # ✅
    if users is None:
        users = {}
    users[name] = True
    return users
字典进阶方法
1
2
3
4
5
6
7
8
9
10
11
12
13
14
15
16
17
18
19
20
21
22
23
24
25
26
27
28
29
30
31
32
33
34
35
36
37
38
39
40
41
42
43
44
45
46
47
48
49
50
51
52
53
54
55
56
57
58
59
60
61
62
63
# setdefault - key不存在则设置默认值,存在则返回原值
user = {"name": "小明"}
user.setdefault("name", "未知")     # 返回 "小明",不修改
user.setdefault("age", 18)         # 返回 18,并添加 key
print(user)  # {'name': '小明', 'age': 18}


# update - 合并字典
defaults = {"theme": "dark", "font": 14, "lang": "zh"}
user_config = {"font": 16, "auto_save": True}
defaults.update(user_config)
print(defaults)  # {'theme': 'dark', 'font': 16, 'lang': 'zh', 'auto_save': True}


# get - 安全获取,支持默认值
data = {"name": "小明"}
print(data.get("name"))          # 小明
print(data.get("age"))           # None(不报错)
print(data.get("age", 0))        # 0(自定义默认值)


# items / keys / values 遍历
scores = {"数学": 90, "英语": 85, "语文": 92}
for key, value in scores.items():
    print(f"{key}: {value}")


# | 合并运算符 (Python 3.9+)
d1 = {"a": 1, "b": 2}
d2 = {"b": 3, "c": 4}
d3 = d1 | d2              # {'a': 1, 'b': 3, 'c': 4}
d1 |= d2                  # d1 就地合并


# 字典推导式
words = ["hello", "world", "hi"]
word_lengths = {w: len(w) for w in words}
print(word_lengths)  # {'hello': 5, 'world': 5, 'hi': 2}


# Counter 计数器
from collections import Counter
text = "abracadabra"
cnt = Counter(text)
print(cnt)                    # Counter({'a': 5, 'b': 2, 'r': 2, 'c': 1, 'd': 1})
print(cnt.most_common(2))     # [('a', 5), ('b', 2)]


# defaultdict - 带默认值的字典
from collections import defaultdict
groups = defaultdict(list)
for name, dept in [("小明", "技术"), ("小红", "市场"), ("小刚", "技术")]:
    groups[dept].append(name)
print(groups)  # {'技术': ['小明', '小刚'], '市场': ['小红']}


# OrderedDict - 有序字典
from collections import OrderedDict
od = OrderedDict()
od["a"] = 1
od["b"] = 2
od.move_to_end("a")      # 将a移到末尾
od.popitem(last=False)    # 弹出第一个元素
列表推导式与推导式大全
1
2
3
4
5
6
7
8
9
10
11
12
13
14
15
16
17
18
19
20
21
22
23
24
25
26
27
28
29
30
31
32
33
34
35
36
37
38
39
40
41
42
43
44
45
46
47
48
49
50
51
52
53
54
55
56
57
58
59
60
61
62
63
64
65
66
67
68
69
70
71
72
# ---- 列表推导式 ----
# 基本形式: [表达式 for 变量 in 可迭代对象 if 条件]

# 带条件过滤
even = [x for x in range(20) if x % 2 == 0]
print(even)  # [0, 2, 4, 6, 8, 10, 12, 14, 16, 18]

# 带转换
squares = [x**2 for x in range(10)]
print(squares)  # [0, 1, 4, 9, 16, 25, 36, 49, 64, 81]

# 嵌套循环(笛卡尔积)
pairs = [(x, y) for x in range(3) for y in range(3) if x != y]
print(pairs)  # [(0,1), (0,2), (1,0), (1,2), (2,0), (2,1)]

# 展平嵌套列表
matrix = [[1, 2, 3], [4, 5, 6], [7, 8, 9]]
flat = [x for row in matrix for x in row]
print(flat)  # [1, 2, 3, 4, 5, 6, 7, 8, 9]

# 条件表达式
labels = ["偶" if x % 2 == 0 else "奇" for x in range(5)]
print(labels)  # ['偶', '奇', '偶', '奇', '偶']


# ---- 字典推导式 ----
words = ["apple", "banana", "cat"]
word_len = {w: len(w) for w in words}
print(word_len)  # {'apple': 5, 'banana': 6, 'cat': 3}

# 翻转键值
original = {"a": 1, "b": 2, "c": 3}
inverted = {v: k for k, v in original.items()}
print(inverted)  # {1: 'a', 2: 'b', 3: 'c'}

# 从两个列表创建字典
keys = ["name", "age", "city"]
values = ["小明", 18, "北京"]
user = dict(zip(keys, values))
print(user)  # {'name': '小明', 'age': 18, 'city': '北京'}


# ---- 集合推导式 ----
nums = [1, 2, 2, 3, 3, 3, 4]
unique_squares = {x**2 for x in nums}
print(unique_squares)  # {1, 4, 9, 16}


# ---- 生成器表达式 ----
# 惰性求值,节省内存
total = sum(x**2 for x in range(1000000))
print(total)  # 333332833333500000

# 作为函数参数
max_val = max(len(w) for w in ["hi", "hello", "hey"])
print(max_val)  # 5


# ---- 海象运算符在推导式中的应用 (Python 3.8+) ----
data = [1, -2, 3, -4, 5]
results = [y for x in data if (y := x**2) > 4]
print(results)  # [9, 16, 25]


# ---- 嵌套推导式 - 矩阵转置 ----
matrix = [[1, 2, 3], [4, 5, 6], [7, 8, 9]]
transposed = [[row[i] for row in matrix] for i in range(3)]
print(transposed)  # [[1, 4, 7], [2, 5, 8], [3, 6, 9]]

# 更好的方式:zip
transposed2 = list(map(list, zip(*matrix)))
print(transposed2)  # [[1, 4, 7], [2, 5, 8], [3, 6, 9]]
函数式编程
闭包=函数+环境变量
1
2
3
4
5
6
7
8
9
10
11
12
13
14
15
16
origin = 0

def factory(pos):
    def go(step):
        nonlocal pos
        new_pos = pos + step
        pos = new_pos
        return new_pos
    return go

tourlist = factory(origin)
print(tourlist(2))

print(tourlist(3))

print(tourlist(5))
匿名函数
普通函数和匿名函数
1
2
3
4
5
6
7
8
9
10
11
12
13
14
15
16
17
18
19
20
21
22
23
from functools import reduce
def add(x,y):
    return x + y

# 匿名函数
f = lambda x,y: x+y

print(add(2,3))
print(f(2,3))


lis = [1,2,3,4,5]
l = map(lambda x: x*x,lis)
print(list(l))

# 连续计算
r = reduce(lambda x,y:x+y,lis)
print(r)

# 过滤器
fl = [1,0,1,1,0]
f = filter(lambda x:True if x==1 else False,fl)
print(list(f))
三元表达式
1
2
3
4
5
6
7
8
x = 2
y = 3

res = x if x > 2 else y

print(res)
装饰器
1
2
3
4
5
6
7
8
9
10
11
12
13
14
import time

def decorator(func):
    def wrapper():
        print(time.time())
        func()
    return wrapper

def f():
    print('this is a function')


fu = decorator(f)
fu()
简便写法
1
2
3
4
5
6
7
8
9
10
11
12
13
14
15
16
17
18
19
20
21
22
23
24
25
26
27
28
import time

def decorator(func):
    def wrapper(*args,**kw):
        print(time.time())
        func(*args,**kw)
    return wrapper

@decorator
def f(func_name):
    print('this is a function'+func_name)

@decorator
def f2(func_name1,func_name2):
    print('this is a function1'+func_name1)
    print('this is a function2'+func_name2)


@decorator
def f3(func_name1,func_name2,**kw):
    print('this is a function1'+func_name1)
    print('this is a function2'+func_name2)
    print('this is a kw'+kw)


f('func1')
f2('func1','func2')
f3('func1','func2',a=1,b=2,c=3)
构造函数装饰器
1
2
3
4
5
6
7
8
9
from dataclasses import dataclass

@dataclass
class Student():
    name:str
    age:int


st = Student('ss',18)
类方法装饰器
1
2
3
4
5
6
7
8
9
10
11
12
13
14
15
16
17
18
19
20
21
22
23
24
25
26
27
28
29
30
31
32
33
34
35
36
37
38
39
40
41
42
43
44
45
46
47
48
49
'''
classmethod
将类函数可以不经过实例化而直接被调用
用法:
@classmethod
def func(cls, ...):
	do
参数介绍:
cls 替代普通类函数中的self变为cls,代表当前操作的是类
'''
class Test(object):
  @classmethod
  def add(cls, a, b):
    return a + b
Test.add(1,2)


'''
staticmethod
将类函数可以不经过实例化而直接被调用,被该装饰器调用的函数不许传递self或cls参数,且无法再该函数内调用其它类函数或类变量
用法:
@staticmethod
def func(...):
参数介绍:
函数题内无cls或self参数
'''
class Test(object):
  @staticmethod
  def add(a, b):
    return a + b
Test,add(1,2)

'''
property
将类函数的执行免去括弧,类似于调用属性(变量)
用法:
@property
def func(self):
	do
'''
class Test(object):
	def _init__(self, name):
    self,name = name
	@property
	def call name(self):
    return 'hello {}'.format(self.name)
test = Test('小慕')
result = tes.call_name
print(result) # hello 小慕
列表推导式
1
2
3
4
5
6
7
8
9
10
11
12
13
14
a = [1,2,3,4,5]

b = [i*i for i in a]

print(b)


# 字典推导式
student = {
    "xixi":1
    "haha":2
}
# 翻转
s = {value:key for key,value in student}
1
2
3
4
5
6
7
8
9
10
11
12
13
14
15
16
origin = 0

def factory(pos):
    def go(step):
        nonlocal pos
        new_pos = pos + step
        pos = new_pos
        return new_pos
    return go

tourlist = factory(origin)
print(tourlist(2))

print(tourlist(3))

print(tourlist(5))
装饰器深入
带参数的装饰器
1
2
3
4
5
6
7
8
9
10
11
12
13
14
15
16
17
18
19
20
21
22
23
24
25
26
27
28
29
import time
from functools import wraps

def retry(max_attempts=3, delay=1):
    """重试装饰器:失败后自动重试"""
    def decorator(func):
        @wraps(func)  # 保留原函数的元信息
        def wrapper(*args, **kwargs):
            for attempt in range(max_attempts):
                try:
                    return func(*args, **kwargs)
                except Exception as e:
                    if attempt < max_attempts - 1:
                        print(f"第{attempt+1}次失败,{delay}秒后重试: {e}")
                        time.sleep(delay)
                    else:
                        print(f"已重试{max_attempts}次,全部失败")
                        raise
        return wrapper
    return decorator

@retry(max_attempts=3, delay=2)
def unstable_api_call():
    import random
    if random.random() < 0.7:
        raise ConnectionError("API连接失败")
    return "成功!"

# unstable_api_call()
类装饰器
1
2
3
4
5
6
7
8
9
10
11
12
13
14
15
16
17
18
19
20
class Singleton:
    """单例模式装饰器"""
    def __init__(self, cls):
        self._cls = cls
        self._instance = None

    def __call__(self, *args, **kwargs):
        if self._instance is None:
            self._instance = self._cls(*args, **kwargs)
        return self._instance

@Singleton
class Database:
    def __init__(self, host):
        self.host = host
        print(f"连接数据库: {host}")

db1 = Database("localhost")   # 连接数据库: localhost
db2 = Database("localhost")   # 不会再次连接
print(db1 is db2)             # True,同一个实例
常用装饰器集合
1
2
3
4
5
6
7
8
9
10
11
12
13
14
15
16
17
18
19
20
21
22
23
24
25
26
27
28
29
30
31
32
33
34
35
36
37
38
39
40
41
42
43
44
45
46
47
48
49
50
51
52
53
54
55
56
57
58
59
60
61
62
63
64
65
66
67
68
69
70
71
72
73
74
75
76
77
78
79
80
81
82
83
84
85
86
87
88
89
90
91
92
from functools import wraps
import time
import logging

logging.basicConfig(level=logging.INFO)
logger = logging.getLogger(__name__)


# 1. 计时装饰器
def timer(func):
    @wraps(func)
    def wrapper(*args, **kwargs):
        start = time.time()
        result = func(*args, **kwargs)
        elapsed = time.time() - start
        print(f"{func.__name__} 耗时: {elapsed:.4f}秒")
        return result
    return wrapper


# 2. 日志装饰器
def log_calls(func):
    @wraps(func)
    def wrapper(*args, **kwargs):
        args_repr = [repr(a) for a in args]
        kwargs_repr = [f"{k}={v!r}" for k, v in kwargs.items()]
        signature = ", ".join(args_repr + kwargs_repr)
        logger.info(f"调用 {func.__name__}({signature})")
        result = func(*args, **kwargs)
        logger.info(f"{func.__name__} 返回 {result!r}")
        return result
    return wrapper


# 3. 缓存/记忆化装饰器
def memoize(func):
    cache = {}
    @wraps(func)
    def wrapper(*args):
        if args not in cache:
            cache[args] = func(*args)
        return cache[args]
    return wrapper

@memoize
def fibonacci(n):
    if n < 2:
        return n
    return fibonacci(n-1) + fibonacci(n-2)

print(fibonacci(100))  # 瞬间计算


# 4. functools.lru_cache - 内置缓存装饰器
from functools import lru_cache

@lru_cache(maxsize=128)
def expensive_computation(n):
    print(f"计算 {n}...")
    return sum(i**2 for i in range(n))

print(expensive_computation(1000))  # 计算并缓存
print(expensive_computation(1000))  # 直接返回缓存结果


# 5. 注册器模式 - 插件系统
class PluginRegistry:
    def __init__(self):
        self._plugins = {}

    def register(self, name):
        def decorator(func):
            self._plugins[name] = func
            return func
        return decorator

    def get(self, name):
        return self._plugins.get(name)

registry = PluginRegistry()

@registry.register("preprocess")
def preprocess_data(data):
    return [x.strip().lower() for x in data]

@registry.register("tokenize")
def tokenize_text(text):
    return text.split()

# 使用
handler = registry.get("preprocess")
print(handler([" Hello ", " WORLD "]))  # ['hello', 'world']
生成器深入
生成器是一种特殊的迭代器,通过 yield 暂停函数执行并返回值,下次调用时从暂停处继续
1
2
3
4
5
6
7
8
9
10
11
12
13
14
15
16
17
18
19
20
21
22
23
24
25
26
27
28
29
30
31
32
33
34
35
36
37
38
39
40
41
42
43
44
45
46
47
48
49
50
51
52
53
54
55
56
57
58
59
60
61
62
63
64
65
66
67
68
69
70
71
72
73
74
75
76
77
78
79
80
81
82
83
84
85
86
87
88
89
90
91
92
93
94
95
96
97
98
99
100
101
102
# ---- 基础生成器 ----
def count_up(max_value):
    count = 1
    while count <= max_value:
        yield count        # 暂停并返回count
        count += 1

gen = count_up(5)
print(next(gen))          # 1
print(next(gen))          # 2
for n in gen:             # 继续从3开始
    print(n)              # 3, 4, 5


# ---- 生成器表达式 ----
# 类似列表推导式,但用圆括号,惰性求值,节省内存
squares = (x**2 for x in range(1000000))  # 不立即创建100万个元素
print(next(squares))      # 0
print(next(squares))      # 1

# 对比:列表推导式一次性占满内存
# squares_list = [x**2 for x in range(1000000)]  # 占用大量内存


# ---- yield from - 委托生成器 ----
def sub_gen():
    yield 1
    yield 2

def main_gen():
    yield 'start'
    yield from sub_gen()    # 委托给子生成器
    yield 'end'

for v in main_gen():
    print(v)  # start, 1, 2, end


# ---- 生成器实现斐波那契数列 ----
def fibonacci():
    a, b = 0, 1
    while True:
        yield a
        a, b = b, a + b

fib = fibonacci()
for _ in range(10):
    print(next(fib), end=" ")  # 0 1 1 2 3 5 8 13 21 34
print()


# ---- 生成器实现数据流处理 ----
def read_large_file(filepath, chunk_size=1024):
    """逐块读取大文件,避免一次性加载"""
    with open(filepath, 'r') as f:
        while True:
            chunk = f.read(chunk_size)
            if not chunk:
                break
            yield chunk

def filter_lines(lines, keyword):
    """过滤包含关键词的行"""
    for line in lines:
        if keyword in line:
            yield line.strip()

def count_words(lines):
    """统计每行单词数"""
    for line in lines:
        yield len(line.split())


# ---- send()方法 - 向生成器发送值 ----
def accumulator():
    total = 0
    while True:
        value = yield total      # yield返回total,同时接收send的值
        if value is None:
            break
        total += value

gen = accumulator()
next(gen)                   # 启动生成器,返回0
gen.send(10)                 # 发送10,total=10,返回10
gen.send(20)                 # 发送20,total=30,返回30
gen.send(5)                  # 发送5,total=35,返回35


# ---- close()和throw() ----
def gen_with_cleanup():
    try:
        yield 1
        yield 2
        yield 3
    finally:
        print("清理资源")

g = gen_with_cleanup()
next(g)       # 1
next(g)       # 2
g.close()     # 触发清理,抛出GeneratorExit
itertools 迭代器工具库
itertools 提供高效、内存友好的迭代器构建工具
1
2
3
4
5
6
7
8
9
10
11
12
13
14
15
16
17
18
19
20
21
22
23
24
25
26
27
28
29
30
31
32
33
34
35
36
37
38
39
40
41
42
43
44
45
46
47
48
49
50
51
52
53
54
55
56
57
58
59
60
61
62
63
64
65
66
67
68
69
70
71
72
73
74
75
76
77
78
79
80
81
82
83
84
85
86
87
88
89
90
91
92
93
94
95
96
97
98
99
100
101
102
103
104
105
106
107
108
109
110
import itertools


# ---- 无限迭代器 ----
# count - 无限计数
for i in itertools.count(start=1, step=2):
    if i > 10:
        break
    print(i)  # 1, 3, 5, 7, 9

# cycle - 无限循环
# for item in itertools.cycle(['A', 'B', 'C']):
#     print(item)  # A B C A B C ...

# repeat - 重复
for x in itertools.repeat(10, 3):
    print(x)  # 10, 10, 10


# ---- 排列组合 ----
# permutations - 排列(考虑顺序)
print(list(itertools.permutations('ABC', 2)))
# [('A','B'), ('A','C'), ('B','A'), ('B','C'), ('C','A'), ('C','B')]

# combinations - 组合(不考虑顺序)
print(list(itertools.combinations('ABC', 2)))
# [('A','B'), ('A','C'), ('B','C')]

# combinations_with_replacement - 可重复组合
print(list(itertools.combinations_with_replacement('ABC', 2)))
# [('A','A'), ('A','B'), ('A','C'), ('B','B'), ('B','C'), ('C','C')]


# ---- 累积与分组 ----
# accumulate - 累积
print(list(itertools.accumulate([1, 2, 3, 4, 5])))
# [1, 3, 6, 10, 15]

import operator
print(list(itertools.accumulate([1, 2, 3, 4], operator.mul)))
# [1, 2, 6, 24]

# groupby - 分组(需要先排序!)
data = [('A', 1), ('B', 2), ('A', 3), ('B', 4), ('A', 5)]
data.sort(key=lambda x: x[0])  # 先排序
for key, group in itertools.groupby(data, key=lambda x: x[0]):
    print(key, list(group))
# A [('A', 1), ('A', 3), ('A', 5)]
# B [('B', 2), ('B', 4)]


# ---- 链接与切片 ----
# chain - 链接多个可迭代对象
list1 = [1, 2, 3]
list2 = ['a', 'b', 'c']
print(list(itertools.chain(list1, list2)))
# [1, 2, 3, 'a', 'b', 'c']

# chain.from_iterable - 从嵌套可迭代对象链接
nested = [[1, 2], [3, 4], [5, 6]]
print(list(itertools.chain.from_iterable(nested)))
# [1, 2, 3, 4, 5, 6]  ← 展平!

# islice - 切片(对任何可迭代对象)
print(list(itertools.islice(range(100), 5, 10)))
# [5, 6, 7, 8, 9]


# ---- 过滤 ----
# filterfalse - 过滤掉满足条件的
print(list(itertools.filterfalse(lambda x: x % 2 == 0, range(10))))
# [1, 3, 5, 7, 9]

# takewhile - 持续取值直到不满足条件
print(list(itertools.takewhile(lambda x: x < 5, [1, 3, 5, 2, 4])))
# [1, 3]  遇到5停止

# dropwhile - 跳过直到不满足条件
print(list(itertools.dropwhile(lambda x: x < 5, [1, 3, 5, 2, 4])))
# [5, 2, 4]  跳过1,3


# ---- 笛卡尔积 ----
# product - 笛卡尔积
print(list(itertools.product('AB', [1, 2])))
# [('A',1), ('A',2), ('B',1), ('B',2)]

# 嵌套循环的替代
# 相当于 for x in 'AB': for y in [1,2]: print(x,y)


# ---- zip_longest ----
# zip遇短停止,zip_longest填充None
print(list(itertools.zip_longest('ABC', [1, 2], fillvalue=0)))
# [('A', 1), ('B', 2), ('C', 0)]


# ---- 实战:批量处理 ----
def batched(iterable, n):
    """将可迭代对象分批"""
    it = iter(iterable)
    while True:
        batch = list(itertools.islice(it, n))
        if not batch:
            break
        yield batch

for batch in batched(range(10), 3):
    print(batch)
# [0, 1, 2], [3, 4, 5], [6, 7, 8], [9]
上下文管理器
上下文管理器用于资源的自动获取与释放,是 with 语句的基础
1
2
3
4
5
6
7
8
9
10
11
12
13
14
15
16
17
18
19
20
21
22
23
24
25
26
27
28
29
30
31
32
33
34
35
36
37
38
39
40
41
42
43
44
45
46
47
48
49
50
51
52
53
54
55
56
57
58
59
60
61
62
63
64
65
66
67
68
69
70
71
72
73
74
75
76
77
78
79
80
81
82
83
84
85
86
87
88
89
90
91
92
93
94
95
96
97
98
99
100
101
# ---- 基本用法 ----
# with语句确保文件自动关闭
with open('data.txt', 'r') as f:
    content = f.read()
# 离开with块后,文件自动关闭,即使发生异常


# ---- 方式1:类实现 __enter__ 和 __exit__ ----
class DatabaseConnection:
    def __init__(self, host):
        self.host = host
        self.conn = None

    def __enter__(self):
        """进入with块时调用,返回值赋给as变量"""
        print(f"连接数据库: {self.host}")
        self.conn = f"Connection({self.host})"  # 模拟连接
        return self.conn

    def __exit__(self, exc_type, exc_val, exc_tb):
        """离开with块时调用,即使有异常也会执行"""
        print(f"关闭数据库连接: {self.host}")
        self.conn = None
        # 返回True表示异常已处理,不再传播
        # 返回False或None表示异常继续传播
        return False

with DatabaseConnection('localhost') as conn:
    print(f"使用连接: {conn}")
# 输出:连接数据库 → 使用连接 → 关闭数据库连接


# ---- 方式2:contextlib.contextmanager 装饰器 ----
from contextlib import contextmanager

@contextmanager
def timer(name="操作"):
    """计时上下文管理器"""
    import time
    start = time.time()
    print(f"{name} 开始...")
    try:
        yield  # yield之前是__enter__,之后是__exit__
    finally:
        elapsed = time.time() - start
        print(f"{name} 耗时: {elapsed:.4f}秒")

with timer("数据处理"):
    # 模拟耗时操作
    sum(range(1000000))
# 输出:数据处理 开始... → 数据处理 耗时: 0.0234秒


# ---- 实用示例:临时修改工作目录 ----
import os

@contextmanager
def change_dir(path):
    old_dir = os.getcwd()
    os.chdir(path)
    try:
        yield
    finally:
        os.chdir(old_dir)

# with change_dir('/tmp'):
#     print(os.getcwd())  # /tmp
# print(os.getcwd())      # 恢复原目录


# ---- 实用示例:临时重定向标准输出 ----
import sys
from io import StringIO

@contextmanager
def capture_output():
    old_stdout = sys.stdout
    sys.stdout = StringIO()
    try:
        yield sys.stdout
    finally:
        sys.stdout = old_stdout

with capture_output() as output:
    print("这行会被捕获")
    print("这行也会")

print("捕获的内容:", output.getvalue())  # 这行会被捕获\n这行也会\n


# ---- contextlib 其他实用工具 ----
from contextlib import suppress, closing, ExitStack

# suppress - 忽略指定异常
with suppress(FileNotFoundError):
    os.remove('nonexistent.txt')  # 文件不存在也不报错

# ExitStack - 动态管理多个上下文
# with ExitStack() as stack:
#     files = [stack.enter_context(open(f)) for f in ['a.txt', 'b.txt', 'c.txt']]
#     # 所有文件在退出时自动关闭
collections模块
1
2
3
4
5
6
7
8
9
10
11
12
13
14
15
16
17
18
19
20
21
22
23
24
25
26
27
28
29
30
31
32
33
34
35
from collections import namedtuple, deque, Counter, defaultdict, OrderedDict

# namedtuple - 命名元组,比普通元组更可读
Point = namedtuple('Point', ['x', 'y'])
p = Point(3, 4)
print(p.x, p.y)           # 3 4
print(p[0], p[1])         # 3 4
x, y = p                  # 可解包

# deque - 双端队列,两端操作都是O(1)
dq = deque([1, 2, 3])
dq.appendleft(0)          # 左端添加 → deque([0, 1, 2, 3])
dq.append(4)              # 右端添加 → deque([0, 1, 2, 3, 4])
dq.popleft()              # 左端弹出 → 0
dq.pop()                  # 右端弹出 → 4

# 旋转
dq = deque([1, 2, 3, 4, 5])
dq.rotate(2)              # 右旋2位 → deque([4, 5, 1, 2, 3])
dq.rotate(-1)             # 左旋1位 → deque([5, 1, 2, 3, 4])

# 限制长度(适合做滑动窗口)
recent = deque(maxlen=5)
for i in range(10):
    recent.append(i)
print(recent)             # deque([5, 6, 7, 8, 9], maxlen=5)


# ChainMap - 多字典链式查找
from collections import ChainMap
defaults = {"color": "blue", "size": "M"}
user = {"size": "L"}
config = ChainMap(user, defaults)
print(config["size"])     # L(user优先)
print(config["color"])    # blue(从defaults找)
第五篇:高阶特性
类型提示(Type Hints)
Python 3.5+ 引入的类型提示系统,让代码更清晰、IDE支持更好、便于静态检查
1
2
3
4
5
6
7
8
9
10
11
12
13
14
15
16
17
18
19
20
21
22
23
24
25
26
27
28
29
30
31
32
33
34
35
36
37
38
39
40
41
42
43
44
45
46
47
48
49
50
51
52
53
54
55
56
57
58
59
60
61
62
63
64
65
66
67
68
69
70
71
72
73
74
75
76
77
78
79
80
81
82
83
84
85
86
87
88
89
90
91
92
93
94
95
96
97
98
99
100
101
102
103
104
105
106
107
108
109
110
111
112
113
114
115
116
117
118
119
120
121
122
123
124
125
126
127
128
129
130
131
132
133
134
135
136
137
138
139
140
141
142
143
144
145
146
147
148
149
150
151
152
153
154
155
156
157
158
159
160
161
162
163
164
165
166
167
168
169
170
# ---- 基本类型标注 ----
name: str = "小明"
age: int = 18
score: float = 95.5
is_student: bool = True


# ---- 函数类型标注 ----
def greet(name: str) -> str:
    return f"Hello, {name}"

def add(a: int, b: int) -> int:
    return a + b

def process(items: list[int]) -> dict[str, int]:
    return {str(i): i for i in items}


# ---- 可选参数和默认值 ----
from typing import Optional

def find_user(user_id: int, active: bool = True) -> Optional[str]:
    """返回用户名,如果未找到返回None"""
    if user_id > 0:
        return "小明"
    return None

# Python 3.10+ 可以用 X | None 代替 Optional[X]
def find_user_v2(user_id: int) -> str | None:
    if user_id > 0:
        return "小明"
    return None


# ---- 集合类型 ----
from typing import List, Dict, Set, Tuple

names: list[str] = ["小明", "小红"]           # Python 3.9+
scores: dict[str, int] = {"数学": 90}        # Python 3.9+
unique_ids: set[int] = {1, 2, 3}             # Python 3.9+
point: tuple[int, int] = (3, 4)               # Python 3.9+

# 旧版本写法 (Python 3.5+)
names_old: List[str] = ["小明", "小红"]
scores_old: Dict[str, int] = {"数学": 90}


# ---- 联合类型 ----
from typing import Union

def process_value(value: Union[int, str]) -> str:
    return str(value)

# Python 3.10+
def process_value_v2(value: int | str) -> str:
    return str(value)


# ---- Any 类型 ----
from typing import Any

def process_any(data: Any) -> Any:
    """可以接收任何类型"""
    return data


# ---- Callable - 函数类型 ----
from typing import Callable

def apply(func: Callable[[int, int], int], a: int, b: int) -> int:
    return func(a, b)

result = apply(lambda x, y: x + y, 3, 5)


# ---- 泛型 ----
from typing import TypeVar, Generic

T = TypeVar('T')

class Stack(Generic[T]):
    def __init__(self) -> None:
        self.items: list[T] = []

    def push(self, item: T) -> None:
        self.items.append(item)

    def pop(self) -> T:
        return self.items.pop()

    def is_empty(self) -> bool:
        return len(self.items) == 0

stack: Stack[int] = Stack()
stack.push(1)
stack.push(2)


# ---- TypedDict - 类型化字典 ----
from typing import TypedDict

class UserInfo(TypedDict):
    name: str
    age: int
    email: str

user: UserInfo = {"name": "小明", "age": 18, "email": "xm@test.com"}


# ---- Literal - 字面量类型 ----
from typing import Literal

def set_mode(mode: Literal["train", "eval", "test"]) -> None:
    print(f"模式: {mode}")

set_mode("train")  # OK
# set_mode("infer")  # 类型检查报错


# ---- Protocol - 结构化类型(鸭子类型的类型提示) ----
from typing import Protocol

class Drawable(Protocol):
    def draw(self) -> None: ...

class Circle:
    def draw(self) -> None:
        print("绘制圆形")

def render(shape: Drawable) -> None:
    shape.draw()

render(Circle())  # OK,Circle有draw方法


# ---- dataclass 结合类型提示 ----
from dataclasses import dataclass

@dataclass
class Student:
    name: str
    age: int
    scores: list[float]
    active: bool = True

    def average(self) -> float:
        return sum(self.scores) / len(self.scores)

stu = Student("小明", 18, [90.5, 85.0, 92.3])
print(stu.average())


# ---- 类型别名 ----
Vector = list[float]
Matrix = list[Vector]

def dot_product(a: Vector, b: Vector) -> float:
    return sum(x * y for x, y in zip(a, b))


# ---- 使用 pydantic 进行数据验证 ----
from pydantic import BaseModel

class User(BaseModel):
    name: str
    age: int
    email: str = ""

user = User(name="小明", age=18)
print(user.model_dump())  # {'name': '小明', 'age': 18, 'email': ''}
异常
介绍
1
2
3
4
5
6
7
8
9
10
11
12
13
14
15
16
17
'''
try:
	<代码块1> # 被try关键字检查并保护的业务代码
except<异常的类型>:
	<代码块2> # 代码块1出现错误后执行的代码块

当except代码块有多个的时候,当捕获到第一个后不会继续往下捕获
'''
try:
	1/0
except (ZeroDivisionError, Exception) as e:
	print('0不能被1整除')
    print('程序继续执行')
    print(e)
finally:
    return 'finally'
异常类型集合
Exception:通用异常类型( 基类 )
ZeroDivisionError:不能整除0
AttributeError:对象没有这个属性
IOError:输入输出操作失败
IndexError:没有当前的索引
KeyError:没有这个键值 (key)
NameError:没有这个变量 (未初始化对象)
SyntaxError:Python语法错误
SystemError:解释器的系统错误
ValueError:传入的参数错误
主动抛出自定义异常
1
2
3
4
5
6
7
8
9
10
11
def test(number):
	if number == 100:
        # 主动抛出异常
		raise ValueError('number 不可以是100')
    return number


# 自定义异常要继承Exception
class NameLimitError(Exception):
    def __init__(self, message):
        self.message = message
断言
1
assert len(kwargs) == 4,"参数必须是4个
异步编程(async/await)
异步编程是处理I/O密集型任务的利器,在AI应用中广泛用于并发请求、数据获取等场景
1
2
3
4
5
6
7
8
9
10
11
12
13
14
15
16
17
18
19
20
21
22
23
24
25
26
27
28
29
30
31
32
33
34
35
36
37
38
39
40
41
42
43
44
45
46
47
48
49
50
51
52
53
54
55
56
57
58
59
60
61
62
63
64
65
66
67
68
69
70
71
72
73
74
75
76
77
78
79
80
81
82
83
84
85
86
87
88
89
90
91
92
93
94
95
96
97
98
99
100
101
102
103
104
105
106
107
108
109
110
111
112
113
114
115
116
117
118
119
120
121
122
123
124
125
126
127
128
129
130
131
132
133
134
135
136
137
138
139
140
141
142
143
144
145
146
147
148
149
150
151
152
153
154
155
156
157
158
159
160
161
162
163
import asyncio
import time


# ---- 基本概念 ----
# async def 定义协程函数
# await 等待异步操作完成
# asyncio.run() 运行协程


# ---- 基础示例 ----
async def hello():
    print("开始...")
    await asyncio.sleep(1)     # 非阻塞等待1秒
    print("结束!")

# 运行协程
asyncio.run(hello())


# ---- 并发执行多个协程 ----
async def fetch_data(name: str, delay: float) -> str:
    print(f"{name} 开始获取数据...")
    await asyncio.sleep(delay)     # 模拟I/O操作
    print(f"{name} 数据获取完成!")
    return f"{name}的数据"

async def main():
    start = time.time()

    # gather 并发执行,等待全部完成
    results = await asyncio.gather(
        fetch_data("任务A", 2),
        fetch_data("任务B", 1),
        fetch_data("任务C", 3),
    )
    print(f"结果: {results}")         # ['任务A的数据', '任务B的数据', '任务C的数据']
    print(f"总耗时: {time.time()-start:.1f}秒")  # 约3秒(不是6秒!)

asyncio.run(main())


# ---- asyncio.create_task ----
async def main_with_tasks():
    # 创建任务后立即开始执行
    task1 = asyncio.create_task(fetch_data("T1", 2))
    task2 = asyncio.create_task(fetch_data("T2", 1))

    # 可以做其他事情
    print("任务已提交,做其他事...")

    # 等待结果
    r1 = await task1
    r2 = await task2
    print(f"{r1}, {r2}")

asyncio.run(main_with_tasks())


# ---- 异步上下文管理器 ----
class AsyncDB:
    async def __aenter__(self):
        print("异步连接数据库")
        await asyncio.sleep(0.1)
        return self

    async def __aexit__(self, exc_type, exc_val, exc_tb):
        print("异步关闭连接")
        await asyncio.sleep(0.1)

    async def query(self, sql: str):
        await asyncio.sleep(0.5)  # 模拟查询
        return f"结果: {sql}"

async def db_example():
    async with AsyncDB() as db:
        result = await db.query("SELECT * FROM users")
        print(result)

asyncio.run(db_example())


# ---- 异步迭代器 ----
class AsyncRange:
    def __init__(self, count):
        self.count = count

    def __aiter__(self):
        self.i = 0
        return self

    async def __anext__(self):
        if self.i >= self.count:
            raise StopAsyncIteration
        await asyncio.sleep(0.1)
        self.i += 1
        return self.i

async def iter_example():
    async for num in AsyncRange(5):
        print(num)

asyncio.run(iter_example())


# ---- 异步生成器 ----
async def async_fibonacci(n):
    a, b = 0, 1
    for _ in range(n):
        await asyncio.sleep(0.01)
        yield a
        a, b = b, a + b

async def async_gen_example():
    async for num in async_fibonacci(10):
        print(num, end=" ")

asyncio.run(async_gen_example())


# ---- asyncio.Semaphore 限制并发数 ----
async def limited_concurrent():
    sem = asyncio.Semaphore(3)  # 最多3个并发

    async def worker(i):
        async with sem:
            print(f"Worker {i} 开始")
            await asyncio.sleep(1)
            print(f"Worker {i} 完成")

    await asyncio.gather(*[worker(i) for i in range(10)])

asyncio.run(limited_concurrent())


# ---- 超时控制 ----
async def timeout_example():
    try:
        result = await asyncio.wait_for(
            fetch_data("慢任务", 10),
            timeout=2.0
        )
    except asyncio.TimeoutError:
        print("任务超时!")

asyncio.run(timeout_example())


# ---- 实战:异步HTTP请求 ----
# 需要安装: pip install aiohttp
import aiohttp

async def fetch_urls(urls: list[str]) -> list[str]:
    results = []
    async with aiohttp.ClientSession() as session:
        tasks = []
        for url in urls:
            async with session.get(url) as response:
                results.append(await response.text())
        # 更好的写法:并发请求
        # tasks = [session.get(url) for url in urls]
        # responses = await asyncio.gather(*tasks)
    return results
多线程深入
1
2
3
4
5
6
7
8
9
10
11
12
13
14
15
16
17
18
19
20
21
22
23
24
25
26
27
28
29
30
31
32
33
34
35
36
37
38
39
40
41
42
43
44
45
46
47
48
49
50
51
52
53
54
55
56
57
58
59
60
61
62
63
64
65
66
67
68
69
70
71
72
73
74
75
76
77
78
79
80
81
82
import threading
import time
from concurrent.futures import ThreadPoolExecutor, as_completed


# ---- 线程基础 ----
def worker(name, duration):
    print(f"{name} 开始")
    time.sleep(duration)
    print(f"{name} 完成")
    return f"{name}的结果"

# 创建线程
t1 = threading.Thread(target=worker, args=("线程1", 2))
t2 = threading.Thread(target=worker, args=("线程2", 1))

t1.start()
t2.start()
t1.join()   # 等待线程完成
t2.join()


# ---- 线程锁 ----
counter = 0
lock = threading.Lock()

def increment(n):
    global counter
    for _ in range(n):
        with lock:          # 自动获取和释放锁
            counter += 1

threads = [threading.Thread(target=increment, args=(100000,)) for _ in range(5)]
for t in threads:
    t.start()
for t in threads:
    t.join()
print(counter)  # 500000(不加锁可能小于此值)


# ---- 线程池 ----
def fetch_url(url):
    time.sleep(1)  # 模拟网络请求
    return f"{url} 的内容"

urls = [f"http://example.com/page/{i}" for i in range(10)]

with ThreadPoolExecutor(max_workers=4) as executor:
    # 方式1:submit + as_completed
    futures = {executor.submit(fetch_url, url): url for url in urls}
    for future in as_completed(futures):
        result = future.result()
        print(result)

    # 方式2:map(保持顺序)
    results = list(executor.map(fetch_url, urls))


# ---- 线程间通信 ----
from queue import Queue

def producer(q):
    for i in range(5):
        q.put(f"消息{i}")
        print(f"生产: 消息{i}")
    q.put(None)  # 发送结束信号

def consumer(q):
    while True:
        item = q.get()
        if item is None:
            break
        print(f"消费: {item}")
        q.task_done()

q = Queue()
t1 = threading.Thread(target=producer, args=(q,))
t2 = threading.Thread(target=consumer, args=(q,))
t1.start()
t2.start()
t1.join()
t2.join()
进程与线程
包
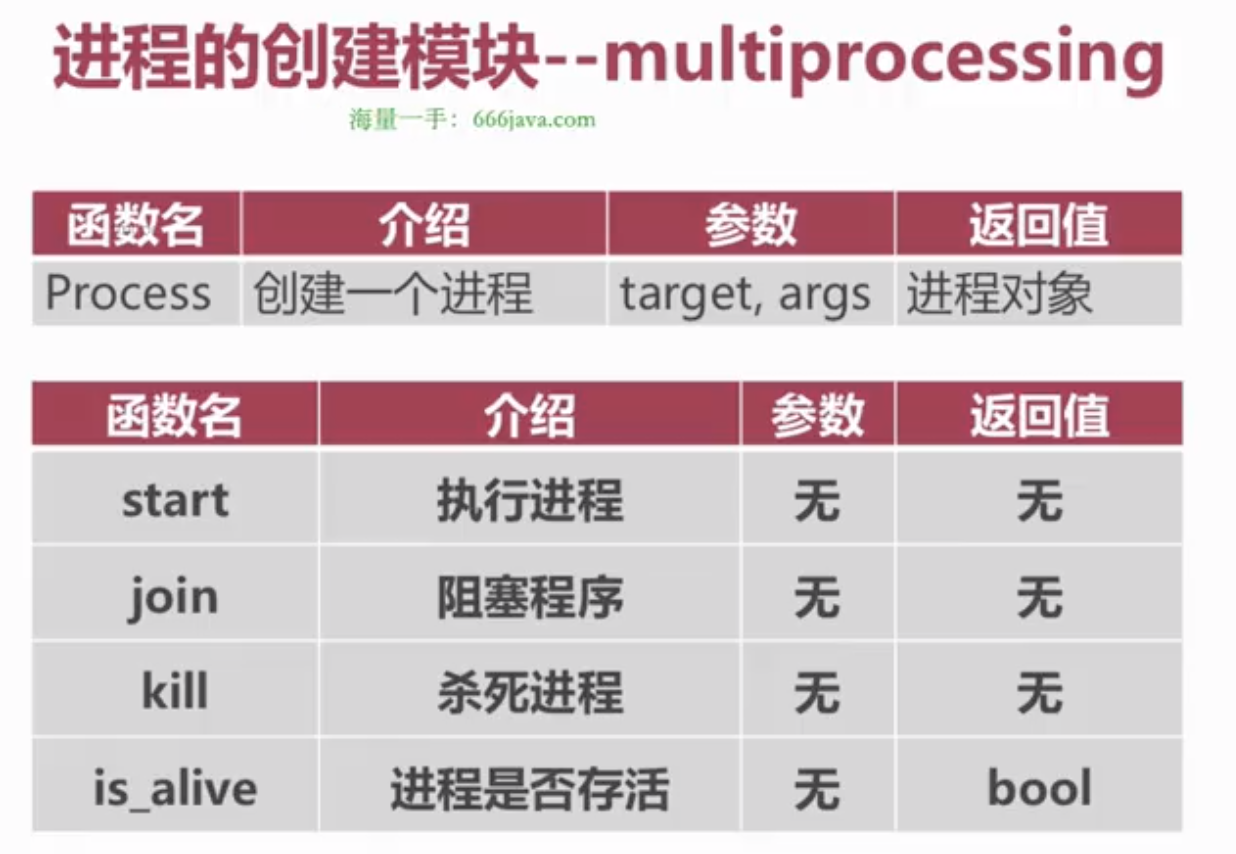
交替打印
1
2
3
4
5
6
7
8
9
10
11
12
13
14
15
16
17
18
19
20
21
22
23
24
25
26
27
28
29
30
31
32
33
34
35
36
# coding:utf-8

import time
import os
import multiprocessing

def work_a():
    for i in range(10):
        print(i, 'a', os.getpid())
        time.sleep(1)

def work_b():
    for i in range(10):
        print(i, 'b', os.getpid())
        time.sleep(1)


if __name__ == '__main__':
    start = time.time() # 主进程1
    a_p = multiprocessing.Process(target=work_a)  # 子进程1
    # a_p.start()  # 子进程1执行
    # a_p.join()
    b_p = multiprocessing.Process(target=work_b)  # 子进程2
    # b_p.start()  # 子进程2执行

    for p in (a_p, b_p):
        p.start()

    for p in (a_p, b_p):
        p.join()

    for p in (a_p, b_p):
        print(p.is_alive())

    print('时间消耗是:', time.time() - start)  # 主进程代码2
    print('parent pid is %s' % os.getpid())  # 主进程代码3行
多进程存在的问题:
通过进程模块执行的函数无法获取返回值
多个进程修改文件可能出现问题
进程太多可能导致资源不足的情况
进程池
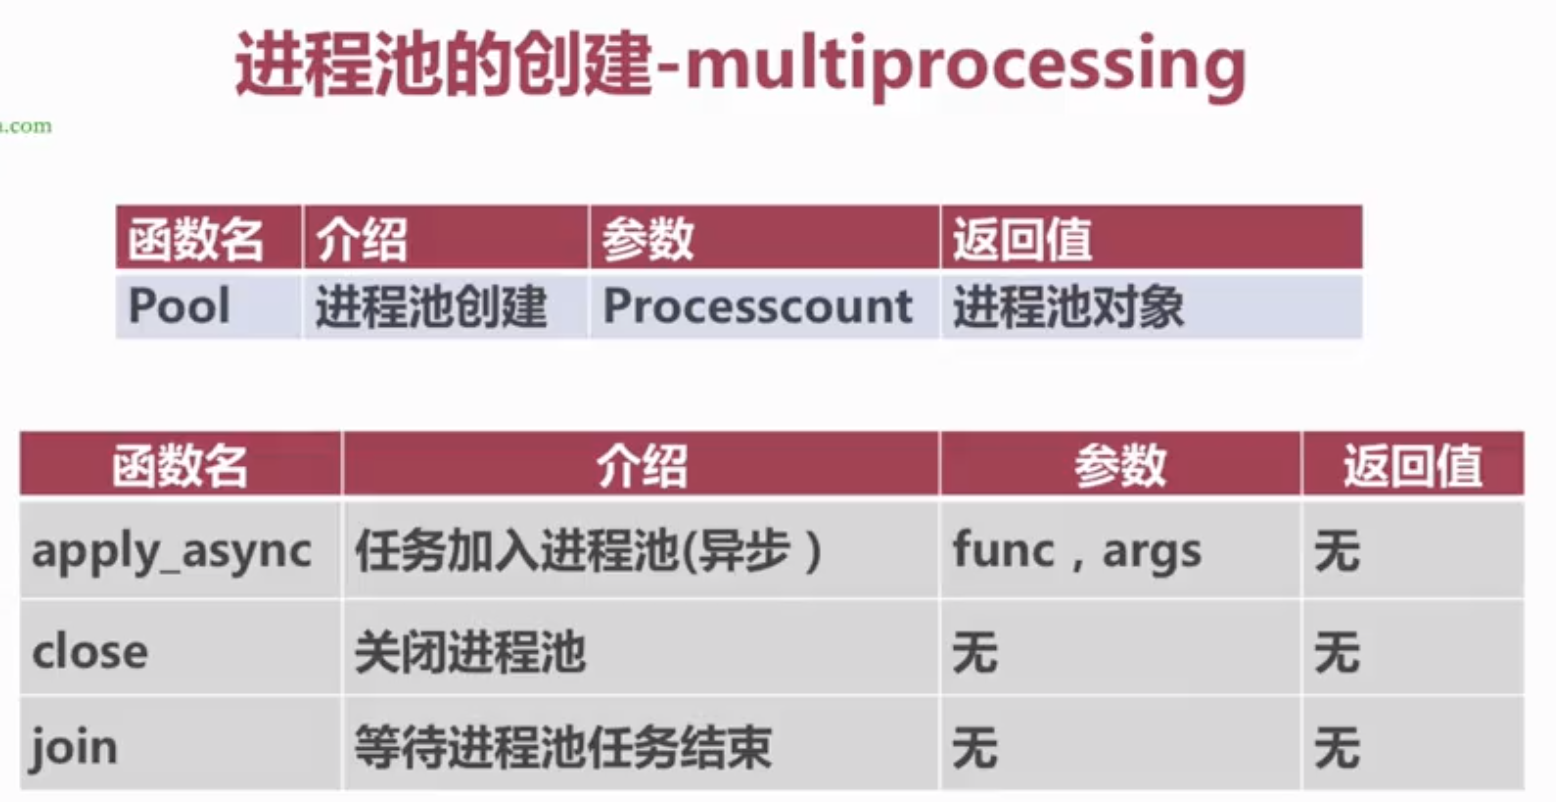
进程池和进程锁
1
2
3
4
5
6
7
8
9
10
11
12
13
14
15
16
17
18
19
20
21
22
23
24
25
26
27
28
29
30
31
32
33
34
# coding:utf-8

import os
import time
import multiprocessing


def work(count, lock):
    lock.acquire()
    print(count, os.getpid())
    time.sleep(5)
    lock.release()
    return 'result is %s, pid is %s' % (count, os.getpid())


if __name__ == '__main__':

    # 进程池
    pool = multiprocessing.Pool(5)
    manger = multiprocessing.Manager()

    # 进程锁
    lock = manger.Lock()
    results = []
    for i in range(20):
        result = pool.apply_async(func=work, args=(i, lock))
        # results.append(result)

    # for res in results:
    #     print(res.get())

    pool.close()
    pool.join()
魔术方法大全
1
2
3
4
5
6
7
8
9
10
11
12
13
14
15
16
17
18
19
20
21
22
23
24
25
26
27
28
29
30
31
32
33
34
35
36
37
38
39
40
41
42
43
44
45
46
47
48
49
50
51
52
53
54
55
56
57
58
59
60
61
62
63
64
65
66
67
68
69
70
71
72
73
74
75
76
77
78
79
80
81
82
83
84
85
86
87
88
89
90
91
92
93
94
95
96
97
98
99
100
101
102
103
104
105
106
107
"""常用魔术方法汇总"""

# ---- 比较方法 ----
class Student:
    def __init__(self, name, score):
        self.name = name
        self.score = score

    def __eq__(self, other):      # ==
        return self.score == other.score

    def __lt__(self, other):      # <
        return self.score < other.score

    def __le__(self, other):      # <=
        return self.score <= other.score

    def __repr__(self):           # 调试输出
        return f"Student({self.name!r}, {self.score})"

    def __str__(self):            # print输出
        return f"{self.name}: {self.score}分"

    def __hash__(self):           # 使对象可哈希(可放入set/dict)
        return hash((self.name, self.score))

s1 = Student("小明", 90)
s2 = Student("小红", 85)
print(s1 > s2)    # True
print(sorted([s1, s2]))  # [小红: 85分, 小明: 90分]


# ---- 算术运算方法 ----
class Vector:
    def __init__(self, x, y):
        self.x = x
        self.y = y

    def __add__(self, other):           # +
        return Vector(self.x + other.x, self.y + other.y)

    def __sub__(self, other):           # -
        return Vector(self.x - other.x, self.y - other.y)

    def __mul__(self, scalar):          # *
        return Vector(self.x * scalar, self.y * scalar)

    def __abs__(self):                  # abs()
        return (self.x**2 + self.y**2)**0.5

    def __repr__(self):
        return f"Vector({self.x}, {self.y})"

v1 = Vector(3, 4)
v2 = Vector(1, 2)
print(v1 + v2)      # Vector(4, 6)
print(v1 * 3)       # Vector(9, 12)
print(abs(v1))       # 5.0


# ---- 容器方法 ----
class SparseArray:
    """稀疏数组:只存储非零元素"""
    def __init__(self):
        self._data = {}

    def __getitem__(self, key):        # obj[key]
        return self._data.get(key, 0)

    def __setitem__(self, key, value): # obj[key] = value
        if value != 0:
            self._data[key] = value
        elif key in self._data:
            del self._data[key]

    def __delitem__(self, key):        # del obj[key]
        del self._data[key]

    def __len__(self):                 # len(obj)
        return max(self._data.keys(), default=-1) + 1 if self._data else 0

    def __contains__(self, item):      # item in obj
        return item in self._data.values()

    def __iter__(self):                # for item in obj
        return iter(self._data.values())

arr = SparseArray()
arr[100] = 5
arr[200] = 10
print(arr[100])     # 5
print(arr[50])      # 0(默认值)
print(5 in arr)     # True


# ---- 可调用对象 ----
class Multiplier:
    def __init__(self, factor):
        self.factor = factor

    def __call__(self, x):            # 让实例像函数一样调用
        return self.factor * x

double = Multiplier(2)
triple = Multiplier(3)
print(double(5))    # 10
print(triple(5))    # 15
元类(Metaclass)
元类是创建类的类,是Python中最高级的面向对象特性
1
2
3
4
5
6
7
8
9
10
11
12
13
14
15
16
17
18
19
20
21
22
23
24
25
26
27
28
29
30
31
32
33
34
35
36
37
38
# ---- type 创建类 ----
# type(类名, 父类元组, 属性字典)
MyClass = type('MyClass', (), {'x': 10, 'greet': lambda self: 'hello'})
obj = MyClass()
print(obj.x)        # 10
print(obj.greet())  # hello


# ---- 单例元类 ----
class SingletonMeta(type):
    _instances = {}

    def __call__(cls, *args, **kwargs):
        if cls not in cls._instances:
            cls._instances[cls] = super().__call__(*args, **kwargs)
        return cls._instances[cls]

class Config(metaclass=SingletonMeta):
    def __init__(self):
        self.debug = False

c1 = Config()
c2 = Config()
print(c1 is c2)   # True


# ---- __init_subclass__ - 更简单的类定制 (Python 3.6+) ----
class PluginBase:
    _registry = {}

    def __init_subclass__(cls, **kwargs):
        super().__init_subclass__(**kwargs)
        PluginBase._registry[cls.__name__] = cls

class MyPlugin(PluginBase):
    pass

print(PluginBase._registry)  # {'MyPlugin': <class 'MyPlugin'>}
描述符(Descriptor)
描述符是Python属性访问机制的核心,property 就是描述符的实现
1
2
3
4
5
6
7
8
9
10
11
12
13
14
15
16
17
18
19
20
21
22
23
24
25
26
27
28
29
30
31
32
33
34
35
36
37
38
39
40
41
42
43
44
45
46
47
48
49
50
51
52
53
54
55
56
57
58
59
60
61
62
63
64
65
66
67
68
# ---- 基本描述符 ----
class Validated:
    """验证描述符"""
    def __init__(self, name, validator=None):
        self.name = name
        self.validator = validator

    def __get__(self, obj, objtype=None):
        if obj is None:
            return self
        return obj.__dict__.get(self.name)

    def __set__(self, obj, value):
        if self.validator and not self.validator(value):
            raise ValueError(f"无效值: {value}")
        obj.__dict__[self.name] = value

    def __delete__(self, obj):
        raise AttributeError(f"不能删除 {self.name}")


def is_positive(v):
    return isinstance(v, (int, float)) and v > 0

def is_nonempty_str(v):
    return isinstance(v, str) and len(v.strip()) > 0


class Product:
    name = Validated('name', is_nonempty_str)
    price = Validated('price', is_positive)
    stock = Validated('stock', is_positive)

    def __init__(self, name, price, stock):
        self.name = name
        self.price = price
        self.stock = stock

p = Product("手机", 2999, 100)
# p.price = -1     # ValueError: 无效值: -1
# p.name = ""      # ValueError: 无效值:


# ---- 用描述符实现 lazy 属性 ----
class LazyProperty:
    def __init__(self, func):
        self.func = func
        self.attr_name = func.__name__

    def __get__(self, obj, objtype=None):
        if obj is None:
            return self
        value = self.func(obj)
        obj.__dict__[self.attr_name] = value  # 缓存结果
        return value

class DataLoader:
    def __init__(self, path):
        self.path = path

    @LazyProperty
    def data(self):
        print("加载数据...")  # 只会执行一次
        return list(range(100))

loader = DataLoader("/data")
print(loader.data)   # 加载数据... [0, 1, ..., 99]
print(loader.data)   # [0, 1, ..., 99](不再加载)
AI开发篇
match/case 模式匹配
Python 3.10+ 引入的结构化模式匹配,类似于其他语言的 switch/case 但更强大
1
2
3
4
5
6
7
8
9
10
11
12
13
14
15
16
17
18
19
20
21
22
23
24
25
26
27
28
29
30
31
32
33
34
35
36
37
38
39
40
41
42
43
44
45
46
47
48
49
50
51
52
53
54
55
56
57
58
59
60
61
62
63
64
65
66
67
68
69
70
71
72
73
74
75
76
77
78
79
80
81
82
83
84
85
86
87
88
89
90
91
92
93
94
95
96
97
98
99
100
101
102
103
104
105
106
107
108
109
110
111
112
113
# ---- 基本用法 ----
def http_status(status):
    match status:
        case 200:
            return "OK"
        case 301:
            return "Moved Permanently"
        case 404:
            return "Not Found"
        case 500:
            return "Internal Server Error"
        case _:                    # _ 是通配符,类似default
            return "Unknown"

print(http_status(200))   # OK
print(http_status(999))   # Unknown


# ---- 带变量绑定 ----
def greet(command):
    match command.split():
        case ["hello", name]:
            return f"Hello, {name}!"
        case ["goodbye", name]:
            return f"Goodbye, {name}!"
        case _:
            return "Unknown command"

print(greet("hello 小明"))     # Hello, 小明!
print(greet("goodbye 小红"))  # Goodbye, 小红!


# ---- 解包匹配 ----
def process_point(point):
    match point:
        case (0, 0):
            return "原点"
        case (0, y):
            return f"Y轴上,y={y}"
        case (x, 0):
            return f"X轴上,x={x}"
        case (x, y):
            return f"坐标({x}, {y})"

print(process_point((0, 0)))    # 原点
print(process_point((3, 0)))    # X轴上,x=3
print(process_point((2, 5)))    # 坐标(2, 5)


# ---- 匹配对象属性 ----
class Student:
    def __init__(self, name, age, grade):
        self.name = name
        self.age = age
        self.grade = grade

def describe(student):
    match student:
        case Student(age=a, grade='A') if a < 20:
            return f"{student.name},年轻优秀!"
        case Student(grade='A'):
            return f"{student.name},成绩优秀"
        case Student(age=a) if a < 18:
            return f"{student.name},未成年"
        case _:
            return f"{student.name},普通学生"

print(describe(Student("小明", 18, "A")))  # 小明,年轻优秀!


# ---- 匹配字典 ----
def handle_event(event):
    match event:
        case {"type": "click", "x": x, "y": y}:
            return f"点击坐标({x}, {y})"
        case {"type": "key", "key": k}:
            return f"按键: {k}"
        case {"type": "scroll", "delta": d} if d > 0:
            return "向上滚动"
        case {"type": "scroll"}:
            return "向下滚动"

print(handle_event({"type": "click", "x": 100, "y": 200}))  # 点击坐标(100, 200)


# ---- 匹配列表(头部/尾部模式) ----
def process_list(items):
    match items:
        case []:
            return "空列表"
        case [x]:
            return f"单元素: {x}"
        case [x, y]:
            return f"两个元素: {x} 和 {y}"
        case [first, *rest]:
            return f"首元素: {first}, 其余: {rest}"

print(process_list([]))           # 空列表
print(process_list([1]))          # 单元素: 1
print(process_list([1, 2, 3]))    # 首元素: 1, 其余: [2, 3]


# ---- OR模式 ----
def classify(num):
    match num:
        case 0 | 1:
            return "二进制位"
        case x if x < 0:
            return "负数"
        case x if x > 100:
            return "大数"
        case _:
            return "普通数字"
functools 工具库
functools 提供高阶函数和可调用对象操作工具
1
2
3
4
5
6
7
8
9
10
11
12
13
14
15
16
17
18
19
20
21
22
23
24
25
26
27
28
29
30
31
32
33
34
35
36
37
38
39
40
41
42
43
44
45
46
47
48
49
50
51
52
53
54
55
56
57
58
59
60
61
62
63
64
65
66
67
68
69
70
71
72
73
74
75
76
77
78
79
80
81
82
83
84
85
86
87
88
89
90
91
92
93
94
95
96
97
98
99
100
101
102
103
104
105
106
107
108
109
110
111
112
113
from functools import reduce, partial, wraps, lru_cache, total_ordering, singledispatch


# ---- 1. partial - 偏函数,固定部分参数 ----
def power(base, exponent):
    return base ** exponent

# 固定exponent=2,创建求平方函数
square = partial(power, exponent=2)
cube = partial(power, exponent=3)

print(square(5))   # 25
cube(3)             # 27

# 实战:固定默认参数
from datetime import datetime
parse_date = partial(datetime.strptime, format='%Y-%m-%d')
print(parse_date('2024-01-15'))  # 2024-01-15 00:00:00


# ---- 2. lru_cache - 缓存装饰器 ----
@lru_cache(maxsize=128)
def fibonacci(n):
    if n < 2:
        return n
    return fibonacci(n-1) + fibonacci(n-2)

print(fibonacci(100))   # 瞬间算出
print(fibonacci.cache_info())  # 查看缓存命中情况

# Python 3.9+ 可以用 @cache 代替 @lru_cache(maxsize=None)
from functools import cache

@cache
def expensive(n):
    return sum(i**2 for i in range(n))


# ---- 3. wraps - 保留原函数信息 ----
def my_decorator(func):
    @wraps(func)   # 不加的话 __name__、__doc__ 会变成wrapper的
    def wrapper(*args, **kwargs):
        """wrapper doc"""
        return func(*args, **kwargs)
    return wrapper

@my_decorator
def greet(name):
    """打招呼"""
    return f"Hello {name}"

print(greet.__name__)    # greet(不是wrapper)
print(greet.__doc__)     # 打招呼(不是wrapper doc)


# ---- 4. total_ordering - 自动生成比较方法 ----
@total_ordering
class Student:
    def __init__(self, name, score):
        self.name = name
        self.score = score

    def __eq__(self, other):
        return self.score == other.score

    def __lt__(self, other):
        return self.score < other.score

    # total_ordering自动生成 __le__, __gt__, __ge__

s1 = Student("小明", 90)
s2 = Student("小红", 85)
print(s1 > s2)     # True
print(s1 >= s2)    # True


# ---- 5. singledispatch - 单分派泛型函数 ----
@singledispatch
def process(data):
    raise NotImplementedError(f"不支持类型: {type(data)}")

@process.register(str)
def _(data):
    return data.upper()

@process.register(list)
def _(data):
    return [x * 2 for x in data]

@process.register(int)
def _(data):
    return data ** 2

print(process("hello"))    # HELLO
print(process([1, 2, 3]))  # [2, 4, 6]
print(process(5))          # 25


# ---- 6. reduce - 累积计算 ----
nums = [1, 2, 3, 4, 5]
print(reduce(lambda x, y: x + y, nums))           # 15
print(reduce(lambda x, y: x * y, nums))           # 120
print(reduce(lambda x, y: x + y, nums, 100))      # 115(初始值100)


# ---- 7. cmp_to_key - 旧式比较函数转key ----
def compare(a, b):
    """旧式比较:返回负数/0/正数"""
    return len(a) - len(b)

words = ['banana', 'pie', 'Washington', 'book']
sorted_words = sorted(words, key=functools.cmp_to_key(compare))
print(sorted_words)  # ['pie', 'book', 'banana', 'Washington']
第六篇:AI开发
Jupyter Notebook
Jupyter Notebook 是AI/数据科学领域最常用的交互式开发环境
1
2
3
4
5
6
7
8
9
10
11
12
13
14
15
16
17
18
19
20
21
22
23
24
25
26
27
28
29
30
31
32
33
34
35
36
37
38
39
40
41
42
43
44
45
46
47
48
49
50
51
52
53
54
55
# ---- 安装 ----
# pip install jupyter
# pip install notebook
# 启动: jupyter notebook
# 或新版: jupyter lab


# ---- Jupyter 魔术命令 ----

# %开头的行魔术命令
%timeit sum(range(1000))           # 计时执行
%pwd                               # 显示当前目录
%ls                                # 列出文件
%who                               # 列出当前变量
%reset                             # 重置所有变量

# %%开头的单元格魔术命令
%%time                              # 计时整个单元格
%%writefile script.py               # 将单元格内容写入文件
%%html                              # 渲染HTML
%%markdown                          # 渲染Markdown


# ---- 在Notebook中显示丰富内容 ----
from IPython.display import display, HTML, Image, Markdown, JSON

display(HTML('<h1 style="color:blue">Hello AI</h1>'))
display(Image(url='https://example.com/image.png'))
display(Markdown('**粗体文本**'))
display(JSON({"name": "小明", "score": 95}))


# ---- 进度条 ----
from tqdm.notebook import tqdm
import time

for i in tqdm(range(100), desc="处理中"):
    time.sleep(0.01)


# ---- 交互式控件 ----
from ipywidgets import interact, IntSlider

@interact(x=IntSlider(min=0, max=100, step=1, value=50))
def square(x):
    return x ** 2


# ---- 注意事项 ----
# 1. 单元格执行顺序很重要,不要依赖非线性执行
# 2. 变量在整个notebook中共享
# 3. 重启内核可以清除所有变量状态
# 4. 使用 ! 前缀执行shell命令: !pip install numpy
# 5. 使用 ? 查看文档: len?
# 6. 使用 ?? 查看源码: sum??
NumPy 数组操作
NumPy 是Python科学计算的基础库,是Pandas、Scikit-learn、TensorFlow等库的底层
1
2
3
4
5
6
7
8
9
10
11
12
13
14
15
16
17
18
19
20
21
22
23
24
25
26
27
28
29
30
31
32
33
34
35
36
37
38
39
40
41
42
43
44
45
46
47
48
49
50
51
52
53
54
55
56
57
58
59
60
61
62
63
64
65
66
67
68
69
70
71
72
73
74
75
76
77
78
79
80
81
82
83
84
85
86
87
88
89
90
91
92
93
94
95
96
97
98
99
100
101
102
103
104
105
106
107
108
109
110
111
112
113
114
115
116
117
118
119
120
121
122
123
124
125
126
127
128
129
130
131
132
133
134
135
136
137
138
139
140
141
142
143
144
145
146
147
148
149
150
151
152
153
154
155
156
157
158
159
160
161
162
163
164
165
166
167
168
169
170
171
172
173
import numpy as np

# ---- 创建数组 ----
# 从列表创建
a = np.array([1, 2, 3, 4, 5])
print(a, a.dtype)          # [1 2 3 4 5] int64

b = np.array([1.0, 2.0, 3.0])
print(b, b.dtype)          # [1. 2. 3.] float64

# 二维数组
c = np.array([[1, 2, 3], [4, 5, 6]])
print(c)
# [[1 2 3]
#  [4 5 6]]

# 特殊数组
zeros = np.zeros((3, 4))        # 3x4 全零
ones = np.ones((2, 3))           # 2x3 全一
full = np.full((2, 3), 7)       # 2x3 全填7
eye = np.eye(3)                  # 3x3 单位矩阵
arange = np.arange(0, 10, 2)    # [0 2 4 6 8]
linspace = np.linspace(0, 1, 5) # [0. 0.25 0.5 0.75 1.]
random = np.random.rand(3, 3)    # 3x3 随机数 [0,1)
randint = np.random.randint(0, 10, (3, 3))  # 3x3 随机整数


# ---- 数组属性 ----
arr = np.array([[1, 2, 3], [4, 5, 6]])
print(arr.shape)       # (2, 3)  形状
print(arr.ndim)        # 2       维度
print(arr.size)        # 6       元素总数
print(arr.dtype)       # int64   数据类型
print(arr.itemsize)    # 8       每个元素字节大小


# ---- 索引与切片 ----
arr = np.array([[1, 2, 3], [4, 5, 6], [7, 8, 9]])

# 基本索引
print(arr[0])          # [1 2 3]      第一行
print(arr[0, 1])       # 2            第0行第1列
print(arr[-1])         # [7 8 9]      最后一行

# 切片
print(arr[0:2])        # 前两行
print(arr[:, 1])       # 所有行的第1列 → [2 5 8]
print(arr[1:, :2])     # 第1行起,前两列

# 花式索引
print(arr[[0, 2]])     # 第0行和第2行
print(arr[:, [0, 2]])  # 第0列和第2列

# 布尔索引
mask = arr > 5
print(arr[mask])       # [6 7 8 9]
print(arr[arr % 2 == 0])  # [2 4 6 8]


# ---- 数组运算(向量化操作,无需循环!) ----
a = np.array([1, 2, 3, 4])
b = np.array([10, 20, 30, 40])

# 算术运算 - 逐元素
print(a + b)           # [11 22 33 44]
print(a * b)           # [10 40 90 160]
print(a ** 2)          # [1 4 9 16]
print(np.sqrt(a))      # [1. 1.414 1.732 2.]

# 标量运算
print(a * 2)           # [2 4 6 8]
print(a + 10)          # [11 12 13 14]

# 比较运算
print(a > 2)           # [False False True True]


# ---- 广播机制 ----
# 不同形状的数组运算时自动扩展
arr = np.array([[1, 2, 3], [4, 5, 6]])  # (2, 3)
row = np.array([10, 20, 30])              # (3,) → 广播为 (2, 3)
col = np.array([[100], [200]])            # (2,1) → 广播为 (2, 3)

print(arr + row)
# [[11 22 33]
#  [104 125 136]]

print(arr + col)
# [[101 102 103]
#  [204 205 206]]


# ---- 形状操作 ----
arr = np.arange(12)   # [0 1 2 ... 11]
print(arr.reshape(3, 4))     # 3x4矩阵
print(arr.reshape(2, -1))    # 自动计算: 2x6
print(arr.reshape(3, 4).T)   # 转置: 4x3

# 展平
matrix = np.array([[1, 2], [3, 4]])
print(matrix.flatten())      # [1 2 3 4]  返回副本
print(matrix.ravel())        # [1 2 3 4]  返回视图(共享内存)


# ---- 常用数学函数 ----
arr = np.array([1, 4, 9, 16, 25])
print(np.sqrt(arr))          # [1. 2. 3. 4. 5.]
print(np.exp(arr))           # e^x
print(np.log(arr))           # ln(x)
print(np.log2(arr))          # log2(x)
print(np.abs([-1, -2]))      # [1 2]
print(np.round([3.14, 2.72], 1))  # [3.1 2.7]


# ---- 统计函数 ----
arr = np.array([[1, 2, 3], [4, 5, 6]])
print(arr.sum())             # 21
print(arr.sum(axis=0))       # [5 7 9]    按列求和
print(arr.sum(axis=1))       # [6 15]     按行求和
print(arr.mean())            # 3.5
print(arr.mean(axis=0))      # [2.5 3.5 4.5]
print(arr.max())             # 6
print(arr.min())             # 1
print(arr.argmax())          # 5  最大值索引
print(arr.std())             # 标准差
print(arr.var())             # 方差
print(np.percentile(arr, 50))  # 中位数


# ---- 矩阵运算 ----
A = np.array([[1, 2], [3, 4]])
B = np.array([[5, 6], [7, 8]])

# 矩阵乘法
print(A @ B)                 # 矩阵乘法
print(np.dot(A, B))          # 同上
print(np.matmul(A, B))       # 同上

# 线性代数
print(np.linalg.det(A))      # 行列式
print(np.linalg.inv(A))      # 逆矩阵
eigenvalues, eigenvectors = np.linalg.eig(A)  # 特征值和特征向量
print(np.linalg.solve(A, [1, 2]))  # 解线性方程组


# ---- 数组拼接与分裂 ----
a = np.array([1, 2, 3])
b = np.array([4, 5, 6])

print(np.concatenate([a, b]))     # [1 2 3 4 5 6]
print(np.vstack([a, b]))          # 垂直堆叠
print(np.hstack([a, b]))          # 水平堆叠
print(np.stack([a, b]))           # 新轴堆叠

arr = np.arange(12).reshape(3, 4)
print(np.split(arr, 3))           # 按行均分3份
print(np.hsplit(arr, 2))          # 按列均分2份


# ---- 随机数 ----
rng = np.random.default_rng(42)   # 新版推荐用法
print(rng.random((3, 3)))          # [0,1) 随机浮点数
print(rng.integers(0, 10, (3, 3))) # 随机整数
print(rng.normal(0, 1, (3, 3)))    # 正态分布
print(rng.choice([1,2,3,4,5], 3))  # 随机选择


# ---- 文件读写 ----
arr = np.arange(12).reshape(3, 4)
np.save('array.npy', arr)              # 保存单个数组
np.savetxt('array.csv', arr, delimiter=',')  # 保存为CSV
loaded = np.load('array.npy')           # 加载
from_csv = np.loadtxt('array.csv', delimiter=',')  # 从CSV加载
Pandas DataFrame
Pandas 是数据分析最核心的库,提供DataFrame和Series两种数据结构
1
2
3
4
5
6
7
8
9
10
11
12
13
14
15
16
17
18
19
20
21
22
23
24
25
26
27
28
29
30
31
32
33
34
35
36
37
38
39
40
41
42
43
44
45
46
47
48
49
50
51
52
53
54
55
56
57
58
59
60
61
62
63
64
65
66
67
68
69
70
71
72
73
74
75
76
77
78
79
80
81
82
83
84
85
86
87
import pandas as pd
import numpy as np

# ---- 创建DataFrame ----

# 从字典创建
df = pd.DataFrame({
    'name': ['小明', '小红', '小刚', '小美'],
    'age': [18, 20, 19, 21],
    'score': [90, 85, 92, 88],
    'city': ['北京', '上海', '广州', '深圳']
})
print(df)

# 从列表创建
df2 = pd.DataFrame([
    {'name': '小明', 'age': 18, 'score': 90},
    {'name': '小红', 'age': 20, 'score': 85},
])

# 从NumPy数组创建
arr = np.random.randn(5, 3)
df3 = pd.DataFrame(arr, columns=['A', 'B', 'C'])


# ---- 基本操作 ----
print(df.head())            # 前5行
print(df.tail(2))           # 后2行
print(df.shape)             # (4, 4) 行列数
print(df.columns)           # 列名
print(df.dtypes)            # 每列数据类型
print(df.info())            # 概览信息
print(df.describe())        # 数值列统计摘要


# ---- 选择数据 ----
# 选择列
print(df['name'])           # 单列 → Series
print(df[['name', 'age']])  # 多列 → DataFrame

# 选择行
print(df.iloc[0])           # 按位置选行
print(df.iloc[0:2])         # 按位置切片
print(df.loc[0])            # 按索引选行

# 条件选择
print(df[df['score'] > 88])           # 分数大于88
print(df[(df['age'] >= 19) & (df['city'] == '广州')])  # 多条件

# query方法
print(df.query('score > 88 and age < 21'))  # SQL风格查询


# ---- 增删改 ----
# 新增列
df['grade'] = ['A', 'B', 'A', 'B']
df['is_adult'] = df['age'] >= 18

# 修改值
df.loc[0, 'score'] = 95

# 删除列
df = df.drop('grade', axis=1)        # 删除列
df = df.drop(0, axis=0)               # 删除行


# ---- 缺失值处理 ----
df_nan = pd.DataFrame({
    'A': [1, np.nan, 3, np.nan],
    'B': [5, 6, np.nan, 8],
    'C': [9, 10, 11, 12]
})

# 检测缺失值
print(df_nan.isnull())         # 布尔矩阵
print(df_nan.isnull().sum())   # 每列缺失数

# 删除缺失行
print(df_nan.dropna())                 # 删除任何含NaN的行
print(df_nan.dropna(subset=['A']))      # 只看A列

# 填充缺失值
print(df_nan.fillna(0))                         # 填0
print(df_nan.fillna(df_nan.mean()))              # 填均值
print(df_nan['A'].fillna(df_nan['A'].median()))   # 填中位数
print(df_nan.fillna(method='ffill'))              # 前向填充
print(df_nan.fillna(method='bfill'))              # 后向填充
数据清洗
1
2
3
4
5
6
7
8
9
10
11
12
13
14
15
16
17
18
19
20
21
22
23
24
25
26
27
28
29
30
31
32
33
34
35
36
37
38
39
40
41
42
43
44
45
46
47
48
49
50
51
52
53
54
55
56
57
58
59
60
61
62
63
64
65
66
67
68
69
70
71
72
73
74
75
import pandas as pd
import numpy as np

# 创建一个有问题的数据集
df = pd.DataFrame({
    '姓名': ['小明', '小红', '  小刚  ', '小美', '小明'],
    '年龄': [18, 200, 19, -5, 18],
    '分数': [90, 85, np.nan, 88, 90],
    '城市': ['北京', '上海', '广州', '深圳', '北京'],
    '日期': ['2024-01-01', '2024/01/02', '2024-01-03', 'Jan 4, 2024', '2024-01-01']
})


# ---- 1. 去除字符串空格 ----
df['姓名'] = df['姓名'].str.strip()    # 去两端空格
# df['姓名'] = df['姓名'].str.lstrip()  # 去左空格
# df['姓名'] = df['姓名'].str.rstrip()  # 去右空格


# ---- 2. 去除重复数据 ----
print(df.duplicated())                  # 查看重复行
print(df.duplicated(subset=['姓名']))   # 按列判断重复
df = df.drop_duplicates()               # 删除重复行
df = df.drop_duplicates(subset=['姓名'], keep='first')  # 保留第一条


# ---- 3. 处理异常值 ----
# 年龄列有200和-5这样的异常值
# 方法1:直接过滤
df = df[(df['年龄'] >= 0) & (df['年龄'] <= 150)]

# 方法2:用分位数截断
q1 = df['年龄'].quantile(0.25)
q3 = df['年龄'].quantile(0.75)
iqr = q3 - q1
lower = q1 - 1.5 * iqr
upper = q3 + 1.5 * iqr
df = df[(df['年龄'] >= lower) & (df['年龄'] <= upper)]

# 方法3:替换异常值
df.loc[df['年龄'] > 150, '年龄'] = 150
df.loc[df['年龄'] < 0, '年龄'] = 0


# ---- 4. 数据类型转换 ----
df['年龄'] = df['年龄'].astype(int)
df['分数'] = df['分数'].astype(float)

# 数值列转字符串
df['年龄_str'] = df['年龄'].astype(str)


# ---- 5. 日期解析 ----
df['日期'] = pd.to_datetime(df['日期'])  # 自动识别多种日期格式
print(df['日期'].dt.year)        # 提取年
print(df['日期'].dt.month)       # 提取月
print(df['日期'].dt.day)         # 提取日
print(df['日期'].dt.dayofweek)   # 星期几(0=周一)


# ---- 6. 字符串处理 ----
df['姓名大写'] = df['姓名'].str.upper()
df['姓名小写'] = df['姓名'].str.lower()
df['是否包含小'] = df['姓名'].str.contains('小')
df['姓名长度'] = df['姓名'].str.len()
df['姓名替换'] = df['姓名'].str.replace('小', '大')


# ---- 7. 列重命名 ----
df = df.rename(columns={'姓名': 'name', '年龄': 'age'})
df.columns = ['name', 'age', 'score', 'city', 'date']  # 批量重命名


# ---- 8. 索引重置 ----
df = df.reset_index(drop=True)   # 重置索引,丢弃旧索引
数据转换
1
2
3
4
5
6
7
8
9
10
11
12
13
14
15
16
17
18
19
20
21
22
23
24
25
26
27
28
29
30
31
32
33
34
35
36
37
38
39
40
41
42
43
44
45
46
47
48
49
50
51
52
53
54
55
56
57
58
59
60
61
62
63
64
65
66
67
68
69
70
71
72
73
74
75
76
77
78
79
80
81
82
83
84
85
86
87
88
89
90
91
92
93
94
95
96
97
98
99
100
101
102
103
104
105
106
107
108
109
110
111
112
113
114
115
116
117
118
119
120
121
122
123
124
125
126
127
128
129
130
import pandas as pd
import numpy as np

# 示例数据
df = pd.DataFrame({
    '姓名': ['小明', '小红', '小刚', '小美'],
    '数学': [90, 85, 92, 88],
    '英语': [80, 90, 75, 95],
    '语文': [88, 82, 95, 90],
    '班级': ['A', 'B', 'A', 'B']
})


# ---- 1. apply - 逐行/列应用函数 ----
# 对列应用函数
df['数学_满分制'] = df['数学'].apply(lambda x: x / 100 * 150)  # 换算150满分

# 对行应用函数
def total_score(row):
    return row['数学'] + row['英语'] + row['语文']

df['总分'] = df.apply(total_score, axis=1)

# 更简洁的写法
df['总分2'] = df[['数学', '英语', '语文']].sum(axis=1)


# ---- 2. map - Series元素映射 ----
score_to_grade = {90: 'A', 85: 'B', 92: 'A', 88: 'B'}
df['数学等级'] = df['数学'].map(score_to_grade)


# ---- 3. map + 函数 ----
def score_level(score):
    if score >= 90:
        return '优秀'
    elif score >= 80:
        return '良好'
    else:
        return '一般'

df['英语等级'] = df['英语'].map(score_level)


# ---- 4. cut / qcut - 分箱 ----
# 按区间分箱
df['数学档次'] = pd.cut(df['数学'], bins=[0, 60, 80, 90, 100],
                      labels=['不及格', '及格', '良好', '优秀'])

# 按分位数分箱(每箱人数大致相等)
df['英语四分位'] = pd.qcut(df['英语'], q=4, labels=['Q1', 'Q2', 'Q3', 'Q4'])


# ---- 5. get_dummies - 独热编码(机器学习必备) ----
df_dummies = pd.get_dummies(df['班级'], prefix='班级')
print(df_dummies)
#    班级_A  班级_B
# 0   True  False
# 1  False   True
# 2   True  False
# 3  False   True


# ---- 6. merge - 合并DataFrame ----
students = pd.DataFrame({'id': [1, 2, 3], 'name': ['小明', '小红', '小刚']})
scores = pd.DataFrame({'id': [1, 2, 4], 'math': [90, 85, 70], 'english': [80, 90, 65]})

# 内连接(交集)
inner = pd.merge(students, scores, on='id', how='inner')
# 左连接
left = pd.merge(students, scores, on='id', how='left')
# 外连接(并集)
outer = pd.merge(students, scores, on='id', how='outer')


# ---- 7. concat - 拼接DataFrame ----
df1 = pd.DataFrame({'A': [1, 2], 'B': [3, 4]})
df2 = pd.DataFrame({'A': [5, 6], 'B': [7, 8]})

# 垂直拼接
vertical = pd.concat([df1, df2], ignore_index=True)
# A  B
# 1  3
# 2  4
# 5  7
# 6  8

# 水平拼接
df3 = pd.DataFrame({'C': [9, 10]})
horizontal = pd.concat([df1, df3], axis=1)
# A  B   C
# 1  3   9
# 2  4  10


# ---- 8. pivot_table - 数据透视表 ----
sales = pd.DataFrame({
    '月份': ['1月','1月','2月','2月','1月','2月'],
    '类别': ['电子','服装','电子','服装','电子','服装'],
    '销售额': [100, 80, 120, 90, 95, 85],
    '数量': [10, 20, 12, 22, 9, 21]
})

pivot = sales.pivot_table(
    values='销售额',
    index='月份',
    columns='类别',
    aggfunc='sum'      # 聚合函数
)
print(pivot)
# 类别  服装  电子
# 月份
# 1月   80  195
# 2月   90  120


# ---- 9. melt - 宽表转长表 ----
wide = pd.DataFrame({
    '姓名': ['小明', '小红'],
    '数学': [90, 85],
    '英语': [80, 90]
})

long = wide.melt(id_vars=['姓名'], var_name='科目', value_name='分数')
print(long)
#   姓名  科目  分数
#  小明  数学   90
#  小红  数学   85
#  小明  英语   80
#  小红  英语   90
数据聚合与分组
1
2
3
4
5
6
7
8
9
10
11
12
13
14
15
16
17
18
19
20
21
22
23
24
25
26
27
28
29
30
31
32
33
34
35
36
37
38
39
40
41
42
43
44
45
46
47
48
49
50
51
52
53
54
55
56
57
58
59
60
61
62
63
64
65
66
67
68
69
70
71
72
73
74
75
76
77
78
79
80
81
82
83
84
85
86
87
88
89
90
91
92
93
94
95
96
97
98
99
100
101
102
103
104
105
106
107
108
109
110
111
112
113
114
115
116
117
118
119
120
121
import pandas as pd
import numpy as np

# 示例数据:学生成绩表
df = pd.DataFrame({
    '班级': ['A', 'A', 'A', 'B', 'B', 'B'],
    '姓名': ['小明', '小红', '小刚', '小美', '小李', '小张'],
    '科目': ['数学', '数学', '英语', '数学', '英语', '英语'],
    '分数': [90, 85, 92, 88, 76, 95]
})


# ---- 1. groupby 基础 ----
# 按班级分组
grouped = df.groupby('班级')

# 查看分组
for name, group in grouped:
    print(f"班级: {name}")
    print(group)

# 常用聚合
print(grouped['分数'].sum())        # 每组总分
print(grouped['分数'].mean())       # 每组均分
print(grouped['分数'].count())      # 每组人数
print(grouped['分数'].max())        # 每组最高分
print(grouped['分数'].min())        # 每组最低分
print(grouped['分数'].std())        # 每组标准差


# ---- 2. 多列聚合 ----
# 同时对多列做聚合
print(grouped.agg({
    '分数': ['mean', 'max', 'min'],
    '姓名': 'count'
}))


# ---- 3. agg - 自定义聚合 ----
print(grouped['分数'].agg([
    ('平均分', 'mean'),
    ('最高分', 'max'),
    ('人数', 'count'),
    ('分数范围', lambda x: x.max() - x.min())
]))


# ---- 4. 多级分组 ----
result = df.groupby(['班级', '科目'])['分数'].mean()
print(result)
# 班级  科目
# A   数学    87.5
#     英语    92.0
# B   数学    88.0
#     英语    85.5

# 取消多级索引
result = result.reset_index()


# ---- 5. transform - 分组转换(保持原形状) ----
# 计算每个学生在其班级内的分数差异
df['班级均分'] = df.groupby('班级')['分数'].transform('mean')
df['与均分差异'] = df['分数'] - df['班级均分']
print(df)


# ---- 6. filter - 分组过滤 ----
# 只保留平均分大于85的班级
good_classes = df.groupby('班级').filter(lambda x: x['分数'].mean() > 85)
print(good_classes)


# ---- 7. apply - 分组应用任意函数 ----
def top_student(group):
    return group.loc[group['分数'].idxmax()]

top_each_class = df.groupby('班级').apply(top_student)
print(top_each_class)


# ---- 8. 实战:销售数据分析 ----
sales = pd.DataFrame({
    '日期': pd.date_range('2024-01-01', periods=100),
    '商品': np.random.choice(['手机', '电脑', '平板'], 100),
    '地区': np.random.choice(['北京', '上海', '广州'], 100),
    '销售额': np.random.randint(100, 10000, 100),
    '数量': np.random.randint(1, 10, 100)
})

# 按商品和地区分组统计
summary = sales.groupby(['商品', '地区']).agg({
    '销售额': ['sum', 'mean'],
    '数量': 'sum'
}).round(2)
print(summary)

# 按月统计
sales['月份'] = sales['日期'].dt.to_period('M')
monthly = sales.groupby('月份')['销售额'].sum()
print(monthly)


# ---- 9. 文件读写 ----
# CSV
sales.to_csv('sales.csv', index=False, encoding='utf-8-sig')
loaded = pd.read_csv('sales.csv')

# Excel(需要 openpyxl)
sales.to_excel('sales.xlsx', sheet_name='销售数据', index=False)
loaded = pd.read_excel('sales.xlsx', sheet_name='销售数据')

# JSON
sales.to_json('sales.json', orient='records', force_ascii=False)
loaded = pd.read_json('sales.json')

# SQL(需要 sqlalchemy)
# from sqlalchemy import create_engine
# engine = create_engine('sqlite:///sales.db')
# sales.to_sql('sales', engine, if_exists='replace', index=False)
# loaded = pd.read_sql('SELECT * FROM sales', engine)
数据可视化快速入门
1
2
3
4
5
6
7
8
9
10
11
12
13
14
15
16
17
18
19
20
21
22
23
24
25
26
27
28
29
30
31
32
33
34
35
36
37
38
39
40
41
42
43
44
45
46
47
48
49
50
51
52
53
import pandas as pd
import numpy as np
import matplotlib.pyplot as plt

# 设置中文显示
plt.rcParams['font.sans-serif'] = ['SimHei']  # Mac用['Arial Unicode MS']
plt.rcParams['axes.unicode_minus'] = False

# 创建示例数据
df = pd.DataFrame({
    '月份': range(1, 13),
    '销售额': [120, 135, 148, 160, 155, 170, 180, 175, 190, 200, 210, 230],
    '成本': [80, 90, 95, 100, 98, 105, 110, 108, 115, 120, 125, 135],
    '类别': np.random.choice(['A', 'B', 'C'], 12)
})


# ---- 折线图 ----
df.plot(x='月份', y=['销售额', '成本'], kind='line', figsize=(10, 6))
plt.title('月度销售趋势')
plt.ylabel('金额(万元)')
plt.savefig('line_chart.png', dpi=150, bbox_inches='tight')
plt.show()


# ---- 柱状图 ----
df.plot(x='月份', y='销售额', kind='bar', figsize=(10, 6))
plt.title('月度销售额')
plt.show()


# ---- 散点图 ----
df.plot(x='成本', y='销售额', kind='scatter', figsize=(8, 6))
plt.title('成本vs销售额')
plt.show()


# ---- 直方图 ----
df['销售额'].plot(kind='hist', bins=5, figsize=(8, 6))
plt.title('销售额分布')
plt.show()


# ---- 饼图 ----
df.groupby('类别')['销售额'].sum().plot(kind='pie', autopct='%1.1f%%')
plt.title('类别占比')
plt.show()


# ---- 箱线图 ----
df[['销售额', '成本']].plot(kind='box', figsize=(8, 6))
plt.title('销售额与成本分布')
plt.show()
AI开发常用Python技巧
1
2
3
4
5
6
7
8
9
10
11
12
13
14
15
16
17
18
19
20
21
22
23
24
25
26
27
28
29
30
31
32
33
34
35
36
37
38
39
40
41
42
43
44
45
46
47
48
49
50
51
52
53
54
55
56
57
58
59
60
61
62
63
64
65
66
67
68
69
70
71
72
73
74
75
76
77
78
79
80
81
82
83
84
85
86
87
88
89
90
91
92
93
94
95
96
97
# ---- 1. 数据管道(Pipeline)模式 ----
# 用生成器和函数组合处理数据
def read_data(filepath):
    """读取数据"""
    with open(filepath) as f:
        for line in f:
            yield line.strip()

def parse_json(lines):
    """解析JSON行"""
    import json
    for line in lines:
        yield json.loads(line)

def filter_valid(records):
    """过滤有效记录"""
    for rec in records:
        if rec.get('score') is not None:
            yield rec

def extract_features(records):
    """提取特征"""
    for rec in records:
        yield {
            'id': rec['id'],
            'feature': [rec.get('score', 0), len(rec.get('text', ''))]
        }

# 组合管道
# pipeline = extract_features(filter_valid(parse_json(read_data('data.jsonl'))))
# for item in pipeline:
#     print(item)


# ---- 2. 向量化操作替代循环 ----
import numpy as np

# 慢:Python循环
def slow_compute(arr):
    result = []
    for x in arr:
        if x > 0:
            result.append(x ** 2)
        else:
            result.append(0)
    return result

# 快:NumPy向量化
def fast_compute(arr):
    return np.where(arr > 0, arr ** 2, 0)

arr = np.random.randn(1000000)
# fast_compute 比slow_compute 快几十到上百倍!


# ---- 3. 数据序列化(模型保存/加载) ----
import pickle
import json

# pickle - 保存Python对象
model = {"weights": [0.1, 0.2, 0.3], "bias": 0.05}
with open('model.pkl', 'wb') as f:
    pickle.dump(model, f)

with open('model.pkl', 'rb') as f:
    loaded_model = pickle.load(f)

# json - 人类可读的格式
with open('config.json', 'w') as f:
    json.dump(model, f, indent=2)

with open('config.json', 'r') as f:
    config = json.load(f)


# ---- 4. 环境管理 ----
# conda create -n ai_env python=3.10
# conda activate ai_env
# pip install numpy pandas matplotlib scikit-learn jupyter

# 导出环境
# pip freeze > requirements.txt
# pip install -r requirements.txt


# ---- 5. 常用AI库速览 ----
# NumPy        - 数值计算基础
# Pandas       - 数据分析
# Matplotlib   - 基础绘图
# Seaborn      - 统计可视化
# Scikit-learn - 机器学习
# TensorFlow   - 深度学习(Google)
# PyTorch      - 深度学习(Meta)
# Transformers - NLP大模型(HuggingFace)
# LangChain    - LLM应用开发
# OpenCV       - 计算机视觉
# NLTK/spaCy   - 自然语言处理
第七篇:工程实践
pathlib 现代路径操作
pathlib 是Python 3.4+ 引入的面向对象路径库,替代 os.path 的字符串拼接方式
1
2
3
4
5
6
7
8
9
10
11
12
13
14
15
16
17
18
19
20
21
22
23
24
25
26
27
28
29
30
31
32
33
34
35
36
37
38
39
40
41
42
43
44
45
46
47
48
49
50
51
52
53
54
55
56
57
58
59
60
61
62
63
64
65
66
67
68
69
70
71
72
73
74
75
76
77
78
79
80
81
82
83
84
85
86
87
88
89
90
91
92
93
94
95
from pathlib import Path

# ---- 创建路径对象 ----
p = Path('/Users/user/project/data.txt')
print(p.name)          # data.txt        文件名
print(p.stem)          # data            不含后缀的文件名
print(p.suffix)        # .txt            后缀
print(p.parent)        # /Users/user/project  父目录
print(p.parts)         # ('/', 'Users', 'user', 'project', 'data.txt')


# ---- 路径拼接(用 / 操作符!) ----
base = Path('/Users/user')
data_dir = base / 'project' / 'data'    # 比os.path.join更优雅
print(data_dir)  # /Users/user/project/data


# ---- 当前目录 ----
print(Path.cwd())       # 当前工作目录
print(Path.home())      # 用户主目录


# ---- 判断 ----
p = Path('data.txt')
print(p.exists())       # 是否存在
print(p.is_file())      # 是否是文件
print(p.is_dir())       # 是否是目录


# ---- 创建目录 ----
dir_path = Path('output/logs')
dir_path.mkdir(parents=True, exist_ok=True)  # 递归创建,已存在不报错


# ---- 遍历目录 ----
data_dir = Path('data')

# 列出所有文件
for f in data_dir.iterdir():
    print(f)

# 按模式搜索
for f in data_dir.glob('*.txt'):
    print(f)

# 递归搜索
for f in data_dir.rglob('*.csv'):
    print(f)


# ---- 读写文件 ----
p = Path('data.txt')

# 写文件
p.write_text('Hello World', encoding='utf-8')

# 读文件
content = p.read_text(encoding='utf-8')
print(content)  # Hello World

# 写二进制
p.write_bytes(b'\x89PNG')

# 读二进制
data = p.read_bytes()


# ---- 文件操作 ----
src = Path('data.txt')
dst = Path('backup/data.txt')

# 复制(需要shutil)
import shutil
shutil.copy2(src, dst)

# 重命名/移动
src.rename('data_new.txt')

# 删除
src.unlink()              # 删除文件
src.rmdir()               # 删除空目录
shutil.rmtree('dir')      # 删除非空目录


# ---- 对比 os.path vs pathlib ----
# os.path 方式
import os
data_path = os.path.join(os.getcwd(), 'data', 'train.csv')
name = os.path.basename(data_path)
ext = os.path.splitext(name)[1]

# pathlib 方式(更简洁)
data_path = Path.cwd() / 'data' / 'train.csv'
name = data_path.name
ext = data_path.suffix
文件操作
创建与写入
1
2
3
4
5
6
7
8
9
10
11
12
13
14
15
16
17
18
19
20
21
22
23
24
25
26
27
28
29
30
31
32
33
34
35
36
37
38
39
40
41
42
43
44
45
46
47
48
49
50
51
52
# coding:utf-8

import os

def create_package(path):
    if os.path.exists(path):
        raise Exception('%s 已经存在不可创建' % path)
    os.makedirs(path)
    init_path = os.path.join(path, '__init__.py')
    f = open(init_path, 'w')
    f.write('# coding:utf-8\n')
    f.close()

class Open(object):
    def __init__(self, path, mode='w', is_return=True):
        self.path = path
        self.mode = mode
        self.is_return = is_return

    def write(self, message):
        f = open(self.path, mode=self.mode)
        if self.is_return:
            message = '%s\n' % message
        f.write(message)
        f.close()

    def read(self, is_strip=True):
        result = []
        with open(self.path, mode=self.mode) as f:
            data = f.readlines()
        for line in data:
            if is_strip == True:
                temp = line.strip()
                if temp != "":
                    result.append(temp)
            else:
                if line != '':
                    result.append(line)
        return result


if __name__ == '__main__':
    current_path = os.getcwd()
    # path = os.path.join(current_path, 'test1')
    # create_package(path)
    # open_path = os.path.join(current_path, 'b.txt')
    o = Open('package_datetime.py', mode='r')
    # o.write('你好 小慕')
    data = o.read(is_strip=False)
    print(data)
加密模块
1
2
3
4
5
6
7
8
9
10
11
12
13
14
15
16
17
18
19
20
21
22
23
24
25
26
27
28
29
30
31
32
33
# coding:utf-8

import hashlib
import time

base_sign = 'muke'

def custom():
    a_timestamp = int(time.time())
    _token = '%s%s' % (base_sign, a_timestamp)

    # sha1 不可逆加密
    hashobj = hashlib.sha1(_token.encode('utf-8'))
    a_token = hashobj.hexdigest()
    return a_token, a_timestamp

def b_service_check(token, timestamp):
    _token = '%s%s' % (base_sign, timestamp)
    b_token = hashlib.sha1(_token.encode('utf-8')).hexdigest()
    if token == b_token:
        return True
    else:
        return False


if __name__ == '__main__':
    need_help_token, timestamp = custom()
    time.sleep(1)
    result = b_service_check(need_help_token, int(time.time()))
    if result == True:
        print('a合法,b服务可以进行帮助')
    else:
        print('a不合法,b不可进行帮助')
base64
1
2
3
4
5
6
7
8
9
10
11
12
13
14
15
16
17
18
19
20
21
22
23
24
25
26
27
28
29
30
31
32
33
# coding;utf-8
import base64

replace_one = '%'
replace_two = '$'

def encode(data):
	if isinstance(data, str):
        data = data.encode('utf-8')
    elif isinstance(data, bytes):
		data = data
    else:
		raise TypeError('data need bytes or str')
	_data = base64.encodebytes(data).decode('utf-8')

    # 二次加密
    _data = _data.replace('a',replace_one).replace('2',replace_two)
    return _data

def decode(data):
	if not isinstance(data, bytes):
        raise TypeError('data need bytes' )
    replace_one_b = replace_one.encode('utf-8')
    replace_two_b = replace_two.encode('utf-8')
    data = data.replace(replace_one_b, b'a').replace(replace_two_b, b'2')
    return base64.decodebytes(data).decode('utf-8')


if __name__ == '__main__':
    result = encode('hello xiaomu')
    print(result)
    new_result = decode(result,encode('utf-8'))
    print(new_result)
日志
1
2
3
4
5
6
7
8
9
10
11
12
13
14
15
16
17
18
19
20
21
22
23
24
25
26
# coding:utf-8

import logging
import os

def init_log(path):
    if os.path.exists(path):
        mode = 'a'
    else:
        mode = 'w'
    logging.basicConfig(
        level=logging.INFO,
        format='%(asctime)s %(filename)s %(lineno)d %(levelname)s %(message)s',
        filename=path,
        filemode=mode
    )
    return logging

current_path = os.getcwd()
path = os.path.join(current_path, 'back.log')
log = init_log(path)

log.info('这是第一个记录的日志信息')
log.warning('这是一个警告')
log.error('这是一个重大的错误信息')
log.debug('这是一个debug')
正则表达式
正则表达式是文本处理的强大工具,用于匹配、搜索、替换字符串
1
2
3
4
5
6
7
8
9
10
11
12
13
14
15
16
17
18
19
20
21
22
23
24
25
26
27
28
29
30
31
32
33
34
35
36
37
38
39
40
41
42
43
44
45
46
47
48
49
50
51
52
53
54
55
56
57
58
59
60
61
62
63
64
65
66
67
68
69
70
71
72
73
74
75
76
77
78
79
80
81
82
83
84
85
86
87
88
89
90
91
92
93
94
95
96
97
98
99
100
101
102
103
104
105
106
107
108
109
110
111
112
113
114
115
116
117
118
119
120
121
122
123
124
125
126
127
128
129
130
131
132
133
134
135
136
137
import re

# ---- 基本匹配 ----
# re.match 从字符串开头匹配
result = re.match(r'hello', 'hello world')
print(result.group())  # hello
print(result.span())   # (0, 5)

# re.search 搜索第一个匹配(不限位置)
result = re.search(r'world', 'hello world')
print(result.group())  # world

# re.findall 找到所有匹配,返回列表
results = re.findall(r'\d+', 'abc123def456ghi789')
print(results)  # ['123', '456', '789']

# re.finditer 找到所有匹配,返回迭代器
for m in re.finditer(r'\d+', 'abc123def456'):
    print(m.group(), m.span())

# re.sub 替换
text = '2024-01-15'
new_text = re.sub(r'-', '/', text)
print(new_text)  # 2024/01/15

# re.split 分割
result = re.split(r'[,;\s]+', 'apple,banana;orange grape')
print(result)  # ['apple', 'banana', 'orange', 'grape']


# ---- 元字符 ----
# .    匹配任意字符(除换行符)
# ^    匹配字符串开头
# $    匹配字符串结尾
# *    前一个字符0次或多次
# +    前一个字符1次或多次
# ?    前一个字符0次或1次
# {n}  前一个字符恰好n次
# {n,m} 前一个字符n到m次
# []   字符集
# |    或
# ()   分组


# ---- 字符集 ----
# \d    数字 [0-9]
# \D    非数字
# \w    单词字符 [a-zA-Z0-9_]
# \W    非单词字符
# \s    空白字符(空格、制表符、换行等)
# \S    非空白字符
# \b    单词边界


# ---- 量词 ----
# *      0次或多次  贪婪
# +      1次或多次  贪婪
# ?      0次或1次
# *?     0次或多次  非贪婪
# +?     1次或多次  非贪婪
# {n,m}  n到m次
# {n,}   至少n次

# 贪婪 vs 非贪婪
text = '<div>hello</div><div>world</div>'
greedy = re.findall(r'<div>.*</div>', text)
print(greedy)    # ['<div>hello</div><div>world</div>']  贪婪匹配最大范围
nongreedy = re.findall(r'<div>.*?</div>', text)
print(nongreedy) # ['<div>hello</div>', '<div>world</div>']  非贪婪逐个匹配


# ---- 分组 ----
# 捕获分组
m = re.search(r'(\d{4})-(\d{2})-(\d{2})', '2024-01-15')
print(m.group())   # 2024-01-15
print(m.group(1))   # 2024
print(m.group(2))   # 01
print(m.group(3))   # 15
print(m.groups())   # ('2024', '01', '15')

# 命名分组
m = re.search(r'(?P<year>\d{4})-(?P<month>\d{2})-(?P<day>\d{2})', '2024-01-15')
print(m.group('year'))   # 2024
print(m.group('month'))  # 01
print(m.groupdict())     # {'year': '2024', 'month': '01', 'day': '15'}


# ---- 常用正则示例 ----

# 手机号(简单版)
phone_pattern = r'1[3-9]\d{9}'
print(re.findall(phone_pattern, '联系电话:13812345678和15987654321'))

# 邮箱
email_pattern = r'[\w.-]+@[\w.-]+\.\w+'
print(re.findall(email_pattern, '联系:test@example.com和hello@world.cn'))

# IP地址
ip_pattern = r'\d{1,3}\.\d{1,3}\.\d{1,3}\.\d{1,3}'
print(re.findall(ip_pattern, '服务器:192.168.1.1和10.0.0.255'))

# URL
url_pattern = r'https?://[\w./-]+'
print(re.findall(url_pattern, '访问 https://example.com/path 和 http://test.com'))

# 中文字符
chinese_pattern = r'[\u4e00-\u9fa5]+'
print(re.findall(chinese_pattern, 'hello世界python编程'))

# 提取HTML标签内容
tag_pattern = r'<title>(.*?)</title>'
html = '<html><title>我的网页</title></html>'
print(re.findall(tag_pattern, html))  # ['我的网页']


# ---- 预编译正则 ----
# 如果同一个正则要多次使用,预编译可以提高性能
phone_re = re.compile(r'1[3-9]\d{9}')
print(phone_re.findall('电话13812345678'))
print(phone_re.search('号码是15987654321').group())


# ---- re.IGNORECASE 忽略大小写 ----
print(re.findall(r'hello', 'Hello HELLO hello', re.IGNORECASE))
# ['Hello', 'HELLO', 'hello']


# ---- re.MULTILINE 多行模式 ----
text = '''第一行
第二行
第三行'''
print(re.findall(r'^第\w+行', text, re.MULTILINE))  # ['第一行', '第二行', '第三行']


# ---- re.DOTALL 让.匹配换行符 ----
html = '<div>hello\nworld</div>'
print(re.findall(r'<div>.*?</div>', html, re.DOTALL))  # ['<div>hello\nworld</div>']
JSON
数据类型对比
| JSON | Python |
|---|---|
| object | dict |
| array | list |
| string | str |
| number | int |
| number | float |
| true | True |
| false | False |
| null | None |
序列化和反序列化
1
2
3
4
5
6
7
8
9
10
11
12
13
14
15
16
import json

# 序列化
student = [{'name':'qq','age':18,'flag':False}]

json_str = json.dumps(student)
print(type(json_str))
print(json_str)


# 反序列化
j_str = '[{"name":"ww","age":12,"flag":true}]'

student1 = json.loads(j_str)
print(type(student1))
print(student1)
结合文件写入读取
1
2
3
4
5
6
7
8
9
10
11
12
13
14
15
16
17
18
19
20
21
22
23
24
# coding;utf-8
import json

def read(path):
	with open(path, 'r') as f:
        data = f.read( )
	return json.loads(data)

def write(path, data):
	with open(path, 'w') as f:
        if isinstance(data, dict):
			_data = json.dumps(data)
            f.write(_data)
		else:
			raise TypeError('data is dict')
    return True

data = {'name':'小暴' ,'age': 18,'top': 176}

if __name__ == '__main__':
    write('test.json', data)
    result = read('test.json')
    result['sex'] = 'boy'
    write('test.json', result)
爬虫demo
爬取虎牙LOL直播列表主播名称和热度
1
2
3
4
5
6
7
8
9
10
11
12
13
14
15
16
17
18
19
20
21
22
23
24
25
26
27
28
29
30
31
32
33
34
35
36
37
38
39
40
41
42
43
44
45
46
47
48
49
50
51
52
53
54
55
56
57
58
59
60
61
62
63
64
65
66
67
68
69
70
71
72
73
74
75
'''
爬虫爬取虎牙游戏主播热度排行
技术 BeautifulSoup
爬虫框架 Scrapy
'''
from urllib import request
import ssl
import re
# 全局取消证书验证
ssl._create_default_https_context = ssl._create_unverified_context


class Spider():
    '''
    this is a class
    '''

    # 获取LOL直播列表HTML页面
    url = 'https://www.huya.com/g/lol'

    # 包含主播名字和热度的代码块
    root_parrten = '<span class="txt">[\s\S]*?</span></span>'

    # 包含主播名字的代码块
    name = '<i class="nick" title="([\s\S]*?)">'

    # 包含主播热度的代码块
    num = '<i class="js-num">([\s\S]*?)</i>'

    # 处理直播列表
    def __fetch_content(self):
        r = request.urlopen(Spider.url)
        htmls = r.read()
        htmls = str(htmls,encoding='utf-8')
        return htmls

    # 处理名字和热度
    def __analysis(self,htmls):
        root_htmls = re.findall(Spider.root_parrten,htmls)
        li = []
        for html in root_htmls:
            name = re.findall(Spider.name,html)
            num = re.findall(Spider.num,html)
            ma = {'name':name,'num':num}
            li.append(ma)
        return li

    # 最终封装数据
    def __fin(self,li):
        l = lambda x:{
            'name':x['name'][0].strip(),
            'num':x['num'][0]
            }
        s = map(l,li)
        s = sorted(s,key=self.__sorted,reverse=True)
        return s

    # 按照热度排序
    def __sorted(self,li):
        r = re.findall('[1-9\d*\.?\d*]',li['num'])
        num = float(r[0])
        if '万' in li['num']:
            num *= 10000

        return num

    # 主入口
    def go(self):
        htmls = self.__fetch_content()
        li = self.__analysis(htmls)
        ma = list(self.__fin(li))
        print(ma)

spider = Spider()
spider.go()
进阶篇
虚拟环境与包管理
1
2
3
4
5
6
7
8
9
10
11
12
13
14
15
16
17
18
19
20
21
22
23
24
25
26
27
28
29
30
31
32
33
34
35
36
37
38
39
40
41
42
43
44
45
46
47
48
49
50
51
52
53
54
55
56
57
58
59
60
61
62
63
64
65
66
67
68
69
70
71
72
73
74
75
# ---- 为什么需要虚拟环境 ----
# 不同项目可能需要不同版本的库
# 虚拟环境让每个项目有独立的依赖,互不干扰


# ---- venv(Python自带) ----
# 创建虚拟环境
# python -m venv myenv

# 激活虚拟环境
# macOS/Linux: source myenv/bin/activate
# Windows:     myenv\Scripts\activate

# 退出虚拟环境
# deactivate


# ---- pip 包管理 ----
# 安装包
# pip install numpy
# pip install numpy==1.24.0         指定版本
# pip install numpy>=1.24.0         最低版本

# 升级包
# pip install --upgrade numpy

# 卸载包
# pip uninstall numpy

# 查看已安装包
# pip list
# pip show numpy                    查看包详情

# 导出依赖
# pip freeze > requirements.txt

# 安装依赖
# pip install -r requirements.txt


# ---- conda(科学计算推荐) ----
# 安装Miniconda或Anaconda
# 创建环境
# conda create -n ai_env python=3.10

# 激活/退出
# conda activate ai_env
# conda deactivate

# 管理包
# conda install numpy pandas matplotlib
# conda install -c conda-forge package_name   从conda-forge安装

# 导出环境
# conda env export > environment.yml
# conda env create -f environment.yml


# ---- pipenv(更现代的选择) ----
# pip install pipenv
# pipenv install numpy           安装并记录
# pipenv install --dev pytest    开发依赖
# pipenv shell                   进入虚拟环境
# pipenv run python main.py      在虚拟环境中运行


# ---- poetry(最现代的包管理) ----
# pip install poetry
# poetry new myproject           创建新项目
# poetry add numpy               添加依赖
# poetry add --group dev pytest  开发依赖
# poetry install                 安装所有依赖
# poetry run python main.py      运行
# poetry build                   打包
# poetry publish                 发布
代码规范与PEP 8
1
2
3
4
5
6
7
8
9
10
11
12
13
14
15
16
17
18
19
20
21
22
23
24
25
26
27
28
29
30
31
32
33
34
35
36
37
38
39
40
41
42
43
44
45
46
47
48
49
50
51
52
53
54
55
56
57
58
59
60
61
62
63
64
65
66
67
68
69
70
71
72
73
74
75
76
77
78
79
80
81
82
83
84
85
86
87
88
89
90
# PEP 8 是Python官方的代码风格指南,遵循规范让代码更易读、更专业


# ---- 命名规范 ----
# 模块名:小写+下划线   my_module.py
# 包名:小写             mypackage
# 类名:大驼峰           MyClassName
# 函数/方法:小写+下划线  my_function()
# 变量:小写+下划线      my_variable
# 常量:大写+下划线      MAX_SIZE = 100
# 私有属性:前缀下划线    _internal_var
# 魔术方法:双下划线      __init__


# ---- 缩进与空格 ----
# 使用4个空格缩进(不用Tab)
# 运算符两边各一个空格:x = a + b
# 逗号后加空格:[1, 2, 3]
# 关键字参数不加空格:func(key=value)
# 默认参数不加空格:def func(x, y=10):


# ---- 行长度 ----
# 每行不超过79个字符(文档/注释72字符)
# 长行可用括号续行
total = (first_variable
         + second_variable
         - third_variable)


# ---- 空行规则 ----
# 顶层函数/类定义前后各2个空行
# 类中方法定义前后1个空行
# 函数内逻辑段落间1个空行


# ---- import规范 ----
# 标准库 → 第三方库 → 本地模块,各组之间空一行
import os
import sys

import numpy as np
import pandas as pd

from mymodule import MyClass

# 避免使用 from module import *
# 使用 __all__ 控制导出


# ---- 类型提示增强可读性 ----
def process_data(
    data: list[dict[str, Any]],
    batch_size: int = 32,
    shuffle: bool = True,
) -> dict[str, float]:
    """处理数据并返回统计结果。

    Args:
        data: 输入数据列表
        batch_size: 批次大小
        shuffle: 是否打乱

    Returns:
        包含统计指标的字典
    """
    pass


# ---- 使用工具自动格式化 ----
# black  - 自动格式化代码(最流行)
# pip install black
# black my_script.py

# isort  - 自动排序import
# pip install isort
# isort my_script.py

# flake8 - 代码风格检查
# pip install flake8
# flake8 my_script.py

# mypy   - 类型检查
# pip install mypy
# mypy my_script.py

# ruff   - 全能工具(替代black+isort+flake8)
# pip install ruff
# ruff check my_script.py     检查
# ruff format my_script.py    格式化
测试基础
1
2
3
4
5
6
7
8
9
10
11
12
13
14
15
16
17
18
19
20
21
22
23
24
25
26
27
28
29
30
31
32
33
34
35
36
37
38
39
40
41
42
43
44
45
46
47
48
49
50
51
52
53
54
55
56
57
58
59
60
61
62
63
64
65
66
67
68
69
70
71
72
73
74
75
76
77
78
79
80
81
# ---- unittest(Python自带) ----
import unittest

def add(a, b):
    return a + b

class TestMath(unittest.TestCase):
    def test_add(self):
        self.assertEqual(add(1, 2), 3)
        self.assertEqual(add(-1, 1), 0)
        self.assertNotEqual(add(1, 1), 3)

    def test_add_float(self):
        self.assertAlmostEqual(add(0.1, 0.2), 0.3, places=7)

    def test_add_type_error(self):
        with self.assertRaises(TypeError):
            add("1", 2)

    def setUp(self):
        """每个测试方法前执行"""
        self.data = [1, 2, 3]

    def tearDown(self):
        """每个测试方法后执行"""
        self.data = None

# 运行: python -m unittest test_file.py


# ---- pytest(更推荐,更简洁) ----
# pip install pytest

def add(a, b):
    return a + b

# 普通测试函数,以test_开头
def test_add():
    assert add(1, 2) == 3
    assert add(-1, 1) == 0

def test_add_float():
    assert add(0.1, 0.2) == pytest.approx(0.3)

def test_add_type_error():
    with pytest.raises(TypeError):
        add("1", 2)


# ---- pytest fixtures ----
import pytest

@pytest.fixture
def sample_data():
    return [1, 2, 3, 4, 5]

def test_sum(sample_data):
    assert sum(sample_data) == 15

def test_len(sample_data):
    assert len(sample_data) == 5


# ---- 参数化测试 ----
@pytest.mark.parametrize("a, b, expected", [
    (1, 2, 3),
    (-1, 1, 0),
    (0, 0, 0),
    (100, 200, 300),
])
def test_add_parametrized(a, b, expected):
    assert add(a, b) == expected


# ---- 运行pytest ----
# pytest                    运行当前目录所有测试
# pytest test_file.py       运行指定文件
# pytest -v                 详细输出
# pytest -s                 显示print输出
# pytest -k "test_add"      按名称过滤
# pytest --cov=myproject    测试覆盖率(需要pytest-cov)