接口数据脱敏
接口数据脱敏的实现方式
手动脱敏:直接在业务逻辑层代码中对敏感数据进行逐一处理,这种方式虽然提供了较高的灵活性,但容易因人为疏忽而导致脱敏遗漏,同时也会导致代码中存在大量的重复处理逻辑,增加了维护成本。
AOP(面向切面编程):利用AOP技术,通过定义切面来拦截API接口返回的数据流,从而实现对敏感字段的统一处理。这种方法能够将脱敏逻辑从业务代码中抽离出来,实现集中管理,提高了代码的可维护性和可扩展性。然而,由于AOP的拦截机制会增加一定的处理开销,因此可能会对系统性能产生一定的影响。
自定义序列化器:在数据序列化阶段,通过集成JSON序列化框架(如Jackson)提供的自定义序列化器功能,实现对敏感字段的自动化处理。这种方法既保持了较好的性能表现,又能够将脱敏逻辑与业务逻辑完全解耦,使得代码更加清晰和易于管理。
注解+反射:通过定义自定义注解来标记那些需要进行脱敏处理的字段,然后在数据返回前,利用Java的反射机制在运行时动态地遍历这些字段并进行脱敏处理。这种方式简化了脱敏操作的使用过程,使得开发者只需通过简单的注解标记即可实现脱敏功能,同时也有利于后续对脱敏逻辑的维护和扩展。
自定义注解实现脱敏
需要使用hutool和json
    <dependency>
        <groupId>cn.hutool</groupId>
        <artifactId>hutool-all</artifactId>
        <version>5.8.25</version>
    </dependency>

    <dependency>
        <groupId>com.fasterxml.jackson.core</groupId>
        <artifactId>jackson-databind</artifactId>
        <version>2.9.2</version>
    </dependency>
创建自定义注解
@Retention(RetentionPolicy.RUNTIME)
@Target(ElementType.FIELD)
@JacksonAnnotationsInside
@JsonSerialize(using = DesensitizeSerializer.class)
public @interface Desensitize {


    DesensitizeType type() default DesensitizeType.DEFAULT;


    int startInclude() default 0;


    int endExclude() default 0;

}
脱敏枚举类
public enum DesensitizeType {

    //默认
    DEFAULT,

    CUSTOM_RULE,

    PHONE,

    EMAIL,

    ID_CARD,

    BANK_CARD,

    ADDRESS,

    CHINESE_NAME,

    PASSWORD,
}
自定义序列化类
这个序列化器的主要用途是在 JSON 序列化过程中自动对标记了 @Desensitize 注解的字段进行脱敏处理
Hutool支持的脱敏数据类型包括:
- 用户id
- 中文姓名
- 身份证号
- 座机号
- 手机号
- 地址
- 电子邮件
- 密码
- 中国大陆车牌,包含普通车辆、新能源车辆
- 银行卡
整体来说,所谓脱敏就是隐藏掉信息中的一部分关键信息,用*代替。DesensitizedUtil类中方法,其实就是replace方法和hide`方法的使用,想要自定义规则进行隐藏可以仿照进行实现。
public class DesensitizeSerializer extends JsonSerializer<String> implements ContextualSerializer {


    private DesensitizeType type;

    private int startInclude;

    private int endExclude;

    public DesensitizeSerializer() {
        this.type = DesensitizeType.DEFAULT;
    }


    public DesensitizeSerializer(DesensitizeType type) {
        this.type = type;
    }

    //在序列化字符串时被调用,根据脱敏类型对字符串进行相应的脱敏处理。根据不同的脱敏类型,使用不同的处理方法对字符串进行脱敏,并将处理后的字符串写入JSON生成器中。
    @Override
    public void serialize(String value, JsonGenerator gen, SerializerProvider serializers) throws IOException {
        switch (type) {
            case CUSTOM_RULE:

                gen.writeString(StrUtil.hide(value, startInclude, endExclude));
                break;
            case PHONE:
                gen.writeString(DesensitizedUtil.mobilePhone(value));
                break;
            case EMAIL:
                gen.writeString(DesensitizedUtil.email(value));
                break;
            case ID_CARD:
                gen.writeString(DesensitizedUtil.idCardNum(value, 1, 2));
                break;
            case BANK_CARD:
                gen.writeString(DesensitizedUtil.bankCard(value));
                break;
            case ADDRESS:
                gen.writeString(DesensitizedUtil.address(value, 8));
                break;
            case CHINESE_NAME:
                gen.writeString(DesensitizedUtil.chineseName(value));
                break;
            case PASSWORD:
                gen.writeString(DesensitizedUtil.password(value));
                break;
            default:
                gen.writeString(value);
                break;
        }
    }

    //根据上下文信息创建自定义的序列化器,用于处理带有@Desensitize注解的属性。它通过获取注解中的脱敏类型和自定义规则的起始位置和结束位置,对实例进行相应的设置,并返回自定义的序列化器实例。
    @Override
    public JsonSerializer<?> createContextual(SerializerProvider prov, BeanProperty property) {
        if (property != null) {
            Desensitize annotation = property.getAnnotation(Desensitize.class);
            if (annotation != null) {
                this.type = annotation.type();
                if (annotation.type() == DesensitizeType.CUSTOM_RULE) {
                    this.startInclude = annotation.startInclude();
                    this.endExclude = annotation.endExclude();
                }
            }
        }
        return this;
    }

}
验证
@Data
public class UserDTO {


    @Desensitize(type = DesensitizeType.CHINESE_NAME)
    private String name;


    @Desensitize(type = DesensitizeType.PHONE)
    private String phoneNumber;


    @Desensitize(type = DesensitizeType.EMAIL)
    private String email;


    @Desensitize(type = DesensitizeType.PASSWORD)
    private String password;


    @Desensitize(type = DesensitizeType.ID_CARD)
    private String idCard;


    @Desensitize(type = DesensitizeType.BANK_CARD)
    private String bankCard;


    @Desensitize(type = DesensitizeType.ADDRESS)
    private String address;


    @Desensitize(type = DesensitizeType.CUSTOM_RULE, startInclude = 2, endExclude = 6)
    private String gameName;
}
动态切换实现类
系统可能对接多个不同的短信服务商,有时候某一个挂了需要马上切换为另一个,希望在不改动业务代码的情况下实现动态切换
Spring-smart-di
它是一个对spring @Autowired注解的扩展,能够自定义用户自己的Autowired注入逻辑,目前实现了两个功能分别是 @SmartAutowired 和 @AutowiredProxySPI 注解,我们这里要使用的便是AutowiredProxySPI 去实现我们的动态切换逻辑。
依赖
<dependency>
    <groupId>io.github.burukeyou</groupId>
    <artifactId>spring-smart-di-all</artifactId>
    <version>0.2.0</version>
</dependency>
在启动类上添加注解@EnableSmartDI启动功能
编写顶层接口和各个实现类
@EnvironmentProxySPI("${sms.impl}")
public interface SmsService {
}

// 给实现类定义别名
@BeanAliasName("某腾短信服务")
@Component
public class ASmsService implements SmsService {
}

@BeanAliasName("某移短信服务")
@Component
public class BSmsService implements SmsService {
}
在配置文件中指定现在使用的服务商
sms.impl=某腾短信服务
在业务逻辑中注入后就可以具体使用
// 依赖注入
@AutowiredProxySPI
private SmsService smsService;
自定义数据库配置动态切换
配置除了可以写在配置文件中,还可以写在数据库中
比如自定义DBProxySPI注解,并标记上@ProxySPI实现并指定具体配置获取逻辑实现类AnnotationProxyFactory即可。
然后DBProxySPI就可以像@EnvironmentProxySPI一样去使用了
@Inherited
@Target({ElementType.FIELD,ElementType.METHOD,ElementType.TYPE})
@Retention(RetentionPolicy.RUNTIME)
@ProxySPI(DbProxyFactory.class) // 指定配置获取逻辑
public @interface DBProxySPI {

    String value();

}

@Component
public class DbProxyFactory implements AnnotationProxyFactory<DBProxySPI> {

    @Autowired
    private SysConfigMapper sysConfigDao;

    @Override
    public Object getProxy(Class<?> targetClass,DBProxySPI spi) {
        // todo 根据注解从数据库获取要注入的实现类
        String configName = sysConfigDao.getConfig(spi.value());
        return springContext.getBean(configName);
    }
}


@DBProxySPI("${sms.impl}")
public interface SmsService {
}
Map注入配合配置中心实现动态切换
先定义业务接口和不同的实现
// 接口定义
public interface PaymentService {
  String process();
}

//阿里支付
@Service("aliPayService")
public class AliPayService implements PaymentService {
  public String process() {
    return "Alipay payment" ;
  }
}

//微信支付
@Service("weixinPayService")
public class WeixinPayService implements PaymentService {
  public String process() {
    return "Weixin payment";
  }
}
接口类
@Controller
//在配置中心的值变动后实现热更新
@RefreshScope
public class PayController {
    @Value("${pay.payBeanName:aliPayService}")
    private String payBeanName;

    @Resource
    private Map<String,PaymentService> payments = new HashMap<>();

    @GetMapping("/pay")
    public void pay(){
        payments.get(payBeanName).process();
    }
}
配置文件数据库敏感信息加密
jasypt简介
Jasypt(Java 简化加密)是一个Java库,它为密码、API密钥、数据库凭证和其他配置属性等敏感信息的保护提供了简单的加密和解密功能。其目的在于简化敏感数据的加密和解密过程,使配置文件和环境变量中的敏感信息保护变得更容易。
Jasypt目标
- 安全配置:Jasypt 使开发人员能够加密敏感的配置属性,防止未经授权访问存储在配置文件或环境变量中的敏感信息。
- 简化加密:Jasypt 为加密和解密提供了简单明了的应用程序接口,将复杂的加密算法和密钥管理抽象化。
- 与Spring Boot集成:Jasypt 与 Spring Boot 无缝集成,为 Spring Boot 应用程序中的配置属性加密和解密提供开箱即用的支持。
在 Spring Boot 应用程序中,Jasypt 可用于加密和解密敏感的配置属性,如数据库密码、API 密钥和其他机密。Spring Boot 通过 spring-boot-starter-parent 和 spring-boot-starter-security 依赖项提供与 Jasypt 的集成。
官网:http://www.jasypt.org/
应用:https://blog.csdn.net/qq_48428343/article/details/139474152
使用
依赖
<dependency>
    <groupId>com.github.ulisesbocchio</groupId>
    <artifactId>jasypt-spring-boot-starter</artifactId>
    <version>3.0.3</version>
</dependency>
配置文件
注意:这里是解密配置,加密时的算法和盐值必须与以上配置中的algorithm与password(盐值)一致。 盐值概念: 在密码学中,盐值(Salt)是一种随机数据,通常用于加强密码的哈希过程,以增加破解的难度。在Jasypt(Java Simplified Encryption)中,盐值(也称为密钥或加密密码)是用于加密和解密过程的一个重要组成部分。它是一个额外的输入,与待加密的数据一起使用,以生成一个特定的加密结果。这样,即使相同的明文数据被加密多次,每次都会因为不同的盐值而得到不同的密文。
jasypt:
  encryptor:
    # 盐值
    password: 123
    # 指定加密方式
    algorithm: PBEWithMD5AndDES
    iv-generator-classname: org.jasypt.iv.NoIvGenerator
    property:
      # 标识为加密属性的前缀
      prefix: ENC(
      # 标识为加密属性的后缀
      suffix: )
加解密工具
public class JasyptUtil {

    /**
     * PBE 算法
     */
    public static final String PBE_ALGORITHMS_MD5_DES = "PBEWITHMD5ANDDES";
    public static final String PBE_ALGORITHMS_MD5_TRIPLEDES = "PBEWITHMD5ANDTRIPLEDES";
    public static final String PBE_ALGORITHMS_SHA1_DESEDE = "PBEWITHSHA1ANDDESEDE";
    public static final String PBE_ALGORITHMS_SHA1_RC2_40 = "PBEWITHSHA1ANDRC2_40";

    private JasyptUtil() {
    }

    /**
     * Jasypt 加密
     *
     * @param encryptedStr 加密字符串
     * @param password     盐值
     * @return
     */
    public static String encrypt(String encryptedStr, String password) {
        return encrypt(encryptedStr, PBE_ALGORITHMS_MD5_DES, password);
    }

    /**
     * Jasypt 加密
     *
     * @param encryptedStr 加密字符串
     * @param algorithm    加密算法
     *                     PBE ALGORITHMS: [PBEWITHMD5ANDDES, PBEWITHMD5ANDTRIPLEDES, PBEWITHSHA1ANDDESEDE, PBEWITHSHA1ANDRC2_40]
     * @param password     盐值
     * @return
     */
    public static String encrypt(String encryptedStr, String algorithm, String password) {
        // StandardPBEStringEncryptor、StandardPBEBigDecimalEncryptor、StandardPBEBigIntegerEncryptor、StandardPBEByteEncryptor
        StandardPBEStringEncryptor encryptor = new StandardPBEStringEncryptor();
        EnvironmentPBEConfig config = new EnvironmentPBEConfig();

        // 指定加密算法
        config.setAlgorithm(algorithm);
        // 加密盐值
        config.setPassword(password);
        //config.setIvGeneratorClassName("org.jasypt.iv.NoIvGenerator");
        encryptor.setConfig(config);

        // 加密
        return encryptor.encrypt(encryptedStr);
    }

    /**
     * Jasypt 解密
     *
     * @param decryptStr 解密字符串
     * @param password   盐值
     * @return
     */
    public static String decrypt(String decryptStr, String password) {
        return decrypt(decryptStr, PBE_ALGORITHMS_MD5_DES, password);
    }

    /**
     * Jasypt 解密
     *
     * @param decryptStr 解密字符串
     * @param algorithm  指定解密算法:解密算法要与加密算法一一对应
     *                   PBE ALGORITHMS: [PBEWITHMD5ANDDES, PBEWITHMD5ANDTRIPLEDES, PBEWITHSHA1ANDDESEDE, PBEWITHSHA1ANDRC2_40]
     * @param password   盐值
     * @return
     */
    public static String decrypt(String decryptStr, String algorithm, String password) {
        // StandardPBEStringEncryptor、StandardPBEBigDecimalEncryptor、StandardPBEBigIntegerEncryptor、StandardPBEByteEncryptor
        StandardPBEStringEncryptor encryptor = new StandardPBEStringEncryptor();
        EnvironmentPBEConfig config = new EnvironmentPBEConfig();

        // 指定解密算法:解密算法要与加密算法一一对应
        config.setAlgorithm(algorithm);
        // 加密秘钥
        config.setPassword(password);
        //config.setIvGeneratorClassName("org.jasypt.iv.NoIvGenerator");
        encryptor.setConfig(config);

        // 解密
        return encryptor.decrypt(decryptStr);
    }

    public static void main(String[] args) {
        String encryptedStr = "I am the string to be encrypted";
        String algorithm = PBE_ALGORITHMS_SHA1_RC2_40;
        String password = "salt";

        String str = JasyptUtil.encrypt(encryptedStr, algorithm, password);
        System.out.println("加密后的字符串:" + str);
        System.out.println("解密后的字符串:" + JasyptUtil.decrypt(str, algorithm, password));
    }
}
启动类添加自动解密注解
@EnableEncryptableProperties
public class Application{
    public static void main(String[] args){
        SpringApplication.run(Application.class,args);
    }
}
测试类
package com.agileboot.admin.jasypt;
import com.agileboot.common.utils.jasypt.JasyptUtil;
import org.junit.jupiter.api.Test;
import org.springframework.boot.test.context.SpringBootTest;

@SpringBootTest
public class jasyptTest {

    /**
     * PBE 算法
     */
    public static final String PBE_ALGORITHMS_MD5_DES = "PBEWITHMD5ANDDES";
    public static final String PBE_ALGORITHMS_MD5_TRIPLEDES = "PBEWITHMD5ANDTRIPLEDES";
    public static final String PBE_ALGORITHMS_SHA1_DESEDE = "PBEWITHSHA1ANDDESEDE";
    public static final String PBE_ALGORITHMS_SHA1_RC2_40 = "PBEWITHSHA1ANDRC2_40";


    @Test
    public void TsetJasypt() {
        String encryptedStr = "root";
        String algorithm = PBE_ALGORITHMS_MD5_DES;
        String password = "salt";
        String str = JasyptUtil.encrypt(encryptedStr, algorithm, password);
        System.out.println("加密后的字符串:" + str);
        System.out.println("解密后的字符串:" + JasyptUtil.decrypt(str, algorithm, password));
    }


}
修改配置文件中的数据库密码明文
spring:
  datasource:
    password: ENC(A+0fOw9iTjCm8RQ8F2+rMQ==)
解密自定义配置文件
我们还可以通过@EncryptablePropertySource注解来加载自定配置文件中的加密属性,可以同时指定多个配置文件
@Configuration
@EncryptablePropertySource({"classpath:app.properties"})
public class AppConfig {

    // 加密的数据在代码中通过@Value注解获取后自动转为明文
    @Value("${spring.datasource.password}")
    private String password ;
}
其实在Spring Boot启动过程中都已经将所有的密文数据解密为明文,这时候在创建bean解析注入对应的@Value注解的属性时一定是明文。
二维码生成方案
在一些企业级应用系统中,有时候需要为产品或者商品生成特定的专属二维码,以供一些硬件设备或者用户在手机端扫码查看;其中,该二维码主要承载了该产品的相关核心信息,比如名称、简介、价格、单位、型号以及使用说明等等
Google工具包
依赖
<!-- zxing生成二维码 -->
<dependency>
    <groupId>com.google.zxing</groupId>
    <artifactId>core</artifactId>
    <version>3.3.3</version>
</dependency>

<dependency>
    <groupId>com.google.zxing</groupId>
    <artifactId>javase</artifactId>
    <version>3.3.3</version>
</dependency>
二维码处理工具类QRCodeUtil
public class QRCodeUtil {
    private static final Logger log= LoggerFactory.getLogger(QRCodeUtil.class);

    //CODE_WIDTH:二维码宽度,单位像素
    private static final int CODE_WIDTH = 400;
    //CODE_HEIGHT:二维码高度,单位像素
    private static final int CODE_HEIGHT = 400;
    //FRONT_COLOR:二维码前景色,0x000000 表示黑色
    private static final int FRONT_COLOR = 0x000000;
    //BACKGROUND_COLOR:二维码背景色,0xFFFFFF 表示白色
    //演示用 16 进制表示,和前端页面 CSS 的取色是一样的,注意前后景颜色应该对比明显,如常见的黑白
    private static final int BACKGROUND_COLOR = 0xFFFFFF;

    // 将信息塞入二维码并将其生成图片存储至物理文件目录下
    public static void createCodeToFile(String content, File codeImgFileSaveDir, String fileName) {
        try {
            if (StringUtils.isBlank(content) || StringUtils.isBlank(fileName)) {
                return;
            }
            content = content.trim();
            if (codeImgFileSaveDir==null || codeImgFileSaveDir.isFile()) {
                //二维码图片存在目录为空,默认放在桌面...
                codeImgFileSaveDir = FileSystemView.getFileSystemView().getHomeDirectory();
            }
            if (!codeImgFileSaveDir.exists()) {
                //二维码图片存在目录不存在,开始创建...
                codeImgFileSaveDir.mkdirs();
            }

            //核心代码-生成二维码
            BufferedImage bufferedImage = getBufferedImage(content);

            File codeImgFile = new File(codeImgFileSaveDir, fileName);
            ImageIO.write(bufferedImage, "png", codeImgFile);

            log.info("二维码图片生成成功:" + codeImgFile.getPath());
        } catch (Exception e) {
            e.printStackTrace();
        }
    }

    //生成二维码并输出到输出流, 通常用于输出到网页上进行显示,输出到网页与输出到磁盘上的文件中,区别在于最后一句 ImageIO.write
    //write(RenderedImage im,String formatName,File output):写到文件中
    //write(RenderedImage im,String formatName,OutputStream output):输出到输出流中
    //@param content  :二维码内容
    //@param outputStream :输出流,比如 HttpServletResponse 的 getOutputStream
    public static void createCodeToOutputStream(String content, OutputStream outputStream) {
        try {
            if (StringUtils.isBlank(content)) {
                return;
            }
            content = content.trim();
            //核心代码-生成二维码
            BufferedImage bufferedImage = getBufferedImage(content);

            //区别就是这一句,输出到输出流中,如果第三个参数是 File,则输出到文件中
            ImageIO.write(bufferedImage, "png", outputStream);

            log.info("二维码图片生成到输出流成功...");
        } catch (Exception e) {
            e.printStackTrace();
        }
    }

    //核心代码-生成二维码
    private static BufferedImage getBufferedImage(String content) throws WriterException {

        //com.google.zxing.EncodeHintType:编码提示类型,枚举类型
        Map<EncodeHintType, Object> hints = new HashMap();

        //EncodeHintType.CHARACTER_SET:设置字符编码类型
        hints.put(EncodeHintType.CHARACTER_SET, "UTF-8");

        //EncodeHintType.ERROR_CORRECTION:设置误差校正
        //ErrorCorrectionLevel:误差校正等级,L = ~7% correction、M = ~15% correction、Q = ~25% correction、H = ~30% correction
        //不设置时,默认为 L 等级,等级不一样,生成的图案不同,但扫描的结果是一样的
        hints.put(EncodeHintType.ERROR_CORRECTION, ErrorCorrectionLevel.M);

        //EncodeHintType.MARGIN:设置二维码边距,单位像素,值越小,二维码距离四周越近
        hints.put(EncodeHintType.MARGIN, 1);

        MultiFormatWriter multiFormatWriter = new MultiFormatWriter();
        BitMatrix bitMatrix = multiFormatWriter.encode(content, BarcodeFormat.QR_CODE, CODE_WIDTH, CODE_HEIGHT, hints);
        BufferedImage bufferedImage = new BufferedImage(CODE_WIDTH, CODE_HEIGHT, BufferedImage.TYPE_INT_BGR);
        for (int x = 0; x < CODE_WIDTH; x++) {
            for (int y = 0; y < CODE_HEIGHT; y++) {
                bufferedImage.setRGB(x, y, bitMatrix.get(x, y) ? FRONT_COLOR : BACKGROUND_COLOR);
            }
        }
        return bufferedImage;
    }
}
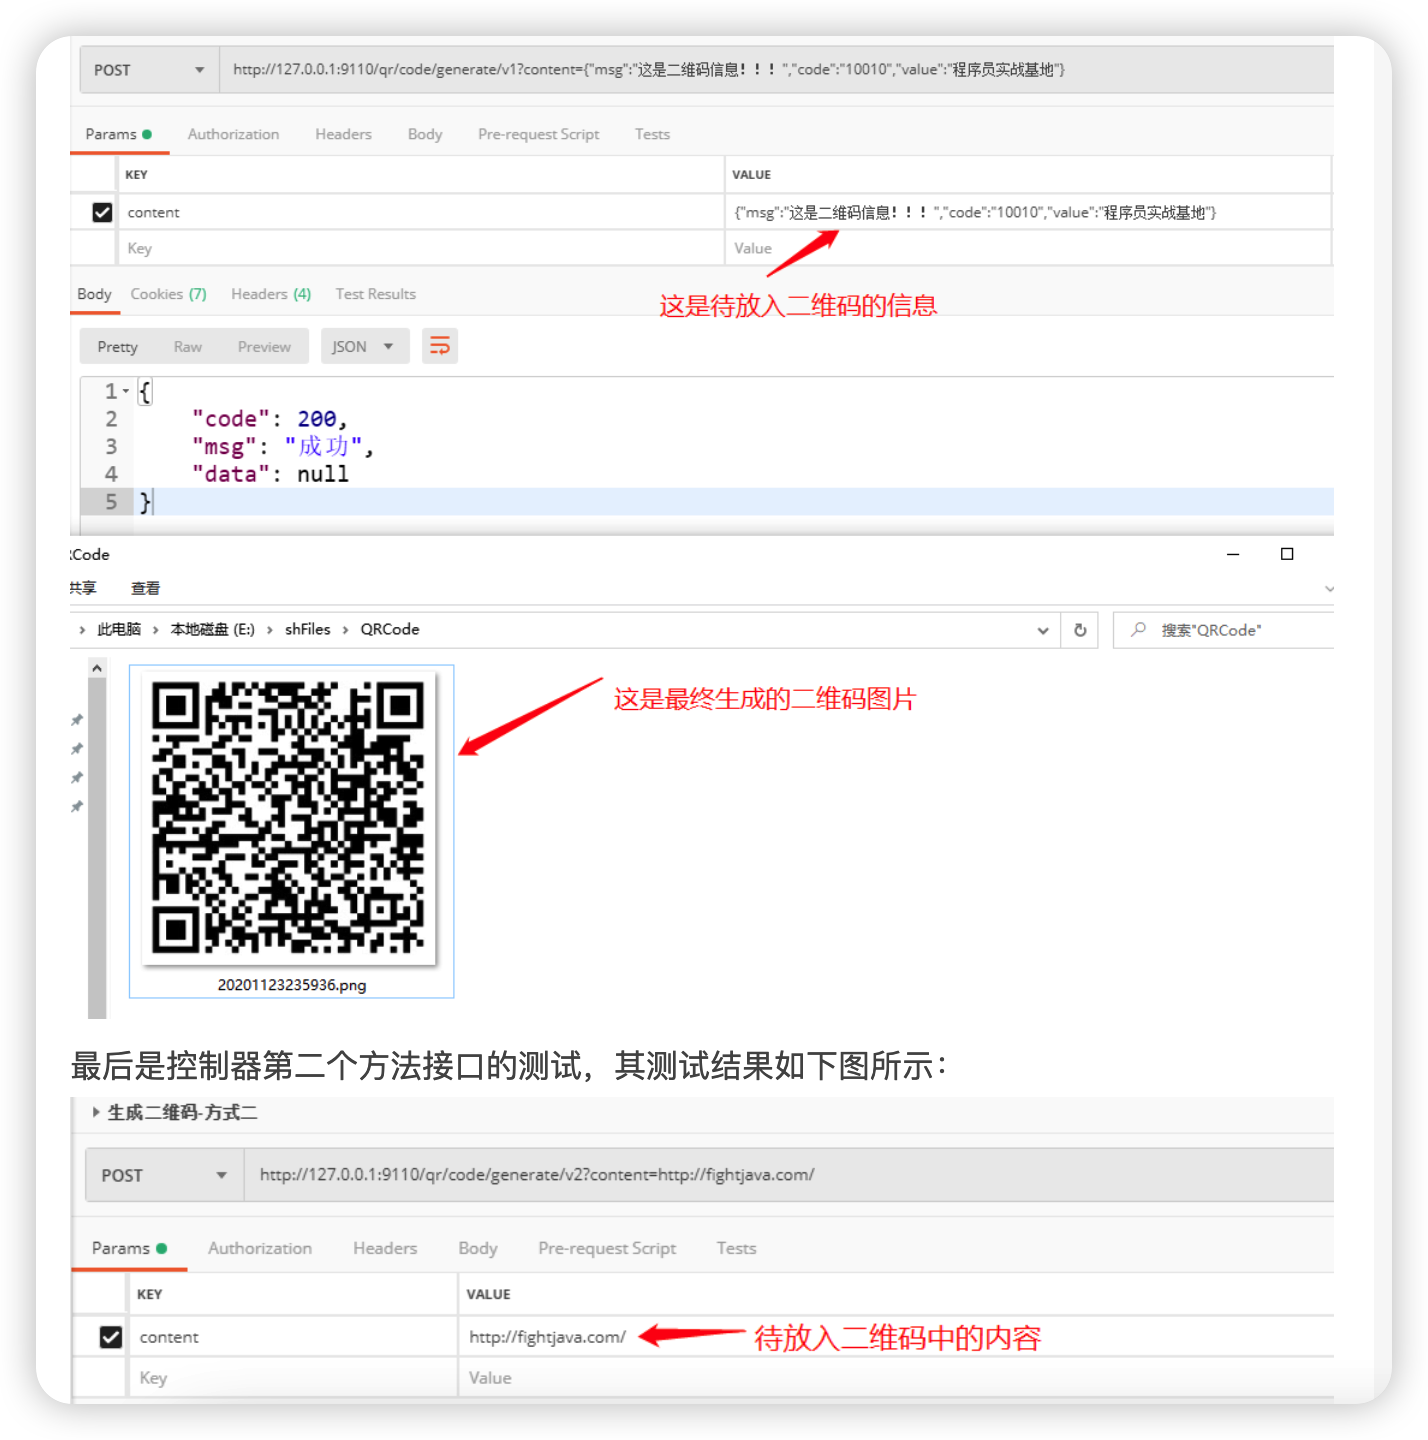
新建一个QrCodeController控制器类,并在其中创建两个请求方法,用于测试Google ZXing工具包这种方式生成两种类型的二维码
@RequestMapping("qr/code")
public class QrCodeController extends BaseController{

    private static final String RootPath="E:\\shFiles\\QRCode";
    private static final String FileFormat=".png";

    private static final ThreadLocal<SimpleDateFormat> LOCALDATEFORMAT=ThreadLocal.withInitial(() -> new SimpleDateFormat("yyyyMMddHHmmss"));

    //生成二维码并将其存放于本地目录
    @PostMapping("generate/v1")
    public BaseResponse generateV1(String content){
        BaseResponse response=new BaseResponse(StatusCode.Success);
        try {
            final String fileName=LOCALDATEFORMAT.get().format(new Date());
            QRCodeUtil.createCodeToFile(content,new File(RootPath),fileName+FileFormat);
        }catch (Exception e){
            response=new BaseResponse(StatusCode.Fail.getCode(),e.getMessage());
        }
        return response;
    }

    //生成二维码并将其返回给前端调用者
    @PostMapping("generate/v2")
    public BaseResponse generateV2(String content,HttpServletResponse servletResponse){
        BaseResponse response=new BaseResponse(StatusCode.Success);
        try {
            QRCodeUtil.createCodeToOutputStream(content,servletResponse.getOutputStream());

        }catch (Exception e){
            response=new BaseResponse(StatusCode.Fail.getCode(),e.getMessage());
        }
        return response;
    }
}
测试结果
具体取舍可以根据实际业务情况来做抉择
hutool工具包
依赖
<!--开发工具集-->
<dependency>
    <groupId>cn.hutool</groupId>
    <artifactId>hutool-all</artifactId>
    <version>4.6.10</version>
</dependency>
自定义一Java Config配置文件,以Bean的形式显示配置并注入QrConfig
@Configuration
public class QRConfig {

    //采用JavaConfig的方式显示注入hutool中 生成二维码
    @Bean
    public QrConfig qrConfig(){
        //初始宽度和高度
        QrConfig qrConfig=new QrConfig(300,300);

        //设置边距,即二维码和边框的距离
        qrConfig.setMargin(2);
        //设置前景色
        qrConfig.setForeColor(Color.BLACK.getRGB());
        //设置背景色
        qrConfig.setBackColor(Color.WHITE.getRGB());

        return qrConfig;
    }
}
模仿业务类
@Service
@Slf4j
public class QrCodeService {
    @Autowired
    private QrConfig config;

    //生成到文件
    public void createCodeToFile(String content, String filePath) {
        try {
            QrCodeUtil.generate(content,config,FileUtil.file(filePath));
        } catch (QrCodeException e) {
            e.printStackTrace();
        }
    }
    //生成到流
    public void createCodeToStream(String content, HttpServletResponse response) {
        try {
            QrCodeUtil.generate(content,config, "png", response.getOutputStream());
        } catch (QrCodeException | IOException e) {
            e.printStackTrace();
        }
    }
}
模拟控制器
@Autowired
private QrCodeService codeService;

//生成二维码并将其返回给前端调用者_hutool
@PostMapping("generate/v3")
public BaseResponse generateV3(String content,HttpServletResponse servletResponse){
    BaseResponse response=new BaseResponse(StatusCode.Success);
    try {
        //将生成的二维码文件存放于文件目录中
        //final String fileName=LOCALDATEFORMAT.get().format(new Date());
        //codeService.createCodeToFile(content,RootPath+File.separator+fileName+".png");

        //将生成的二维码文件直接返回给前端响应流
        codeService.createCodeToStream(content,servletResponse);
    }catch (Exception e){
        response=new BaseResponse(StatusCode.Fail.getCode(),e.getMessage());
    }
    return response;
}
文件下载方案
传统的文件下载方式(如 HttpServletResponse)虽然简单,但缺乏灵活性,无法支持断点续传或动态鉴权。现代方案(如 ResponseEntity<Resource> 或 StreamingResponseBody)提供了更好的资源管理和异步处理能力。
HttpServletResponse
优点:该文件下载方式实现简单、控制灵活,适合小文件和低并发场景。
缺点:性能有限、安全性差、缺乏错误处理,不适合大并发。
@GetMapping("/download")
public void download(HttpServletResponse response) throws IOException {
  File file = new File("e://技术.docx");
  response.setContentType("application/octet-stream");
  response.setHeader("Content-Disposition", "attachment; filename=\"" +  URLEncoder.encode(file.getName(), "UTF-8") + "\"");
  try (InputStream in = new FileInputStream(file); OutputStream out = response.getOutputStream()) {
    byte[] buffer = new byte[4096];
    int bytesRead;
    while ((bytesRead = in.read(buffer)) != -1) {
      out.write(buffer, 0, bytesRead);
    }
  }
}
Resource
优点:简单直接,适合快速实现文件下载;使用 FileSystemResource 直接操作本地文件,性能较好;通过 ResponseEntity 灵活控制响应头(如文件名编码、MIME类型)。
缺点:大文件下载时可能阻塞线程;不适合大文件或高并发场景。
@GetMapping("/download")
public ResponseEntity<Resource> download() throws Exception {
  File file = new File("e://技术.docx");
  Resource resource = new FileSystemResource(file);
  return ResponseEntity.ok()
      .header(HttpHeaders.CONTENT_DISPOSITION,
          "attachment; filename=\"" + URLEncoder.encode(file.getName(), "UTF-8") + "\"")
      .contentType(MediaType.APPLICATION_OCTET_STREAM)
      .body(resource);
}
StreamingResponseBody
优点:非阻塞 I/O,内存占用低,避免内存溢出,适合大文件下载。
缺点:代码稍复杂;需手动处理流。
@GetMapping("/download")
public ResponseEntity<StreamingResponseBody> download() throws Exception {
  File file = new File("e://技术.docx");
  StreamingResponseBody body = os -> {
    try (InputStream in = new FileInputStream(file)) {
      byte[] buffer = new byte[4096];
      int bytesRead;
      while ((bytesRead = in.read(buffer)) != -1) {
        os.write(buffer, 0, bytesRead) ;
      }
    }
  } ;
  return ResponseEntity.ok()
      .header(HttpHeaders.CONTENT_DISPOSITION, "attachment; filename=\"" + URLEncoder.encode(file.getName(), "UTF-8") + "\"")
      .body(body);
}
range分段下载
优点:支持断点续传和大文件分块下载。
缺点:实现复杂;需手动处理范围请求逻辑。
@GetMapping("/download")
public ResponseEntity<Resource> download(HttpHeaders headers) throws Exception {
  File file = new File("e://技术.docx");
  Resource resource = new FileSystemResource(file);
  long fileLength = file.length();
  // 解析 Range 请求头(格式:"bytes=0-999")
  List<HttpRange> ranges = headers.getRange();
  if (ranges.isEmpty()) {
      // 无 Range 请求时返回完整文件
      return ResponseEntity.ok()
              .header(HttpHeaders.CONTENT_DISPOSITION, "attachment; filename=\"" + URLEncoder.encode(file.getName(), "UTF-8") + "\"")
              .contentLength(fileLength)
              .body(resource);
  }
  // 处理第一个Range(一般只会有一个)
  HttpRange range = ranges.get(0);
  long rangeStart = range.getRangeStart(fileLength);
  long rangeEnd = range.getRangeEnd(fileLength);
  long contentLength = rangeEnd - rangeStart + 1;
  // 自定义 Resource 实现
  InputStream inputStream = new FileInputStream(file);
  inputStream.skip(rangeStart); // 跳过起始字节
  Resource rangeResource = new InputStreamResource(inputStream) {
      @Override
      public long contentLength() {
          return contentLength;
      }
  };
  return ResponseEntity.status(HttpStatus.PARTIAL_CONTENT)
          .header(HttpHeaders.CONTENT_RANGE, "bytes " + rangeStart + "-" + rangeEnd + "/" + fileLength)
          .contentType(MediaType.APPLICATION_OCTET_STREAM)
          .contentLength(contentLength)
          .body(rangeResource);
}
分布式Id方案
常见的算法主要有以下几种
一:UUID:因为是本地生成,性能极高,但是生成的ID太长,16字节128位,通常需要字符串类型存储,且无序,所以很多场景不适用,也不适用于作为MySQL数据库的主键和索引(MySql官方建议,主键越短越好;对于InnoDB引擎,索引的无序性可能会引起数据位置频繁变动,严重影响性能)。
二:数据库自增ID:每次获取ID都需要DB的IO操作,DB压力大,性能低。数据库宕机对外依赖服务就是毁灭性打击,不过可以部署数据库集群保证高可用。
三:数据库号段算法:对数据库自增ID的优化,每次获取一个号段的值。用完之后再去数据库获取新的号段,可以大大减轻数据库的压力。号段越长,性能越高,同时如果数据库宕机,号段没有用完,短时间还可以对外提供服务。(美团的Leaf、滴滴的TinyId)
四:雪花算法:Twitter开源的snowflake,以时间戳+机器+递增序列组成,基本趋势递增,且性能很高,因为强依赖机器时钟,所以需要考虑时钟回拨问题,即机器上的时间可能因为校正出现倒退,导致生成的ID重复。(百度的uid-generator、美团的Leaf)
雪花算法
数据库分库分表是一贯的垂直水平做法,但是需要一个全局唯一ID标识一条数据或者MQ消息,数据库id自增就显然不能满足要求了。因为场景不同,分布式ID需要满足以下几个条件:
一:全局唯一性,不能出现重复的ID。
二:趋势递增,在MySQL InnoDB引擎中使用的是聚集索引,由于多数RDBMS使用B-tree的数据结构来存储索引数据,在主键的选择上应该尽量使用有序的主键保证写入性能。
三:单调递增,保证下一个ID一定大于上一个ID。例如分布式事务版本号、IM增量消息、排序等特殊需求。
四:信息安全,对于特殊业务,如订单等,分布式ID生成应该是无规则的,不能从ID上反解析出流量等敏感信息。
snowflake原理其实很简单,生成一个64bit(long)的全局唯一ID,标准元素以1bit无用符号位+41bit时间戳+10bit机器ID+12bit序列化组成,其中除1bit符号位不可调整外,其他三个标识的bit都可以根据实际情况调整:
41bit-时间可以表示(1L<<41)/(1000L*3600*24*365)=69年的时间。
10bit-机器可以表示1024台机器。如果对IDC划分有需求,还可以将10-bit分5-bit给IDC,分5-bit给工作机器。这样就可以表示32个IDC,每个IDC下可以有32台机器
12个自增序列号可以表示2^12个ID,理论上snowflake方案的QPS约为409.6w/s
都是从0开始计数

优点
毫秒数在高位,自增序列在低位,整个ID都是趋势递增的
可以不依赖数据库等第三方系统,以服务的方式部署,稳定性更高,生成ID的性能也非常高
可以根据自身业务特性分配bit位,非常灵活
缺点
强依赖机器时钟,如果机器上时钟回拨,会导致发号重复或者服务处于不可用状态
实现方法
41bit给时间戳,5bit给IDC,5bit给工作机器,12bit给序列号,代码中是写死的,如果某些bit需要动态调整,可在成员属性定义。
public class SnowflakeIdGenerator {

    public static final int TOTAL_BITS = 1 << 6;

    private static final long SIGN_BITS = 1;

    private static final long TIME_STAMP_BITS = 41L;

    private static final long DATA_CENTER_ID_BITS = 5L;

    private static final long WORKER_ID_BITS = 5L;

    private static final long SEQUENCE_BITS = 12L;

    /**
     * 时间向左位移位数 22位
     */
    private static final long TIMESTAMP_LEFT_SHIFT = WORKER_ID_BITS + DATA_CENTER_ID_BITS + SEQUENCE_BITS;

    /**
     * IDC向左位移位数 17位
     */
    private static final long DATA_CENTER_ID_SHIFT = WORKER_ID_BITS + SEQUENCE_BITS;

    /**
     * 机器ID 向左位移位数 12位
     */
    private static final long WORKER_ID_SHIFT = SEQUENCE_BITS;

    /**
     * 序列掩码,用于限定序列最大值为4095
     */
    private static final long SEQUENCE_MASK =  -1L ^ (-1L << SEQUENCE_BITS);

    /**
     * 最大支持机器节点数0~31,一共32个
     */
    private static final long MAX_WORKER_ID = -1L ^ (-1L << WORKER_ID_BITS);
    /**
     * 最大支持数据中心节点数0~31,一共32个
     */
    private static final long MAX_DATA_CENTER_ID = -1L ^ (-1L << DATA_CENTER_ID_BITS);

    /**
     * 最大时间戳 2199023255551
     */
    private static final long MAX_DELTA_TIMESTAMP = -1L ^ (-1L << TIME_STAMP_BITS);

    /**
     * Customer epoch
     */
    private final long twepoch;

    private final long workerId;

    private final long dataCenterId;

    private long sequence = 0L;

    private long lastTimestamp = -1L;

    /**
     *
     * @param workerId 机器ID
     * @param dataCenterId  IDC ID
     */
    public SnowflakeIdGenerator(long workerId, long dataCenterId) {
        this(workerId, dataCenterId, null);
    }

    /**
     *
     * @param workerId  机器ID
     * @param dataCenterId IDC ID
     * @param epochDate 初始化时间起点
     */
    public SnowflakeIdGenerator(long workerId, long dataCenterId, Date epochDate) {
        if (workerId > MAX_WORKER_ID || workerId < 0) {
            throw new IllegalArgumentException("worker Id can't be greater than "+ MAX_WORKER_ID + " or less than 0");
        }
        if (dataCenterId > MAX_DATA_CENTER_ID || dataCenterId < 0) {
            throw new IllegalArgumentException("datacenter Id can't be greater than {" + MAX_DATA_CENTER_ID + "} or less than 0");
        }

        this.workerId = workerId;
        this.dataCenterId = dataCenterId;
        if (epochDate != null) {
            this.twepoch = epochDate.getTime();
        } else {
            //2010-10-11
            this.twepoch = 1286726400000L;
        }

    }

    public long genID() throws Exception {
        try {
            return nextId();
        } catch (Exception e) {
            throw e;
        }
    }

    public long getLastTimestamp() {
        return lastTimestamp;
    }

    /**
     * 通过移位解析出sequence,sequence有效位为[0,12]
     * 所以先向左移64-12,然后再像右移64-12,通过两次移位就可以把无效位移除了
     * @param id
     * @return
     */
    public long getSequence2(long id) {
        return (id << (TOTAL_BITS - SEQUENCE_BITS)) >>> (TOTAL_BITS - SEQUENCE_BITS);
    }

    /**
     * 通过移位解析出workerId,workerId有效位为[13,17], 左右两边都有无效位
     * 先向左移 41+5+1,移除掉41bit-时间,5bit-IDC、1bit-sign,
     * 然后右移回去41+5+1+12,从而移除掉12bit-序列号
     * @param id
     * @return
     */
    public long getWorkerId2(long id) {
        return (id << (TIME_STAMP_BITS + DATA_CENTER_ID_BITS + SIGN_BITS)) >>> (TIME_STAMP_BITS + DATA_CENTER_ID_BITS + SEQUENCE_BITS + SIGN_BITS);
    }
    /**
     * 通过移位解析出IDC_ID,dataCenterId有效位为[18,23],左边两边都有无效位
     * 先左移41+1,移除掉41bit-时间和1bit-sign
     * 然后右移回去41+1+5+12,移除掉右边的5bit-workerId和12bit-序列号
     * @param id
     * @return
     */
    public long getDataCenterId2(long id) {
        return (id << (TIME_STAMP_BITS + SIGN_BITS)) >>> (TIME_STAMP_BITS + WORKER_ID_BITS + SEQUENCE_BITS + SIGN_BITS);
    }
    /**
     * 41bit-时间,左边1bit-sign为0,可以忽略,不用左移,所以只需要右移,并加上起始时间twepoch即可。
     * @param id
     * @return
     */
    public long getGenerateDateTime2(long id) {
        return (id >>> (DATA_CENTER_ID_BITS + WORKER_ID_BITS + SEQUENCE_BITS)) + twepoch;
    }

    public long getSequence(long id) {
        return id & ~(-1L << SEQUENCE_BITS);
    }

    public long getWorkerId(long id) {
        return id >> WORKER_ID_SHIFT & ~(-1L << WORKER_ID_BITS);
    }

    public long getDataCenterId(long id) {
        return id >> DATA_CENTER_ID_SHIFT & ~(-1L << DATA_CENTER_ID_BITS);
    }

    public long getGenerateDateTime(long id) {
        return (id >> TIMESTAMP_LEFT_SHIFT & ~(-1L << 41L)) + twepoch;
    }

    private synchronized long nextId() throws Exception {
        long timestamp = timeGen();
        // 1、出现时钟回拨问题,直接抛异常
        if (timestamp < lastTimestamp) {
            long refusedTimes = lastTimestamp - timestamp;
            // 可自定义异常类
            throw new UnsupportedOperationException(String.format("Clock moved backwards. Refusing for %d seconds", refusedTimes));
        }
        // 2、时间等于lastTimestamp,取当前的sequence + 1
        if (timestamp == lastTimestamp) {
            sequence = (sequence + 1) & SEQUENCE_MASK;
            // Exceed the max sequence, we wait the next second to generate id
            if (sequence == 0) {
                timestamp = tilNextMillis(lastTimestamp);
            }
        } else {
            // 3、时间大于lastTimestamp没有发生回拨, sequence 从0开始
            this.sequence = 0L;
        }
        lastTimestamp = timestamp;

        return allocate(timestamp - this.twepoch);
    }

    private long allocate(long deltaSeconds) {
        return (deltaSeconds << TIMESTAMP_LEFT_SHIFT) | (this.dataCenterId << DATA_CENTER_ID_SHIFT) | (this.workerId << WORKER_ID_SHIFT) | this.sequence;
    }

    private long timeGen() {
        long currentTimestamp = System.currentTimeMillis();
        // 时间戳超出最大值
        if (currentTimestamp - twepoch > MAX_DELTA_TIMESTAMP) {
            throw new UnsupportedOperationException("Timestamp bits is exhausted. Refusing ID generate. Now: " + currentTimestamp);
        }
        return currentTimestamp;
    }

    private long tilNextMillis(long lastTimestamp) {
        long timestamp = timeGen();
        while (timestamp <= lastTimestamp) {
            timestamp = timeGen();
        }
        return timestamp;
    }

    /**
     * 测试
     * @param args
     */
    public static void main(String[] args) throws Exception {
        SnowflakeIdGenerator snowflakeIdGenerator = new SnowflakeIdGenerator(1,2);
        long id = snowflakeIdGenerator.genID();

        System.out.println("ID=" + id + ", lastTimestamp=" + snowflakeIdGenerator.getLastTimestamp());
        System.out.println("ID二进制:" + Long.toBinaryString(id));
        System.out.println("解析ID:");
        System.out.println("Sequence=" + snowflakeIdGenerator.getSequence(id));
        System.out.println("WorkerId=" + snowflakeIdGenerator.getWorkerId(id));
        System.out.println("DataCenterId=" + snowflakeIdGenerator.getDataCenterId(id));
        System.out.println("GenerateDateTime=" + snowflakeIdGenerator.getGenerateDateTime(id));

        System.out.println("Sequence2=" + snowflakeIdGenerator.getSequence2(id));
        System.out.println("WorkerId2=" + snowflakeIdGenerator.getWorkerId2(id));
        System.out.println("DataCenterId2=" + snowflakeIdGenerator.getDataCenterId2(id));
        System.out.println("GenerateDateTime2=" + snowflakeIdGenerator.getGenerateDateTime2(id));
    }

}
流程图

时钟回拨问题
机器本地时钟可能会因为各种原因发生不准的情况,网络中提供了NTP服务来做时间校准,做校准的时候就会发生时钟的跳跃或者回拨的问题。
时钟回拨问题,可通过手动调整电脑上的时钟进行模拟测试。
因为雪花算法强依赖机器时钟,所以难以避免受到时钟回拨的影响,有可能产生ID重复。原标准实现代码中是直接抛异常,短暂停止对外服务,这样在实际生产中是无法忍受的。所以要尽量避免时钟回拨带来的影响,解决思路有两个:
一:不依赖机器时钟驱动,就没时钟回拨的事儿了。即定义一个初始时间戳,在初始时间戳上自增,不跟随机器时钟增加。时间戳何时自增?当序列号增加到最大时,此时时间戳+1,这样完全不会浪费序列号,适合流量较大的场景,如果流量较小,可能出现时间断层滞后
二:依然依赖机器时钟,如果时钟回拨范围较小,如几十毫秒,可以等到时间回到正常;如果流量不大,前几百毫秒或者几秒的序列号肯定有剩余,可以将前几百毫秒或者几秒的序列号缓存起来,如果发生时钟回拨,就从缓存中获取序列号自增
参考:https://blog.csdn.net/weixin_36586120/article/details/118018414
方法重试组件
在分布式系统与微服务架构中,系统间的交互复杂性显著增加,网络延迟、服务超时、临时性故障等问题成为常态。例如,数据库连接中断、第三方API调用失败或消息队列积压等场景,均可能导致业务逻辑中断,影响用户体验和数据一致性。
重试功能逐渐从业务代码中剥离,演变为独立的横切关注点。如Spring Retry、Resilience4 通过AOP或装饰器模式,提供声明式的重试配置,支持指数退避、随机抖动等高级策略,并能与熔断器、限流器联动,形成完整的弹性工程解决方案。
Spring-Retry
Spring官方出品,该项目为应用程序提供声明式重试支持。它用于 Spring Batch、Spring Integration 等。对于显式使用,也支持强制重试。
依赖
<dependency>
  <groupId>org.springframework.retry</groupId>
  <artifactId>spring-retry</artifactId>
</dependency>
开启重试功能
@EnableRetry
public class AppRetryConfig {}
使用案例
@Retryable(
    recover = "deductStockRecover",
    retryFor = StockDeductException.class,
    maxAttempts = 3,
    backoff = @Backoff(delay = 1000))
public void deductStock(Stock stock, Integer count) {
  System.out.printf("准备扣减【%s】商品, 总数: %d%n", stock.name(), count) ;
  if (stock.quantity() < count) {
    throw new StockDeductException("库存不足") ;
  }
  // ...
}
@Recover
public void deductStockRecover(StockDeductException e, Stock stock, Integer count) {
  System.err.printf("【%s】库存扣减失败, 库存不足: %d个%n", stock.name(), count) ;
}
效果:
准备扣减【活着】商品, 总数: 3
准备扣减【活着】商品, 总数: 3
准备扣减【活着】商品, 总数: 3
【活着】库存扣减失败, 库存不足: 3个
Resilience4j-Retry
Resilience4j 是一款专为函数式编程设计的轻量级容错库。它提供了一系列高阶函数(装饰器),可用于为任何函数式接口、Lambda 表达式或方法引用增强熔断器(Circuit Breaker)、限流器(Rate Limiter)、重试机制(Retry)或舱壁隔离(Bulkhead)功能。
依赖
<dependency>
  <groupId>io.github.resilience4j</groupId>
  <artifactId>resilience4j-spring-boot3</artifactId>
  <version>2.2.0</version>
</dependency>
使用示例
// name: 需要在配置文件中配置重试的各种参数
// fallbackMethod: 重试一定次数后还是失败的降级方法,降级方法可以只接受一个异常参数也可以包含原方法所有参数+异常对象。
@Retry(name = "stock-deduct", fallbackMethod = "stockDeductFallback")
public void deductStock(Stock stock, Integer count) {
  System.out.printf("准备扣减【%s】商品, 总数: %d%n", stock.name(), count) ;
  if (stock.quantity() < count) {
    throw new StockDeductException("库存不足") ;
  }
  // ...
}
public void stockDeductFallback(Stock stock, Integer count, Throwable e) {
  System.err.printf("resilience4j-retry, 【%s】库存扣减失败, 库存不足: %d个%n", stock.name(), count) ;
}
配置项
resilience4j.retry:
  instances:
    stock-deduct:
      max-attempts: 3
      wait-duration: 1000
      exponential-backoff-multiplier: 1
Fast-Retry
Fast-Retry是一个高性能任务重试框架,支持百万级别任务的并发重试处理。与主流的Spring-Retry, Guava-Retry等同步重试框架不同,Fast-Retry是一个支持异步重试框架,支持异步任务的重试、超时等待、回调。
该组件没有降级方法配置。
依赖
<dependency>
  <groupId>io.github.burukeyou</groupId>
  <artifactId>fast-retry-spring</artifactId>
  <version>0.3.2</version>
</dependency>
开启重试功能
@EnableFastRetry
public class AppRetryConfig {}
使用示例
基于注解的方式:
@FastRetry(
  retryWait = @RetryWait(delay = 1, timeUnit = TimeUnit.SECONDS),
  // 如果为true,则返回null并打印异常日志
  exceptionRecover = true ,
  maxAttempts = 2,
  briefErrorLog = true,
  retryStrategy = PackRetryPolicy.class
)
public String deductStock(Stock stock, Integer count) {
  System.out.printf("准备扣减【%s】商品, 总数: %d%n", stock.name(), count) ;
  if (stock.quantity() < count) {
    throw new StockDeductException("库存不足") ;
  }
  return "success" ;
}
自定义方法返回结果重试策略;结果重试策略可以有多个。
public class PackRetryPolicy implements RetryResultPolicy<String> {
  public boolean canRetry(String t) {
    return !t.equals("success") ;
  }
}
基于编程方式
public String process() throws Exception {
  // 自定义结果重试策略,如果返回结果不是"success"则进行重试
  RetryResultPolicy<String> resultPolicy = result -> !result.equals("success");
  FastRetryer<String> retryer = FastRetryBuilder.<String>builder()
      // 重试次数
      .attemptMaxTimes(2)
       // 重试间隔
      .waitRetryTime(1, TimeUnit.SECONDS)
      // 发生异常后是否重试
      .retryIfException(true)
      // 什么类型的异常进行重试
      .retryIfExceptionOfType(RuntimeException.class)
      .exceptionRecover(true)
      // 自定义结果重试策略
      .resultPolicy(resultPolicy)
      .build();
  CompletableFuture<String> future = retryer.submit(() -> {
    int r = new Random().nextInt(10) ;
    System.out.printf("执行业务方法, 随机值: %d%n", r) ;
    if (r != 1) {
      // 抛出异常,也会重试
      // throw new RuntimeException("错误的参数: " + r) ;
      return "dead" ;
    }
    return "success" ;
  });
  return future.get();
}
超过重试次数后抛出异常,并且方法执行的最终结果返回:null。
异步任务重试
@FastRetry(
  retryWait = @RetryWait(delay = 2),
  maxAttempts = 2,
  retryStrategy = PackRetryPolicy.class
)
public CompletableFuture<String> asyncBusiness(Long id, String name) {
  return CompletableFuture.supplyAsync(() -> {
    System.out.println("async 执行业务方法...") ;
    int r = new Random().nextInt(10) ;
    if (r != 1) {
      // throw new RuntimeException("错误的参数: " + r) ;
      return "1" ;
    }
    return "success" ;
  }) ;
}
Guava-Retrying
Guava-Retrying 模块提供了一种通用方法,用于对任意 Java 代码执行重试操作,并具备由 Guava 谓词匹配(predicate matching)增强的特定停止条件、重试策略和异常处理能力。
依赖
<dependency>
  <groupId>com.github.rholder</groupId>
  <artifactId>guava-retrying</artifactId>
  <version>2.0.0</version>
</dependency>
使用示例
private static final Retryer<Object> retryer = RetryerBuilder.<Object>newBuilder()
    .retryIfException()                     // 所有异常重试
    .withWaitStrategy(WaitStrategies.exponentialWait(100, 200, TimeUnit.SECONDS))
    .withStopStrategy(StopStrategies.stopAfterAttempt(3))
    .build();
public void deductStock(Stock stock, Integer count) {
  try {
    retryer.call(() -> {
      System.out.printf("准备扣减【%s】商品, 总数: %d%n", stock.name(), count) ;
      if (stock.quantity() < count) {
        throw new StockDeductException("库存不足") ;
      }
      return null ;
    }) ;
  } catch (RetryException | ExecutionException e) {
    System.err.println(e.getMessage()) ;
  }
}
自定义AOP实现
自定义注解
@Retention(RetentionPolicy.RUNTIME)
@Target(ElementType.METHOD)
public @interface PackRetry {

  /**最大重试次数*/
  int maxAttempts() default 3 ;

  /**最大等待时间*/
  long retryInterval() default 1000 ;

  /**重试异常*/
  Class<? extends Throwable>[] retryFor() default {Exception.class} ;
}
自定义重试切面
@Aspect
@Component
public class PackRetryAspect {
  private static final int DEFAULT_MAX_RETRIES = 3 ;
  @Around("@annotation(packRetry)")
  public Object retryOperator(ProceedingJoinPoint pjp, PackRetry packRetry) throws Throwable {
      long interval = packRetry.retryInterval() ;
      Class<? extends Throwable>[] retryExceptions = packRetry.retryFor() ;
      int maxAttempts = packRetry.maxAttempts() + 1;
    int maxRetries = maxAttempts < 0 ?  DEFAULT_MAX_RETRIES : maxAttempts ;
    int numAttempts = 0 ;
    Throwable exception;
    do {
      numAttempts++;
      try {
        return pjp.proceed();
      } catch (Throwable ex) {
        exception = ex;
        if (!shouldRetry(ex, retryExceptions) || numAttempts >= maxAttempts) {
          break;
        }
        retryWait(interval, numAttempts, exception);
      }
    } while (numAttempts <= maxRetries) ;
    throw exception ;
  }
  private boolean shouldRetry(Throwable ex, Class<? extends Throwable>[] retryExceptions) {
    return Arrays.stream(retryExceptions).anyMatch(clazz -> clazz.isInstance(ex));
  }

  private void retryWait(long interval, int attempt, Throwable ex) {
    try {
      synchronized (this) {
        wait(interval) ;
      }
      System.out.printf("→ Retry #%d after %dms (cause: %s)%n", attempt, interval, ex.getClass().getSimpleName());
    } catch (InterruptedException e) {
      Thread.currentThread().interrupt();
      throw new RuntimeException("Retry interrupted", e);
    }
  }
}
业务示例
@PackRetry
public void deductStock(Stock stock, Integer count) {
  System.out.printf("准备扣减【%s】商品, 总数: %d%n", stock.name(), count) ;
  if (stock.quantity() < count) {
    throw new StockDeductException("库存不足") ;
  }
}